BackOffice is where the business manages inventory, tracks sales, and runs reports. Learn what BackOffice settings are available, how employee privileges work, and how to change the BackOffice login and password.
Locations
Create new or link existing locations to be able to switch between each store’s BackOffice, view multi-location reporting, create and delete items in all linked locations, and copy one item shortcuts layout to all locations.
Receipt and tip settings can also be accessed from the Retail POS (S-Series) app by the Business Owner. This feature is available for Lightspeed Retail accounts created on or after July 23, 2019.
Taxes
Enter the business’s default tax rate and, if needed, create additional tax rates.
Employees with the relevant BackOffice permissions can also create and apply tax rates when creating new items from the Retail POS (S-Series) app.
Discounts
Create named discounts and manage their settings.
Tenders
Manage which tenders are available to use at the register, including enabling optional tenders such as check, coupon, gift card, Pay by Link, and more.
Inventory
Turn on Raw Goods for tracking item components, and change the method used to calculate inventory cost.
Label Printing
Configure what prints on Lightspeed barcode labels. Add and customize descriptions, prices and currency symbols, the store name, and barcodes for labels.
Overtime Settings
Set up the overtime settings used for the Labor Tracking Report. This feature is only available to select merchants.
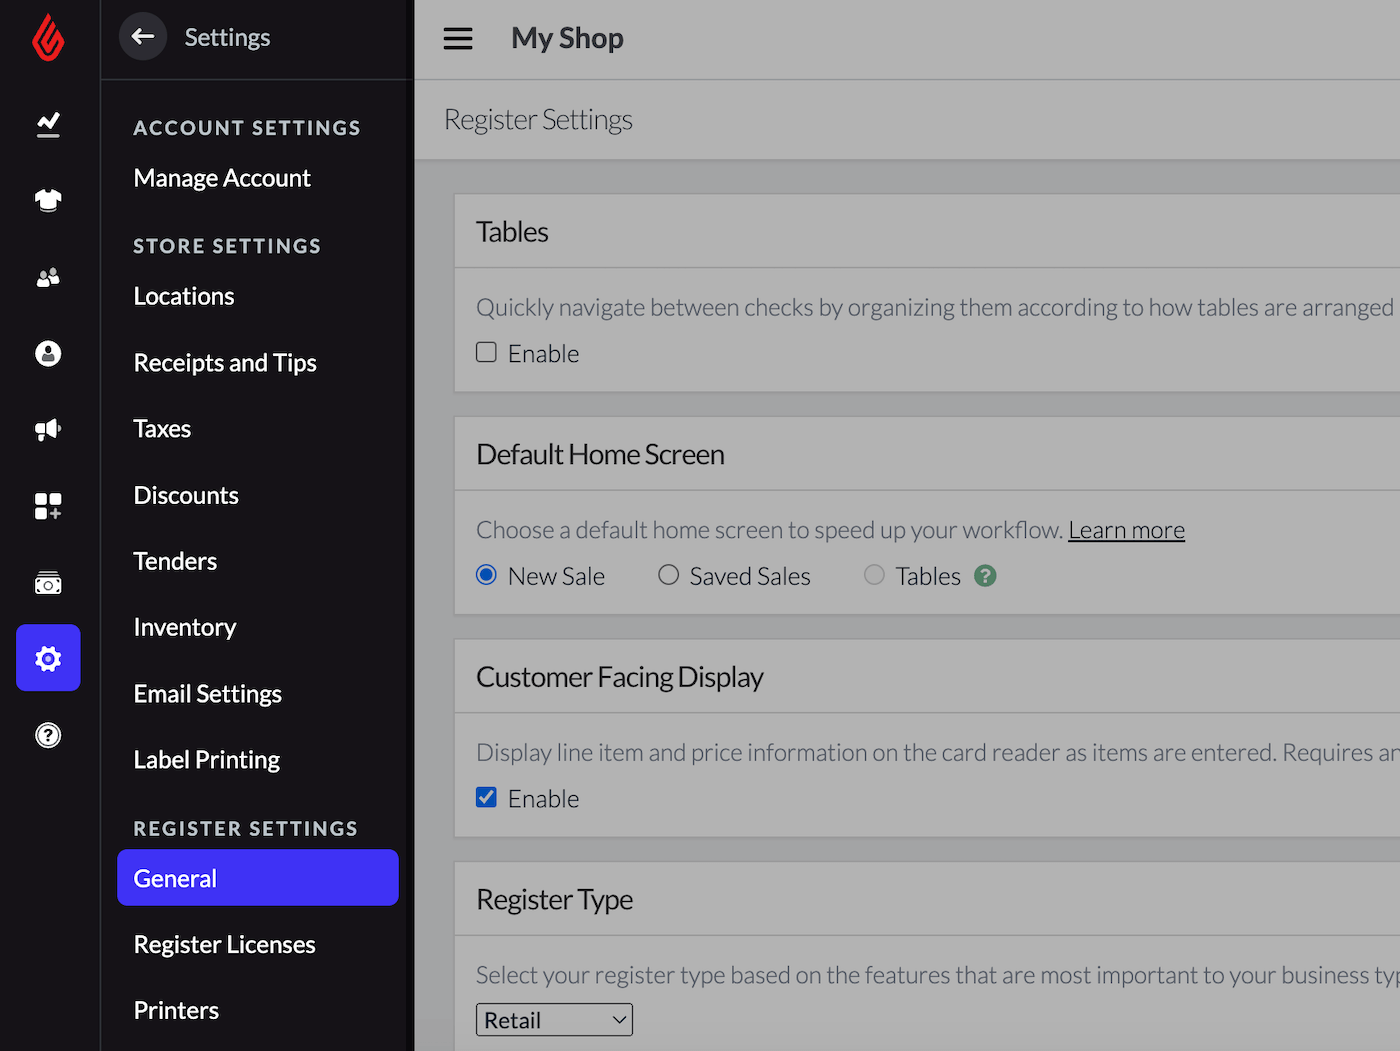
Register Settings
General
Enable the Table Layout, set a default home screen*, enable Auto Signout*, turn the customer-facing display on or off for an iPP or Link/2500 credit card reader, select a register type, and enable Guest Count. *Default Home Screen and Auto Signout settings only apply to the Retail POS (S-Series) app for iOS. For the Android version of the Retail POS (S-Series) app, Auto Signout can be enabled in the app itself.
Register Licenses
Add, remove, or deactivate register licenses, and view each register’s name, number, and status.
Printers
Manage the printers and printer groups used for ticket printing.
Employee Privileges
The Business Owner can access every option in the Settings menu, but other BackOffice users have limited permissions. Learn below about which options are available to each type of BackOffice user.
Available BackOffice user types will vary depending on your current pricing package. To learn more about BackOffice and register privileges, visit our Manage Staff article.
Business Owner Access
The Business Owner login is the email address originally used to create the Lightspeed Retail account. The Business Owner can view every area of BackOffice, including all options on the Settings menu:
Manage Account
Locations
Receipts and Tips
Taxes
Discounts
Tenders
Inventory
Email Settings
Label Printing
Overtime Settings (select merchants only)
General
Register Licenses
Printers
At the register, the Business Owner can access the following BackOffice features:
Item List, Item Shortcuts, and Receipt and Tip Settings. Receipt and tip settings are only available at the register for accounts created on or after July 23, 2019.
BackOffice Managers are a type of BackOffice user the Business Owner can create. BackOffice Managers can access the following settings:
Locations*
Taxes
Discounts
Tenders
Inventory
Label Printing
Overtime Settings (select merchants only)
General
Printers
*BackOffice Managers can only view the current location. They cannot make changes, create, or link locations.
BackOffice Managers can also access:
All areas of the Reports, Items, Staff, and Customers menus, and the Marketing Dashboard. BackOffice Managers see a limited version of the Staff List and cannot access the Sales by Location report or other multi-location features.
At the register, BackOffice Managers can access the following BackOffice features:
Item List and Item Shortcuts. On the Retail POS (S-Series) app for Android, BackOffice Managers can also access all settings on the Setup screen (excluding ‘Receipt and tip settings’).
Receive Inventory Users are another type of BackOffice user the Business Owner can create. They are able to use only specific BackOffice inventory features. Receive Inventory Users can access:
Update Inventory – Add/Receive
Receive Inventory Users can also sign into the Lightspeed Pay mobile app.
Custom Permissions
For BackOffice users with custom permissions, the areas of BackOffice the employee will be able to access are chosen when adding them to the Staff List. At the register, these employees can access the Item List and Item Shortcuts setup page if they have the relevant permissions and, in the Retail POS (S-Series) app for Android, can access all settings on the Setup screen (excluding ‘Receipt and tip settings’).
Learn about the specific permissions available for employees with custom permissions here.
Change BackOffice Login
A BackOffice user’s login is the email address they use to sign into BackOffice (not into the Retail POS (S-Series) app). The process to change a BackOffice login will vary based on the role of the individual user.
Business Owner Login
The Business Owner’s BackOffice login can only be changed by contacting Customer Care.
Contact Customer Care to request a change to the BackOffice login for the Business Owner.
Employee Logins
Employee BackOffice logins can be changed directly from BackOffice by the Business Owner or an employee with ‘Manage Staff’ and ‘Manage BackOffice Access’ permissions.
Sign into BackOffice as the Business Owner or as an employee with 'Manage Staff' and 'Manage BackOffice Access' permissions.
Learn more about customizable BackOffice permissions here.
Follow the steps here to edit the BackOffice login information for the employee via the Staff List.
Change BackOffice Password
Forgot your password or just want to change it? This section covers how to reset BackOffice passwords for the Business Owner and for employees.
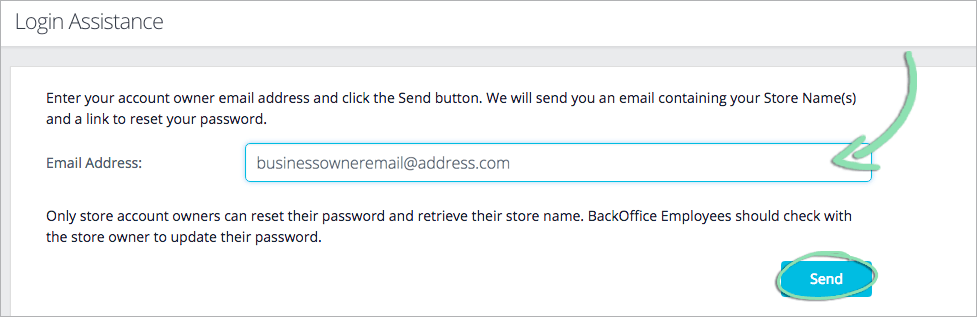
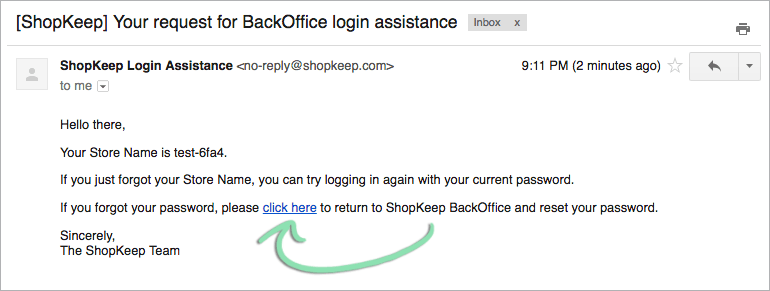
Business Owner Password
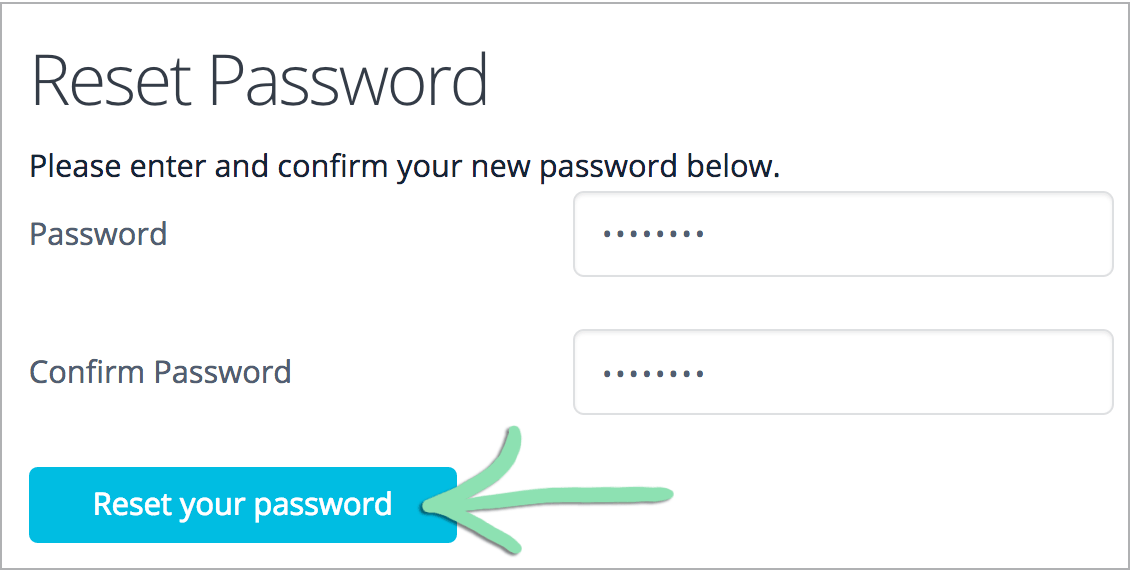
Follow the steps below to reset or change the Business Owner’s BackOffice password, which is linked to the email address used to sign up for Lightspeed Retail.
Enter a new password, then click 'Reset your password'.
Employee Password
Employees cannot use the password reset page and must instead have the Business Owner or an employee with ‘Manage Staff’ and ‘Manage BackOffice Access’ permissions sign into BackOffice to reset their password.
Sign into BackOffice as the Business Owner or as an employee with 'Manage Staff' and 'Manage BackOffice Access' permissions.
Learn more about customizable BackOffice permissions here.
Follow the steps here to enter a new BackOffice password for the employee via the Staff List.
Visit our BackOffice FAQ for answers to common questions about BackOffice.