BackOffice is where you set up your business in Lightspeed Retail. Learn how to add the menu for your restaurant, enable ticket printing, and perform other initial setup before using the register.
Table of Contents
Build Your Menu
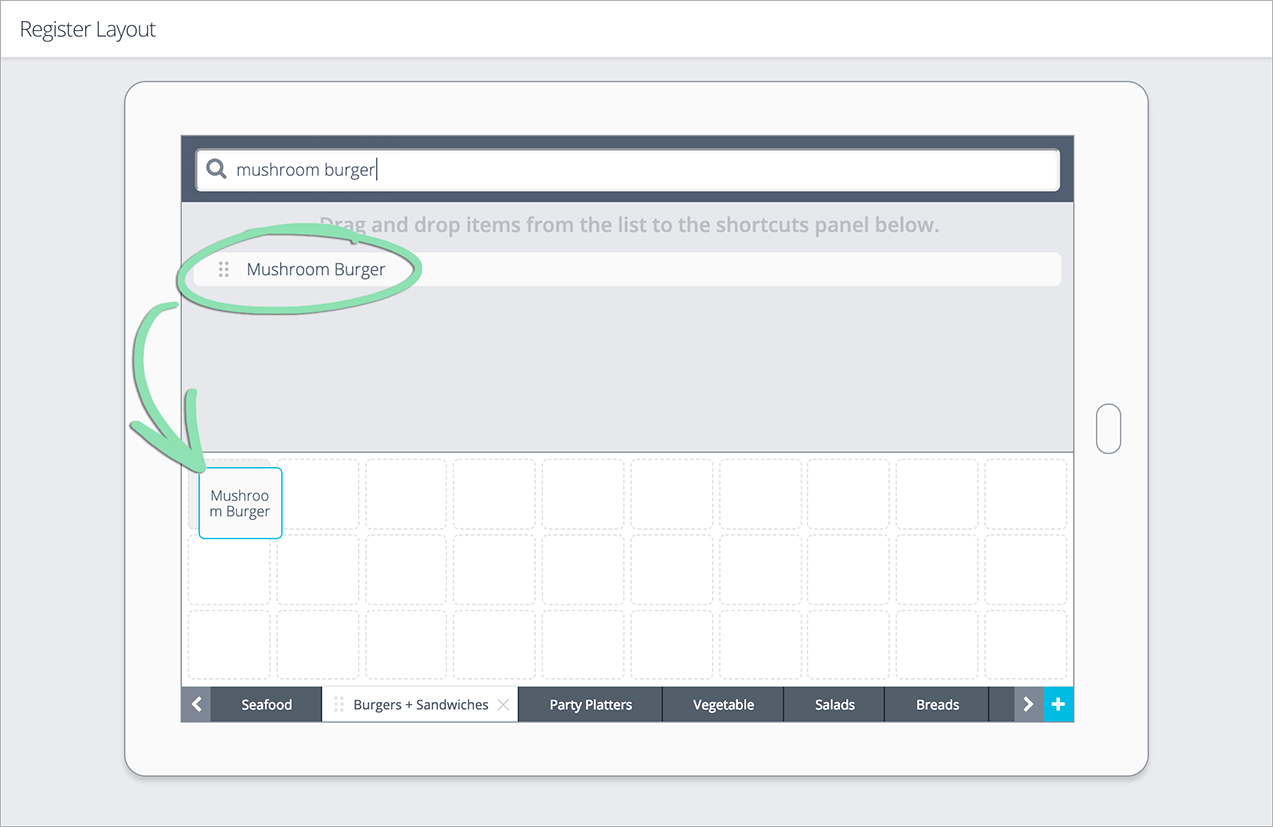
Before servers can start taking orders, you need to set up your menu in BackOffice or from the Retail POS (S-Series) app (employees with the relevant BackOffice permissions only). Learn how to add the dishes you sell, add modifiers to cover every order option, and create item shortcuts for the register so staff can find what they need.
If you have questions about adding or managing menu items, visit our Inventory FAQ.
Add Menu Items
Add entrees, appetizers, and other menu items the restaurant offers so servers can ring in customer orders at the register.
Visit the Item List in BackOffice or from the Retail POS (S-Series) app (employees with BackOffice permissions only).
In BackOffice, click ‘Items’ and select ‘Item List’.
In the Retail POS (S-Series) app for iOS, tap ‘Manage Items’ on the Main Menu. For the Retail POS (S-Series) app for Android, tap ‘Setup’ on the register menu, then select ‘Manage Items’.
Quickly add a basic item by entering an ‘Item Name’ and ‘Item Price’, then clicking ‘Save’. If more details such as a UPC code, Department, or Supplier are required, tap ‘More fields…’ and follow the steps below.
Category | Subgroup within a department that is used for organization, ticket printing, and reporting.
Sales Price | Amount the customer pays. This field is only available if Price Type is set to Fixed or Unit Price.
Price Type | How the item’s price is entered: Fixed, At the Register, or by Unit Price.
Fixed – Item has a predetermined price set in BackOffice. Restaurants typically use fixed pricing for most menu items. At the Register – Cashier enters the sales price at the register. Use this option for market-priced menu items or those with prices that change often. Unit Price – A fixed price per unit (oz, lb, ft, etc.) sold.
Taxable | Set to Yes’ if tax applies to the item or No if non-taxable.
Track Quantity on Hand | Controls whether the quantity on hand of the item will be updated after sales and returns. Disable for made-to-order items or those without a quantity.
Click the default save option or click the arrow to select another save option to finish creating the item.
Save and create new | Save the current item and create a new basic item. Save and keep editing | Save the current item and remain on the details page to make adjustments. Save and close | Save the current item and return to the Item List.
The last used selection will be remembered as the default save option.
Visit our Add Basic Items article for help with fields we did not cover, such as ‘Cost per Item’ and ‘Supplier’.
Add modifiers to an item to allow diners to customize their order. Modifiers represent the different options a customer has when they order, such as choosing the kind of cheese for a burger.
Click the 'Modifiers' tab.
Groups – Single Choice
Single choice modifiers are for either/or choices you give the customer. For example, a burger can be cooked medium or medium-rare but not both ways at once.
Click 'Add a group' and enter a group name.
Enter the default option for the group.
Use 'Add another option' to create more choices.
Add to Price | Amount added to the sales price if selected. Green Check | Base or default choice the item starts with. Trash Can | Deletes the group or option.
Click 'OK' to save changes.
Add-Ons
Add-ons include toppings, customizations, and other extras a customer can add to a dish. Customer can select as many add-ons as they want but no more than one of each.
Click 'Add an option' under 'Add-ons'.
Enter a name and optional ‘Add to price’.
Use 'Add another option' to add more add-ons.
Click 'OK' to save changes.
“NO” Options
“NO” options allow diners to exclude ingredients that usually come standard with a menu item.
Click 'Add an option' under '"NO" Options'
Enter a name and optional ‘Discount when OFF’ price.
Discount when OFF | Amount subtracted from the price if the customer does not want the ingredient.
Use 'Add another option' to set up more '"NO" options'.
Click 'OK' to save changes.
For more on modifiers, such as how to copy them from one item to another, visit the Modifiers article.
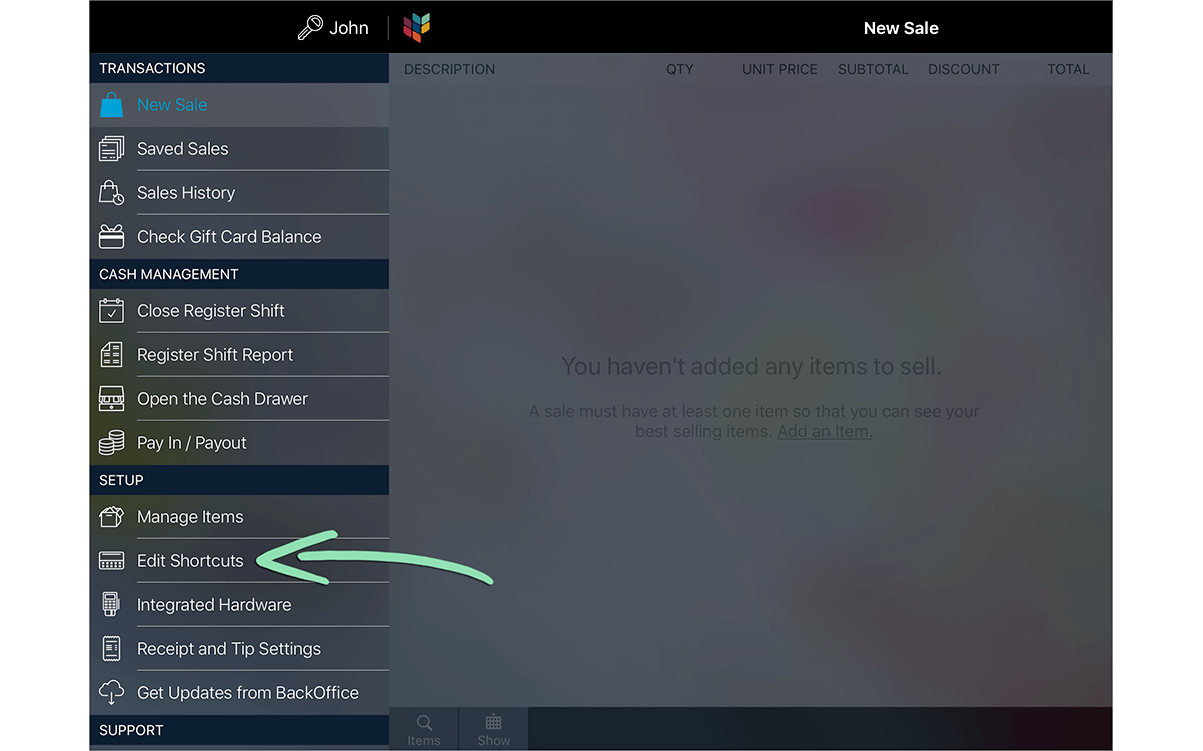
In the Retail POS (S-Series) app for iOS, tap ‘Edit Shortcuts’ on the Main Menu. For the Retail POS (S-Series) app for Android, tap ‘Setup’ on the register menu, then select ‘Edit Shortcuts’.
Tickets contain the details the kitchen needs to prepare an order, including selected modifiers and server notes. Tickets print whenever a server tenders or saves a sale with items assigned to a printer group.
If you have questions about ticket printers, visit our Hardware FAQ.
Follow the steps here to set up a ticket printer and connect it to the Retail POS (S-Series) app.
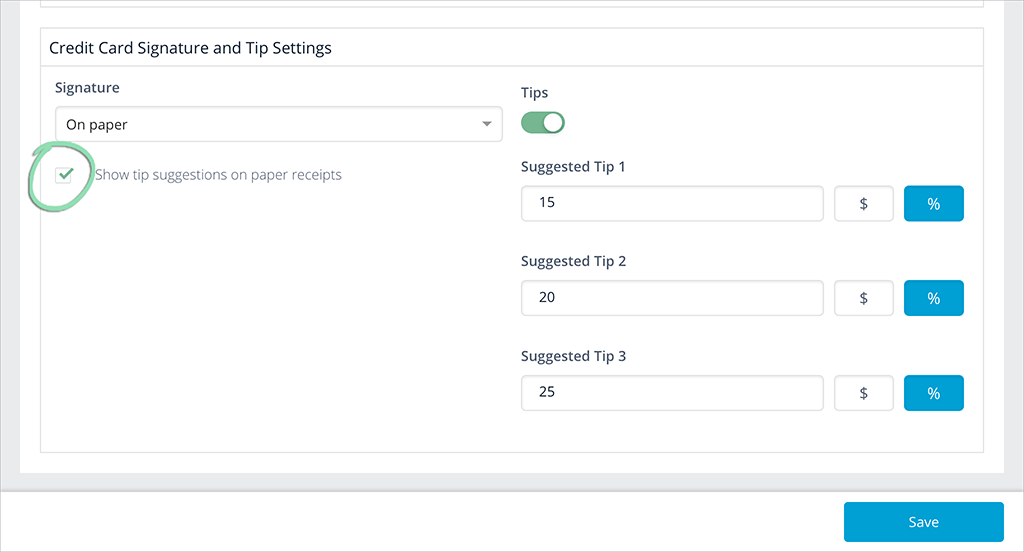
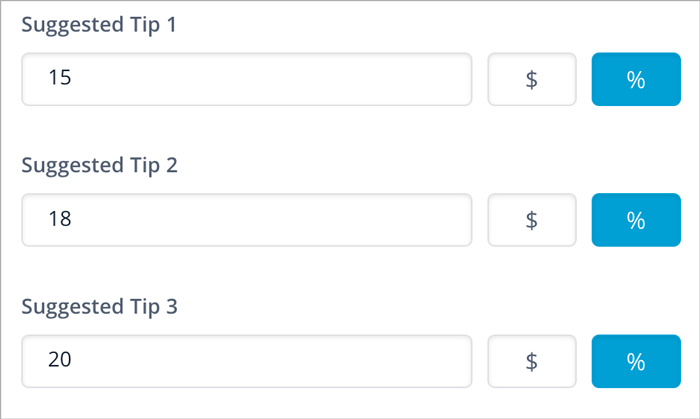
Enter the business details that will print on customer receipts and decide how customers will sign and tip for credit card sales in BackOffice or from the Retail POS (S-Series) app (Business Owners only).
Most restaurants prefer to print receipts. If you want to set up email receipts, see our Receipt Setup article.
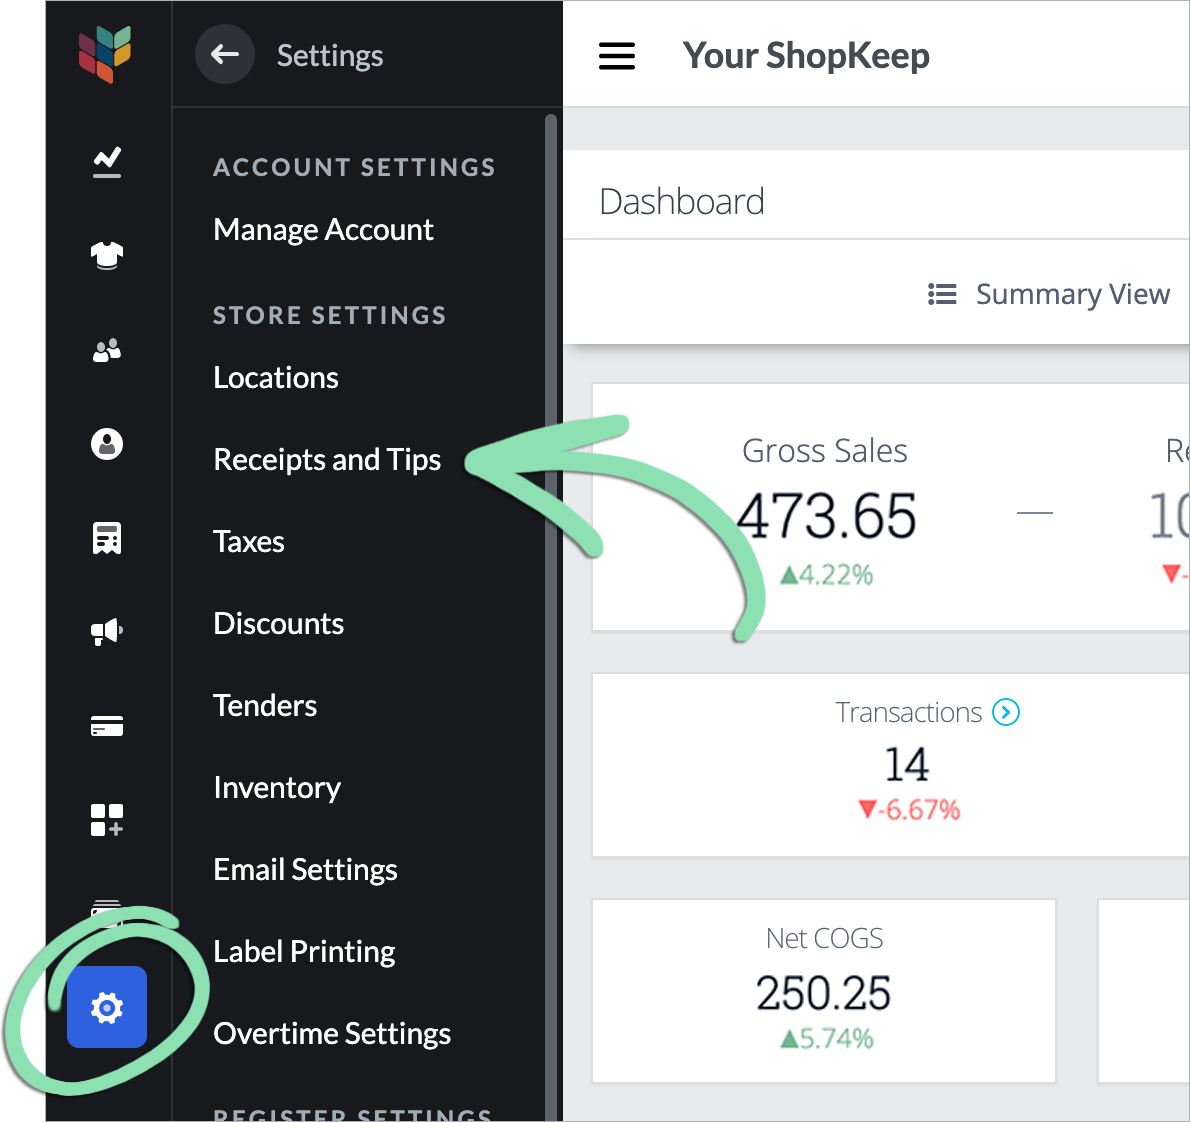
Sign into BackOffice as an employee with the relevant permissions or the Retail POS (S-Series) app as the Business Owner and open receipt settings.
In BackOffice, click ‘Settings’ and select ‘Receipts and Tips’.
In the Retail POS (S-Series) app for iOS, tap ‘Receipt and Tip Settings’ on the Main Menu. For the Retail POS (S-Series) app for Android, tap ‘Setup’ on the register menu, then select ‘Receipt and Tip Settings’.
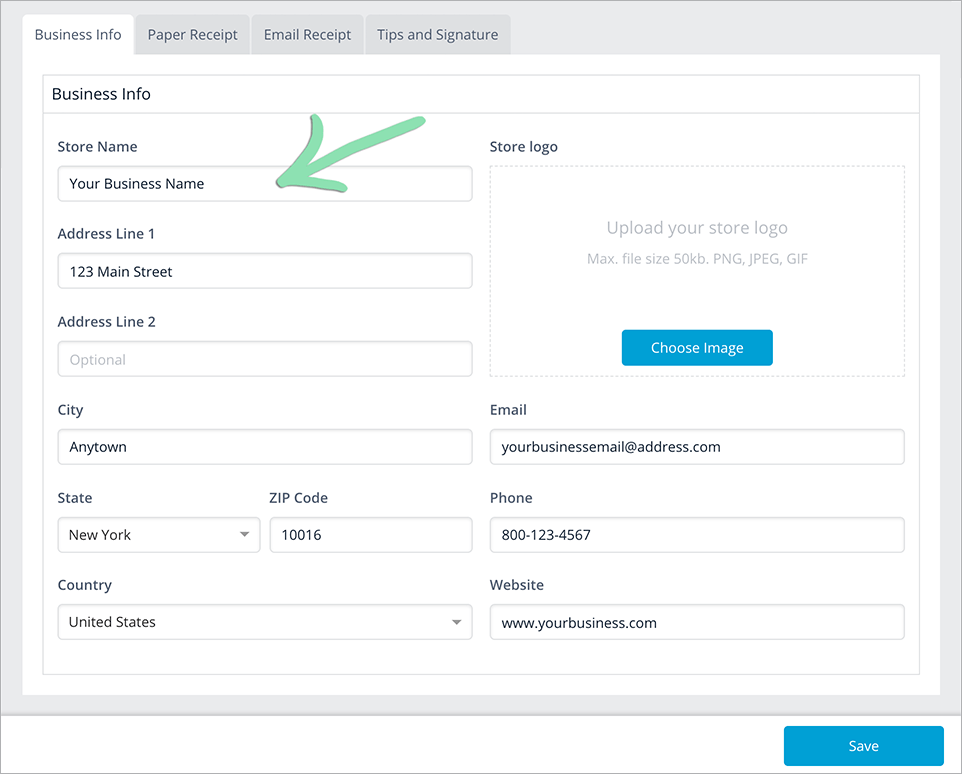
The receipt is a reminder of a customer’s experience at your restaurant. Enter your business information to give them a record of where they ordered that delicious meal last week.
Servers need the register for ordering, supervisors need manager access for end-of-day duties, and cooks need to clock in and out. Set up each staff member in BackOffice so they can use the register.
If you have questions about adding staff, visit our BackOffice FAQ.
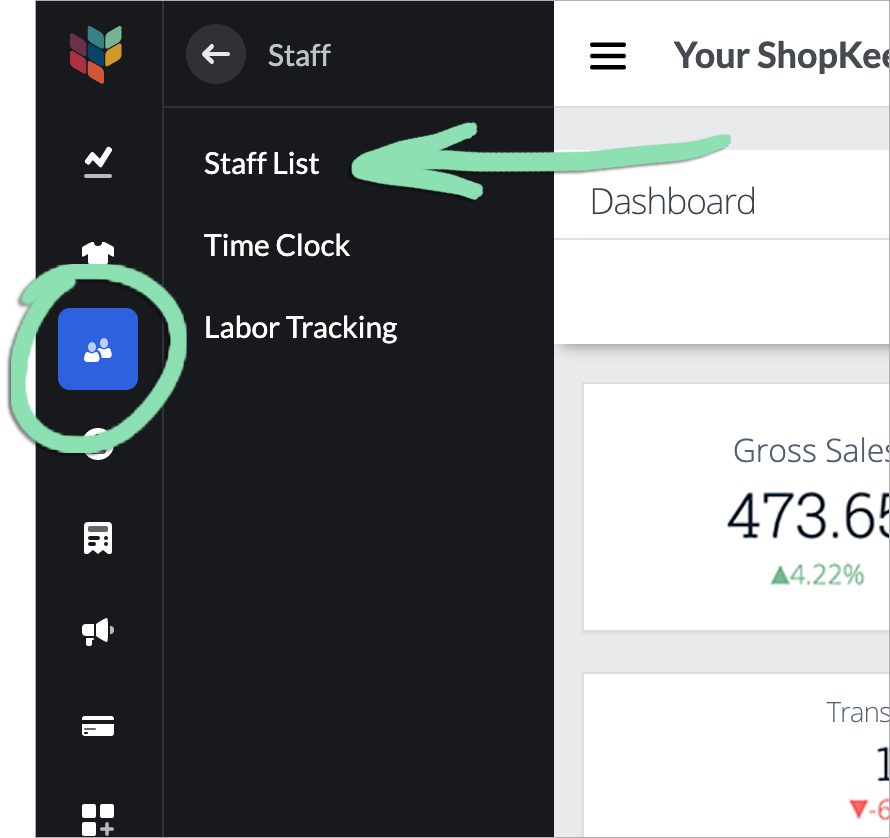
In BackOffice, click 'Staff' and select 'Staff List'.
Click to Enlarge
Click 'Add Staff'.
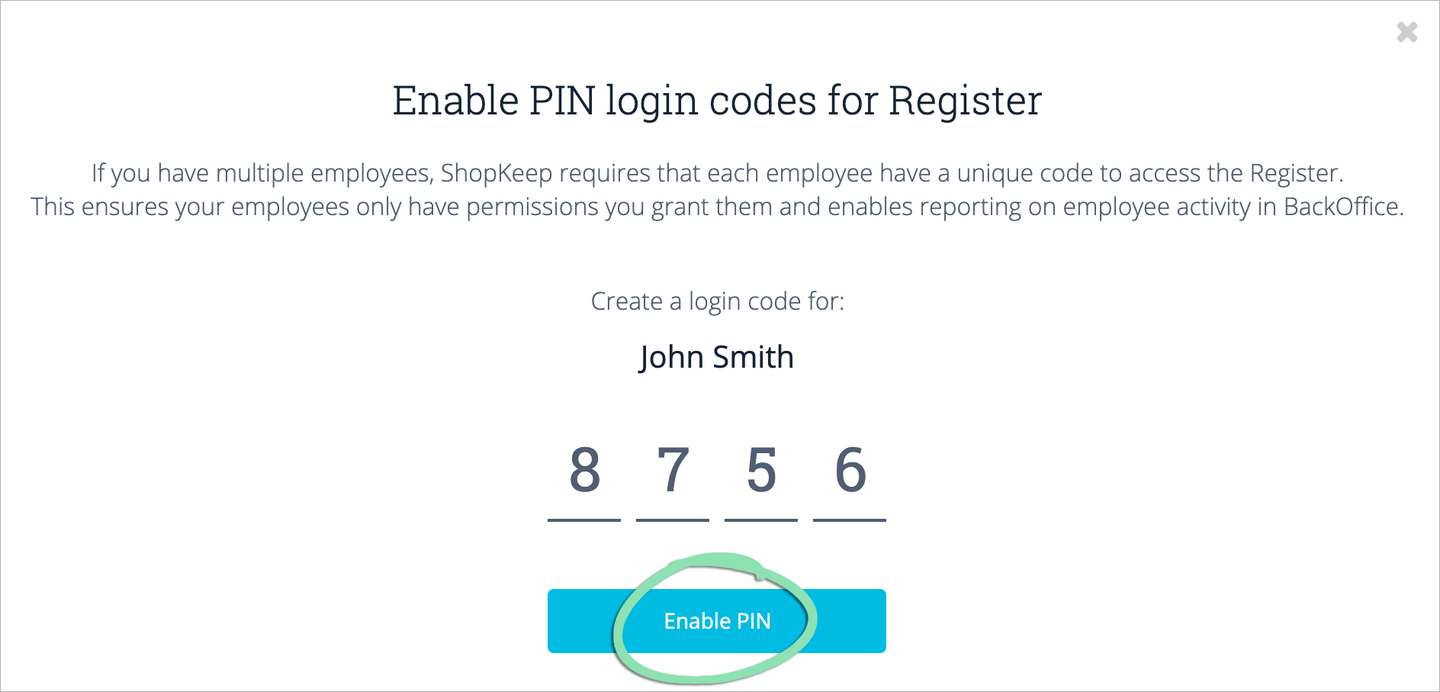
If prompted, set a new register code for the Business Owner and tap 'Enable PIN'.
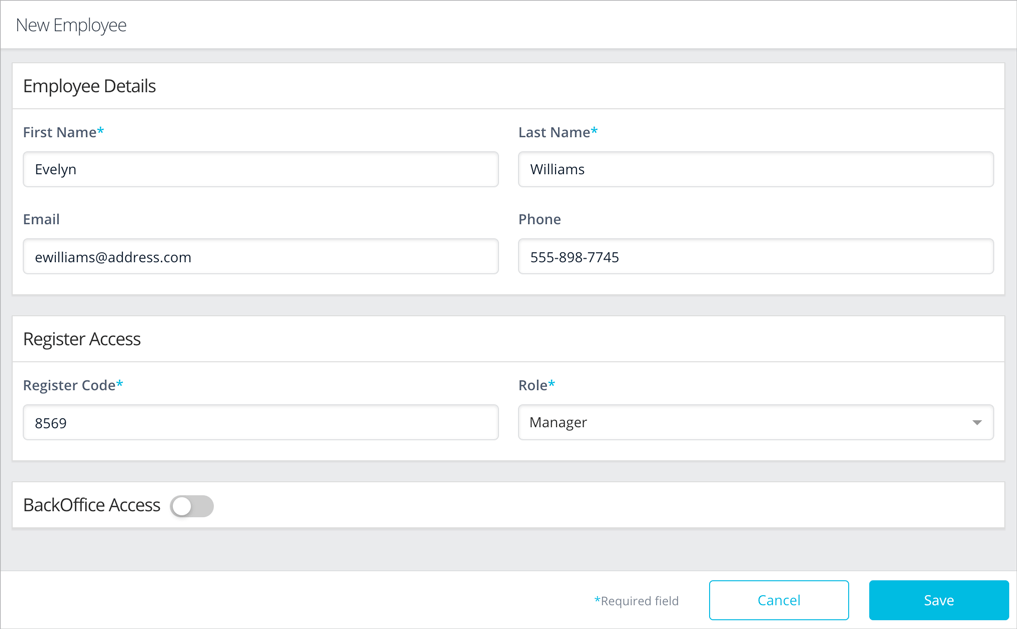
Enter at least a first name, last name, register code, select a role, and click 'Save'.
Click to Enlarge
Register Code | 4-digit code that allows an employee to clock in and out and sign into the register. Role | Select ‘Cashier’ or ‘Manager’. Cashiers can run sales, returns, and perform other cashier functions at the register. Managers can perform cashier functions and manager functions, such as opening the register shift and cash drawer. BackOffice Access | Select a level of BackOffice access to give to an employee. Visit our Manage Staff article to learn about the different types of BackOffice permissions.
Help us improve Lightspeed Support. Was this article helpful?