Retail POS (S-Series) on The Mini, built by Clover Troubleshooting
This guide focuses on solving issues that affect the Retail POS (S-Series) on The Mini, built by Clover.
Having problems using the Clover Mini as a customer facing display with the Retail POS (S-Series) app for iOS, visit this troubleshooting guide instead.
The 1st-gen Mini no longer supports updated versions of the Retail POS (S-Series) app. If using a 1st-gen device, you can continue to receive app updates by upgrading to a 2nd-gen Mini or other supported register device. Learn which type of Mini you have by visiting Clover support.
Table of Contents
Setup Issues
This section deals with issues you may run into while setting up the register.
My device is not powering on.
If the screen does not turn on after plugging the power cable into an outlet, the device is most likely not receiving power. After each step below, check to see if the problem is resolved.
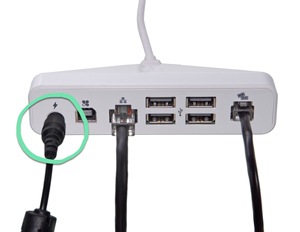
Unplug the power cable from the power adapter, then plug it back in.
Unplug the power cable from the Hub, then plug it back in.
Click to Enlarge
Unplug the power cable from its power outlet, then plug it into a different power outlet.
Make sure to use a known working outlet.
If a cash drawer is connected to the Hub, make sure the correct cable is in use.
For APG cash drawers, the CD-101A cable is the only compatible cable. If a different cable is connected, the device will not power on. Purchase a new cable here, if necessary.
For the Clover cash drawer, you must use the cable that came with the drawer.
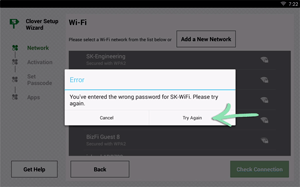
"You've entered the wrong password"
This error appears on the register when you enter a Wi-Fi network’s password incorrectly.
Look to see if you are connecting to the correct network.
If you selected the wrong network, tap ‘Cancel’ and pick the correct one.
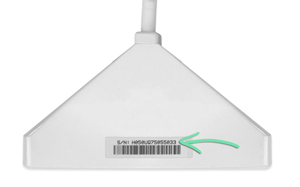
"Invalid activation store name and/or manager code"
Make sure that the store name and manager code combination being used are the same as listed in BackOffice. Be sure that the store name is entered using all lowercase and no spaces. The manager code is four digits.
"Unable to activate register; no available licenses"
This error message is received if there are no available register licenses. For help adding an additional register or reactivating an existing register, visit our Register Licenses article.
Sale and Return Issues
Having trouble running sales or returns? We can help. Find your issue in this section and follow the troubleshooting steps.
Items don't appear on the register when I scan them.
Check to see if your USB barcode scanner is properly connected to the register and communicating with The Mini inside the Retail POS (S-Series) app.
If the scanner beeps but the item does not appear on screen, follow the bullets below this step. Otherwise, skip to step 2.
Open the Item List and search for the UPC code of the item.
If an item appears on the Item List, return to the register and tap ‘Get BackOffice Updates’ on the register menu. Then, go to the New Sale screen and scan the item.
If no item appears on the Item List, the scanned UPC is not associated with an item in inventory. Either add a new item with that UPC or add the UPC to an existing item. If the item’s barcode was printed using Lightspeed Label Printing, print a new label for the item.
Disconnect and reconnect the scanner.
Unplug the scanner from The Mini’s Hub.
Plug the scanner back into the Hub.
If using a Zebra USB barcode scanner, follow steps 5 - 11 here in the Retail POS (S-Series) app to scan the setup barcode.
The Mini’s Built-In Camera
Make sure you are using proper technique when scanning barcodes using The Mini’s built-in camera.
Make sure the barcode is aligned with the red line on screen.
Click to Enlarge
Ensure there is adequate lighting in the area where the barcode is being scanned.
Move the barcode closer to or further from the camera until it appears in focus.
If The Mini beeps but the item does not appear on the screen, follow the bullets below this step.
Open the Item List and search for the number below the item’s barcode.
If an item appears on the Item List, return to the register and tap ‘Get BackOffice Updates’ on the register menu. Then, go to the New Sale screen and scan the item.
If no item appears on the Item List, the scanned UPC is not associated with an item in inventory. Either add a new item with that UPC or add the UPC to an existing item. If the item’s barcode was printed using Lightspeed Label Printing, print a new label for the item.
After scanning a customer’s ID, driver’s license, or passport, I am not prompted to verify the customer’s information.
This issue may occur if you scan the wrong barcode, are not using a supported scanner model, or did not scan the setup barcode.
Make sure you are scanning the correct part of the customer’s ID, driver’s license, or passport.
Other barcode scanner models are not supported for scanning IDs.
If scanning a passport, make sure you are using the Zebra DS4608 2D barcode scanner.
Other barcode scanner models are not supported for scanning passports.
"Invalid search"
This message appears if a transaction number is entered incorrectly when attempting a return. Double check the numbers on the receipt and the numbers entered on the transaction history screen to make sure that they are correct.
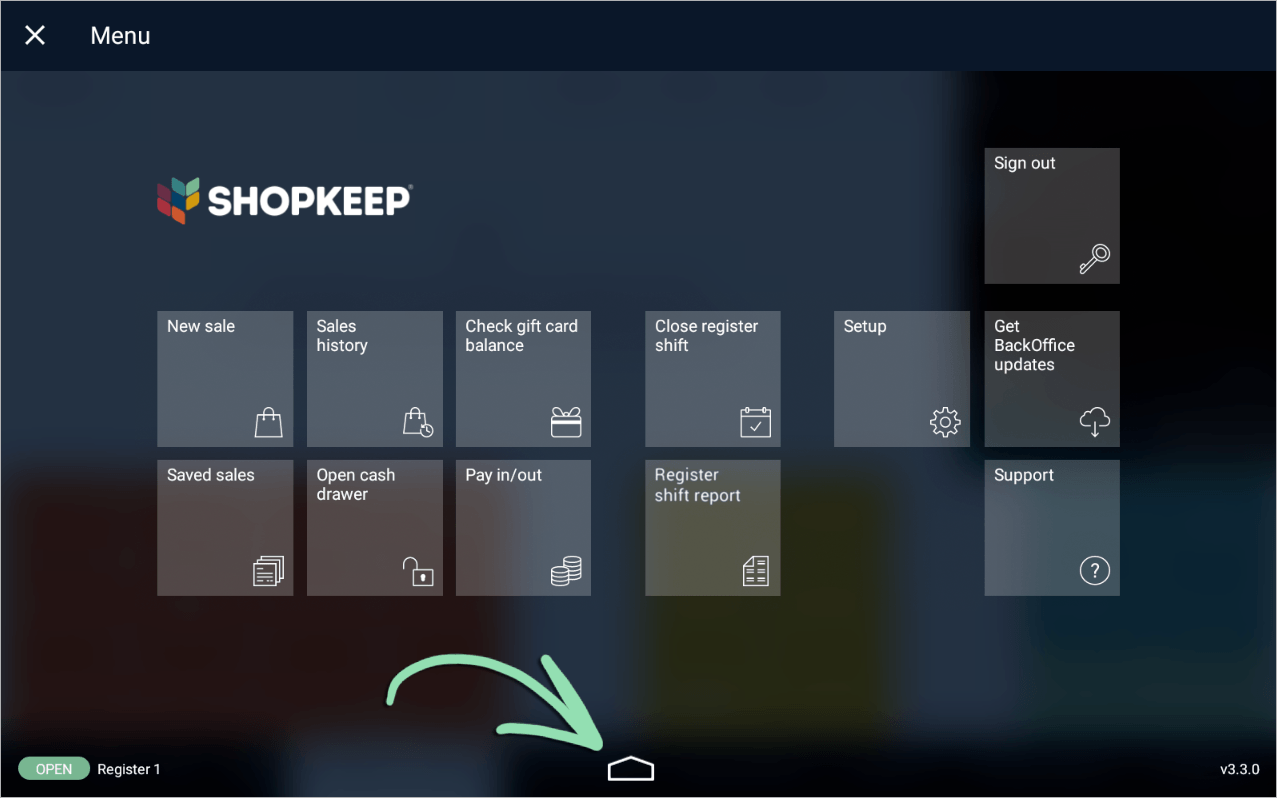
"Something went wrong"
This error can occur if the register has lost internet connection.
From the register menu, tap the Home button to return to the Home screen.
Click to Enlarge
Open the 'Settings' app.
Whether using ethernet or Wi-Fi, make sure that you are connected to the correct network.
If you connect using Wi-Fi and your device is connected to the wrong network, tap ‘Cancel’ and connect the device to the correct network.
If the problem persists, contact your internet service provider.
"Card number is invalid" / "Card number length is not correct"
These errors appear on the register’s screen if a customer makes a mistake while manually entering their credit card information.
Tap 'OK' to dismiss the error.
Have the customer re-enter their card number.
"Transaction failed: invalid card"
This error appears on the register’s screen if a customer swipes something other than a credit/debit card, like a gift card. It can also occur if the card’s magnetic strip is damaged.
Tap 'OK' to dismiss the error.
Have the customer swipe a valid credit or debit card.
If the swipe fails again, manually enter the card information.
I'm receiving a credit card processing error not listed on this page.
If you cannot find the error, contact Customer Care.
Saved Sales Screen Issues
This section covers issues related to the Saved Sales screen.
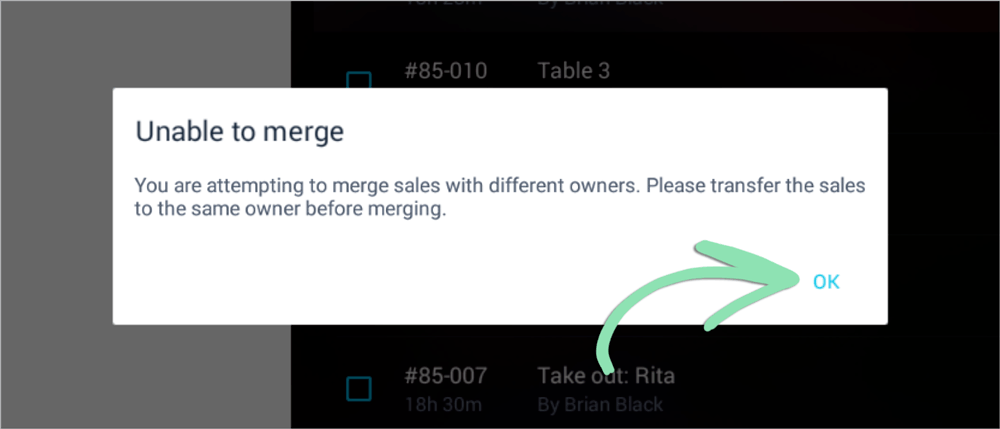
“Unable to merge”
This error occurs when a register manager tries to merge saved sales with different owners. Transfer saved sales to the same employee to be able to merge them.
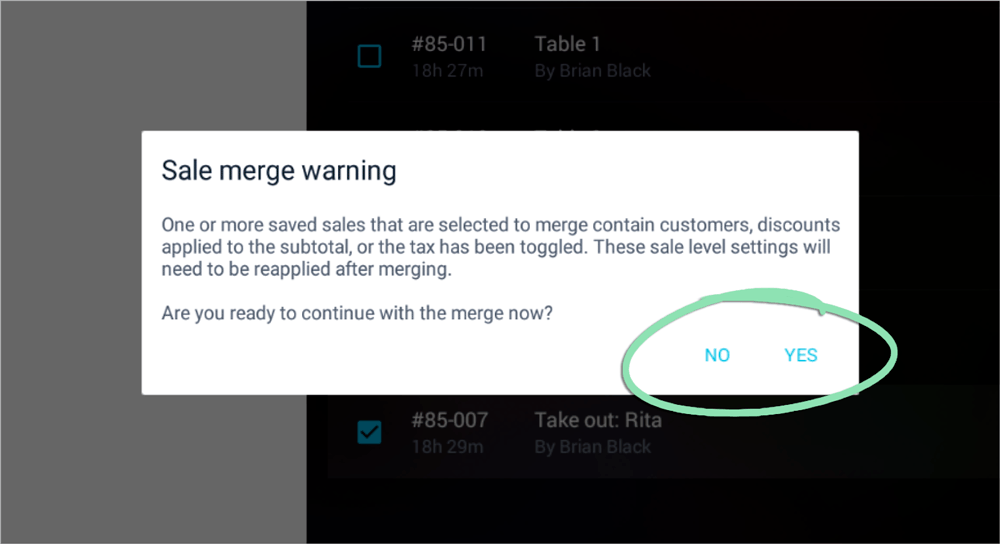
When saved sales are merged, high-level settings such as customer assignments, transaction-level discounts, and tax removal are not automatically applied to the merged sale. Decide whether to continue with the merge, then reapply these settings if necessary.
Tap ‘Yes’ to merge the saved sales or ‘No’ to cancel the merge.
Click to Enlarge
If yes, reapply the relevant sale-level setting(s) to the new merged saved sale.
Assign a customer, apply a transaction-level discount, or toggle the tax off.
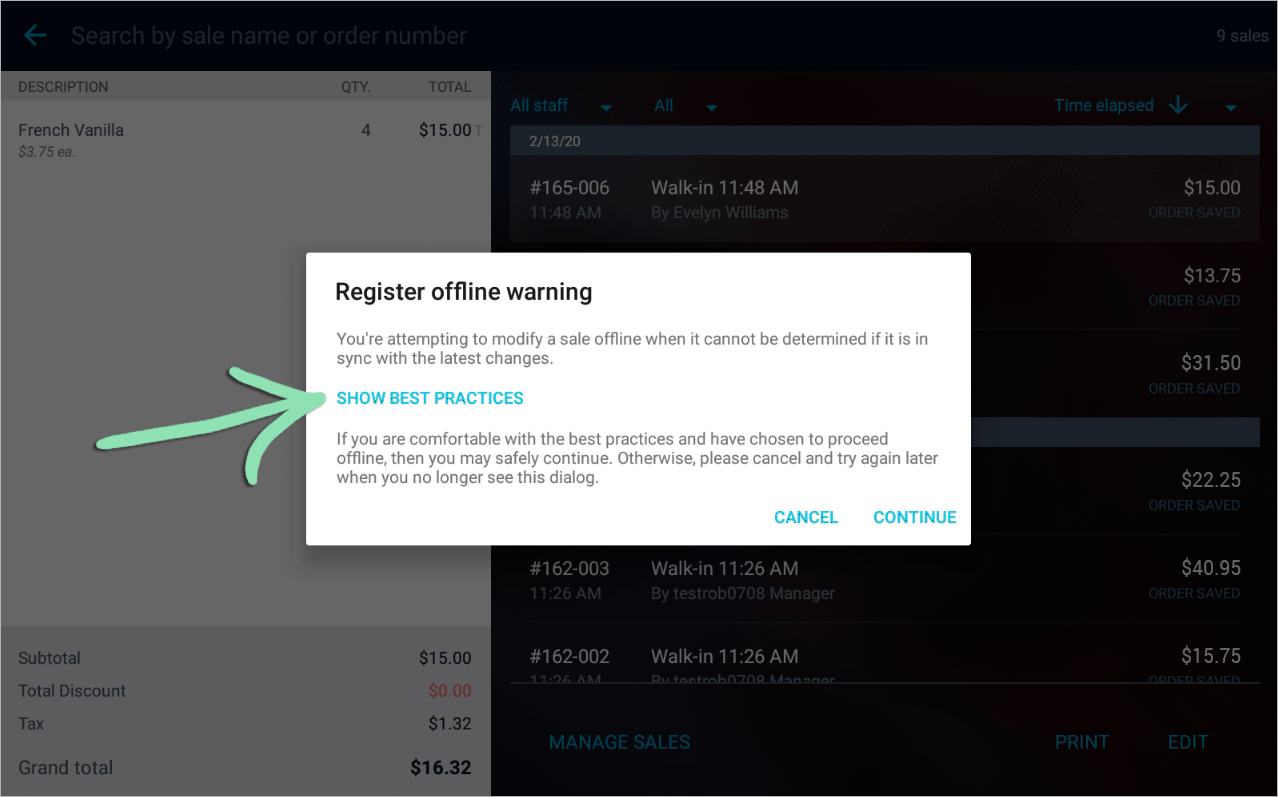
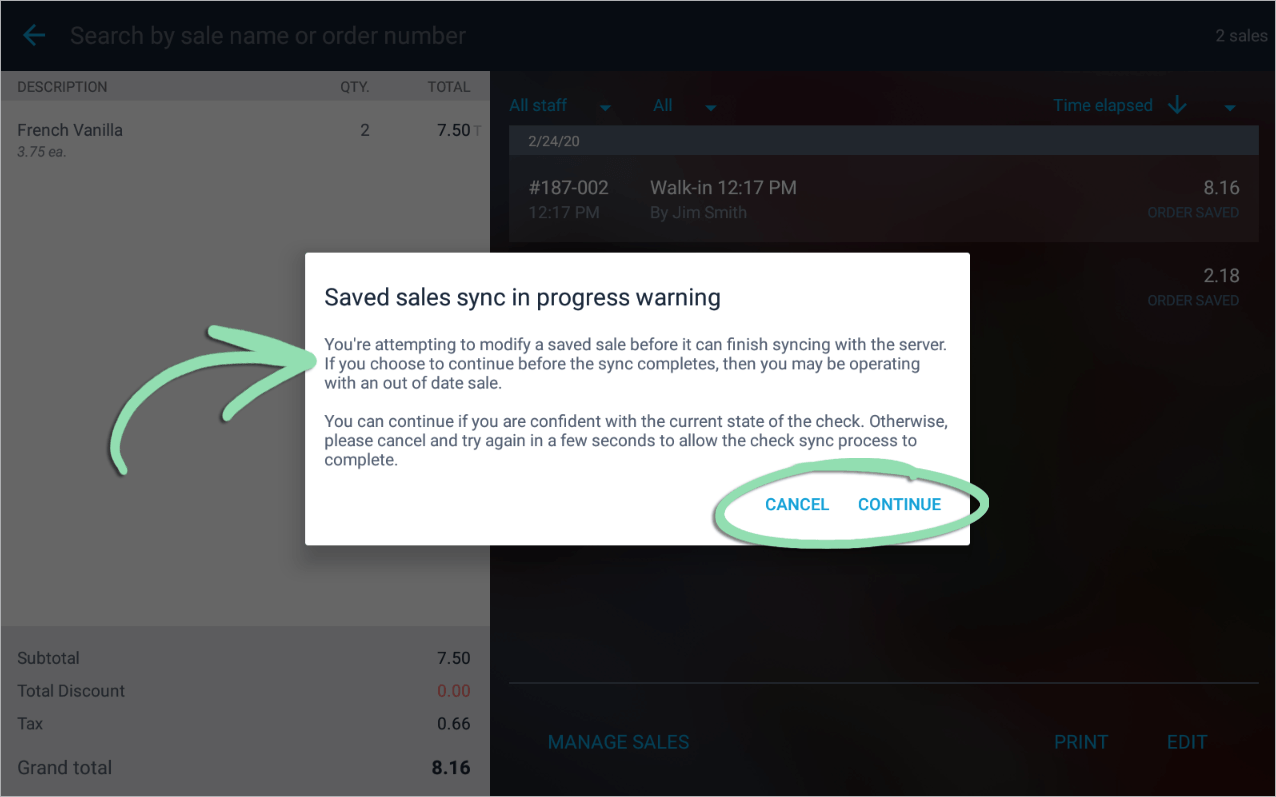
“Register Offline Warning”
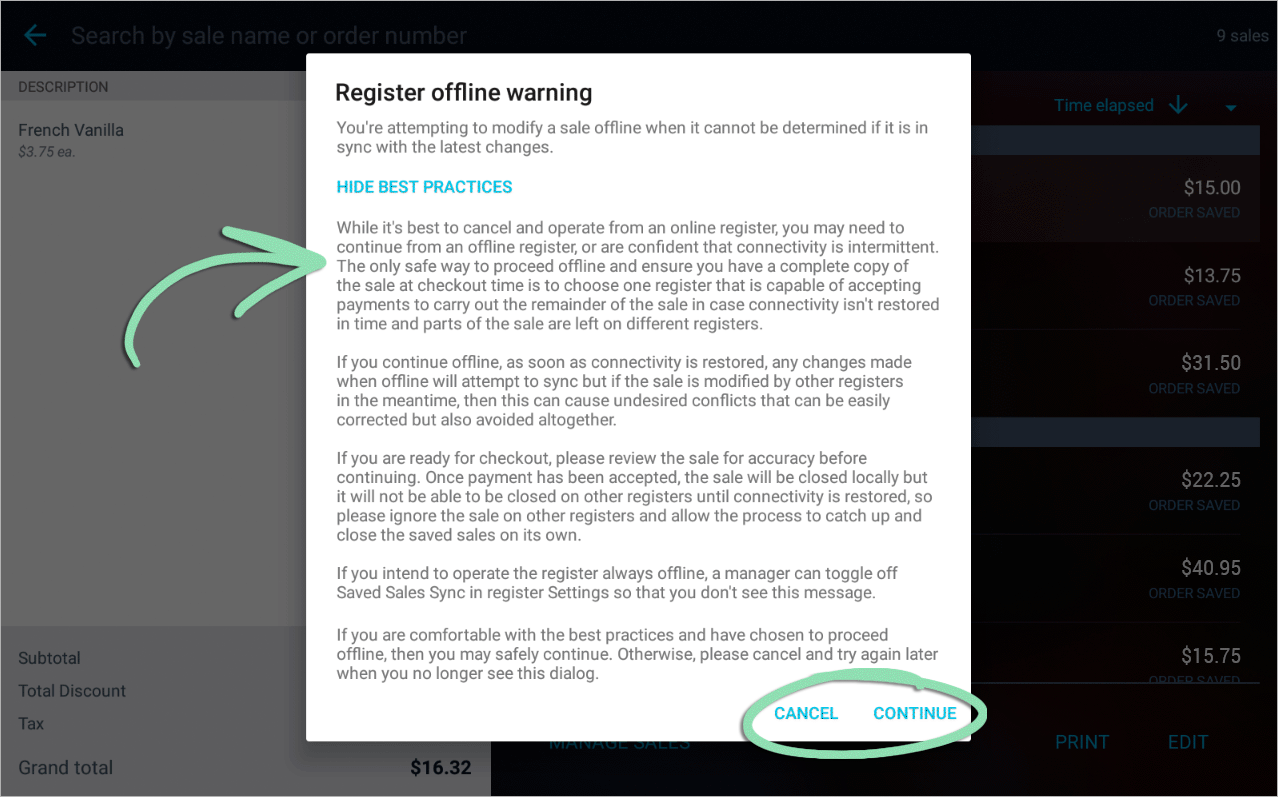
When modifying a saved sale from a register without an internet connection, the register may not be in sync with the latest version of the sale. Review the best practices within this warning to determine how to proceed.
Read the best practices, then tap ‘Cancel’ or ‘Continue’.
We recommend tapping ‘Cancel’, then switching to an online register to modify the saved sale. If you only have one register, it is safe to continue, but the sale will not be backed up until connectivity is restored.
Continue troubleshooting below based on the option selected in the previous step.
If you tapped ‘Cancel’:
Go to an online register and modify the saved sale from there. Do not create or modify saved sales on the offline register until internet connectivity is restored.
If no other registers are online, modify the saved sale from the offline register, tap ‘Continue’, then skip to the ‘Continue’ section below.
Troubleshoot the internet connection of the offline register. If connected via ethernet, make sure the cable is plugged into both The Mini’s Hub and the router. If connected via Wi-Fi, exit to the The Mini’s home screen from the register menu, then open the ‘Settings’ app and reconnect to your network.
Be aware that once connectivity is restored to the offline register, changes made from online registers will automatically sync to it.
If you tapped ‘Continue’:
Finish modifying or processing the saved sale on that register.
Do not modify the saved sale from other registers until the offline register is brought back online.
Do not create or modify any saved sales from the offline register until internet connectivity is restored. If all registers are offline, only create and modify saved sales on a single register able to accept all payment tenders needed for checkout.
Troubleshoot the internet connection of the offline register. If connected via ethernet cable, make sure the cable is plugged into both The Mini’s Hub and the router. If connected via Wi-Fi, exit to the The Mini’s home screen from the register menu, then open the ‘Settings’ app and reconnect to your Wi-Fi network. If all registers are offline, make sure your network follows our best practices, then reboot the router or contact your internet service provider for help restoring the internet connection.
If you intend to always operate this register offline, disable Saved Sales Sync to avoid receiving future warnings.
Be aware that once connectivity is restored to the offline register, the updated saved sale will automatically sync to other registers.
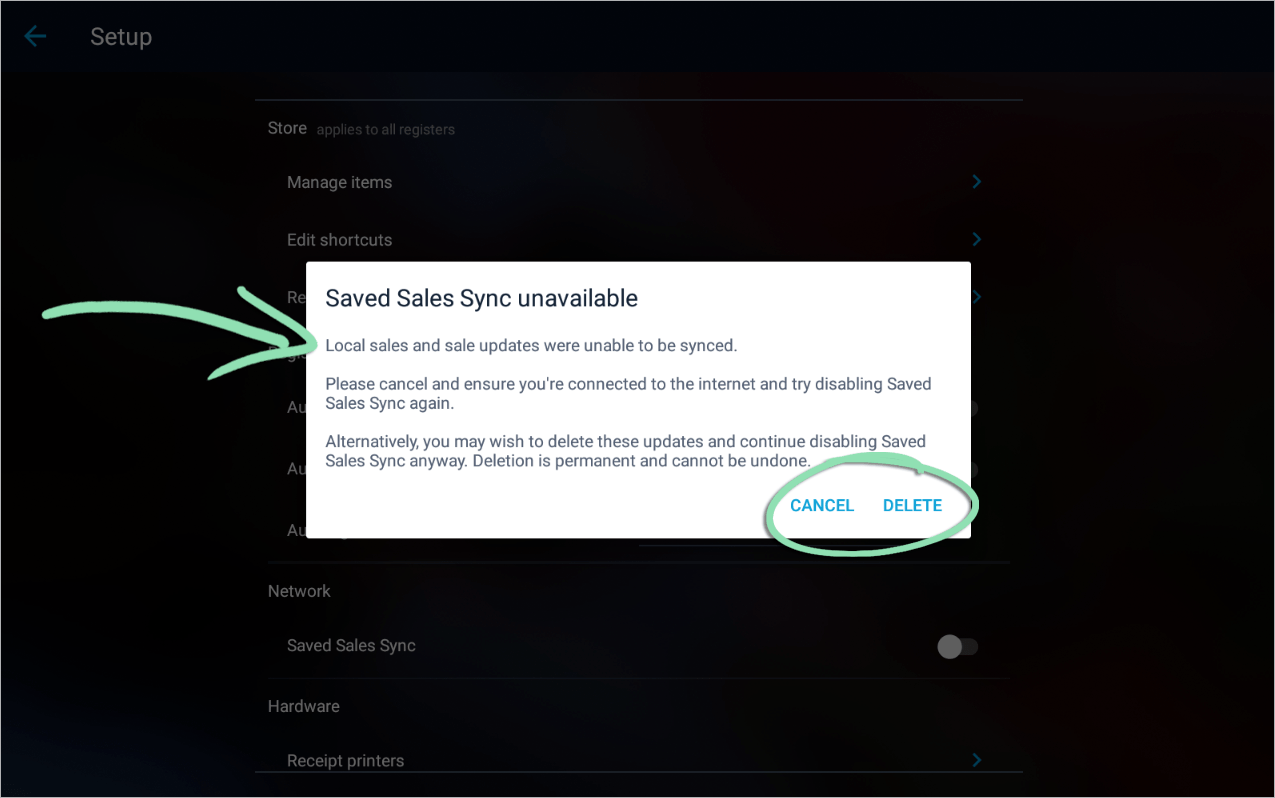
“Saved Sales Sync Unavailable”
When disabling Saved Sales Sync on a register, the register will try to sync updated versions of its saved sales to your other registers. If the sales cannot be synced due to an internet connection issue, you must either resolve the issue or choose to delete saved sales from that register.
Read the warning message and decide how to proceed.
In most cases, we recommend tapping ‘Cancel’, then troubleshooting the register’s internet connection. If you do not want the saved sales to be synced, tap ‘Delete’ to remove them.
If you tapped ‘Cancel’ in the previous step, continue troubleshooting below:
aTroubleshoot the register’s internet connection.
If connected via ethernet, make sure the cable is plugged into both the Mini’s Hub and the router.
If connected via Wi-Fi, exit to the The Mini’s home screen from the register menu, then open the ‘Settings’ app and reconnect to your Wi-Fi network.
If the problem persists, make sure your network follows our best practices, then reboot the router or contact your internet service provider for help restoring the internet connection.
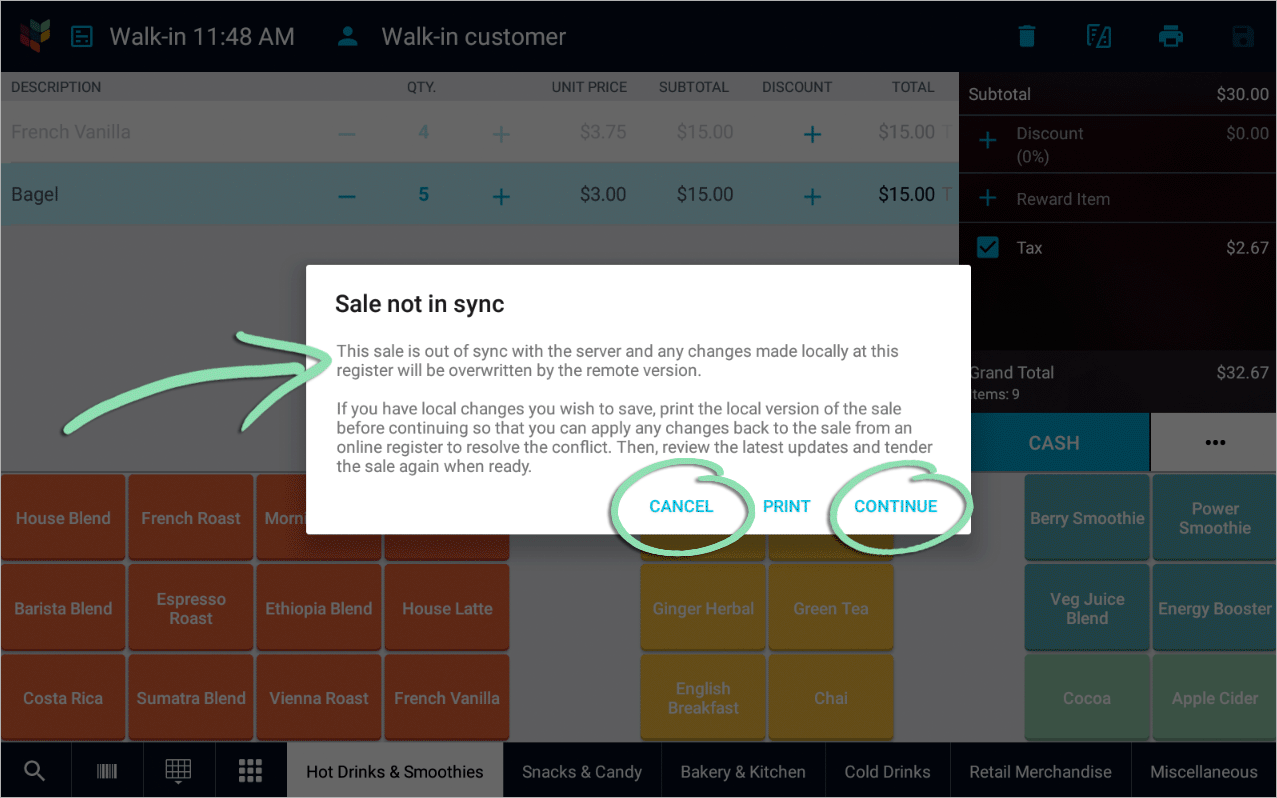
This warning appears when the version of a saved sale stored on a register differs from the version backed up in the cloud. Since the version in the cloud takes priority, changes made on the register will be overwritten.
If there are changes you want to document, tap ‘Print’ to print a copy of the saved sale.
Click to Enlarge
Read the warning message, then tap ‘Cancel’ or ‘Continue’.
‘Cancel’ will stop the current action and ‘Continue’ will overwrite the local version of the saved sale with the version stored in the cloud. If the sale was closed on another register, ‘Continue’ will remove the sale from this register.
The Saved Sales screen does not show all open saved sales.
When sales go missing from the Saved Sales screen of an employee, that employee may have applied filters that prevent those sales from being displayed. If saved sales are still missing after disabling all filters, look for the missing sales on a different register or see if they were closed out.
From the Saved Sales screen, clear the search field and set both filters to ‘All’.
Click to Enlarge
If Saved Sales Sync is disabled, search another register for the missing sales.
Not using thermal receipt paper? Purchase some from the Lightspeed Store.
My kitchen printer is not listed on the Available Printers screen.
There are a few reasons why this problem can occur while you are setting up your kitchen printer. The printer may be disconnected, connected to the wrong network, or there could be a hardware issue.
Follow the steps below to troubleshoot this issue. After each step, check if the problem is resolved.
Check that the printer is connected to power and turned on.
My kitchen printer is connected, but tickets do not print.
This problem usually occurs when you skip a step during the printer’s initial setup. If there are no error messages in the Retail POS (S-Series) app and no error lights lit on the printer, continue below to troubleshoot.
Follow the steps here to see if the printer is listed on the Kitchen Printers screen.
Click to Enlarge
If the printer is not listed, tap the ‘+’ button to search for and set up the printer.
If the printer is listed but is not switched on, tap the switch to toggle it on.
If the printer is listed and is already switched on, go to step 2.
In BackOffice, make sure Printer Groups are properly set up. Learn how to set up Printer Groups here.
Printer Groups allow you to manage which items print to the kitchen printer. Each Printer Group must have at least one department or category of items and one or more printers assigned to it.
This issue can occur for a variety of reasons. After each step below, check to see if the problem is resolved.
If performing a sale, make sure you tendered it to Cash.
The drawer opens for Cash sales but not for other tenders, such as Credit.
Check that the drawer's lock is in the vertical position (unlocked).
Make sure the correct cash drawer cable is in use.
For APG cash drawers, you must use the CD-101A cable. Purchase a new cable here, if necessary.
For the Clover cash drawer, you must use the cable that came with the drawer.
Disconnect the cash drawer cable from the Hub and the drawer, then reconnect it.
Using The Station, built by Clover? Plug the cable into the #2 port on the Hub as the drawer will not open if the cable is connected to port #1.
Setup Screen Issues
This section covers issues related to the options found in the Setup section of the register menu.
Some credit sales do not ask for a customer signature.
A signature threshold prevents sales below a specific amount from prompting for a signature. Change or remove this restriction in the Setup app.
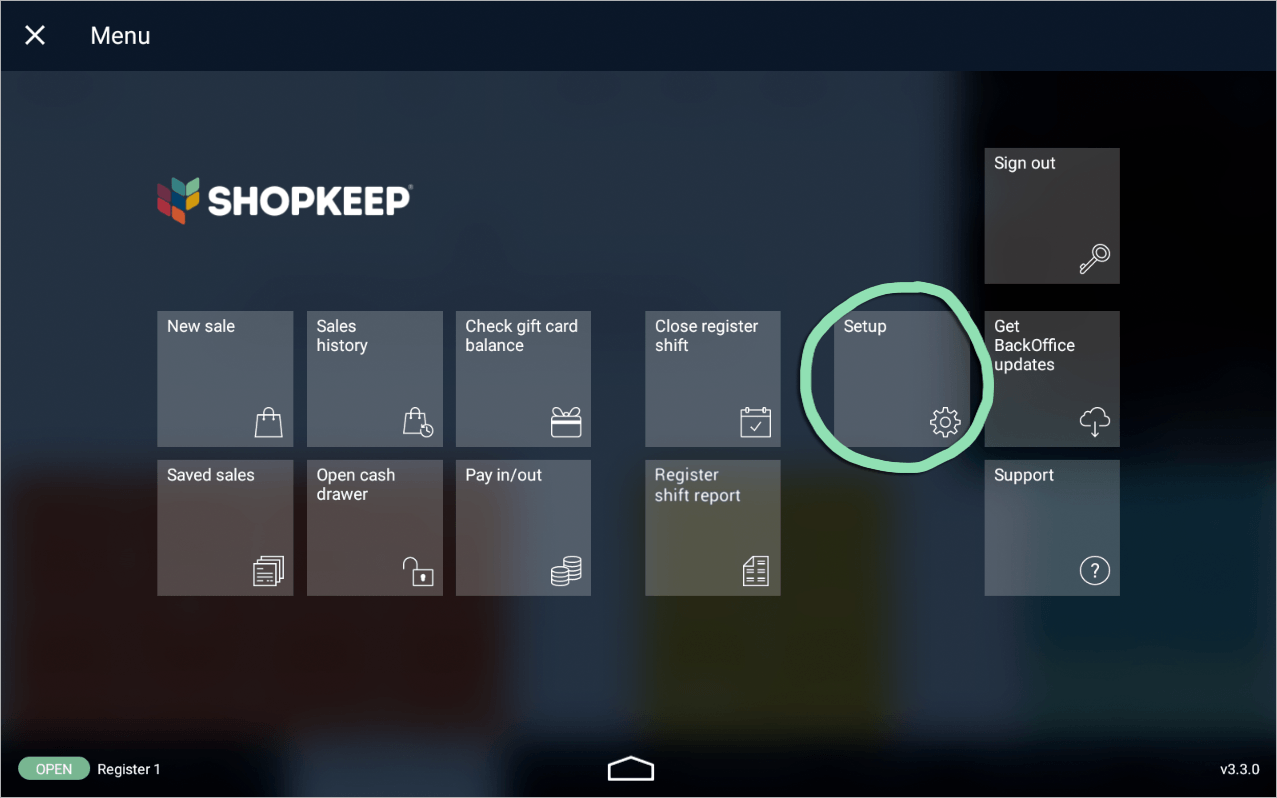
Sign into the Retail POS (S-Series) app as a register manager and tap ‘Setup’.
Click to Enlarge
Tap ‘Card signature threshold’ to open the Setup app.
Click to Enlarge
Follow the steps here to set a new threshold or disable it.
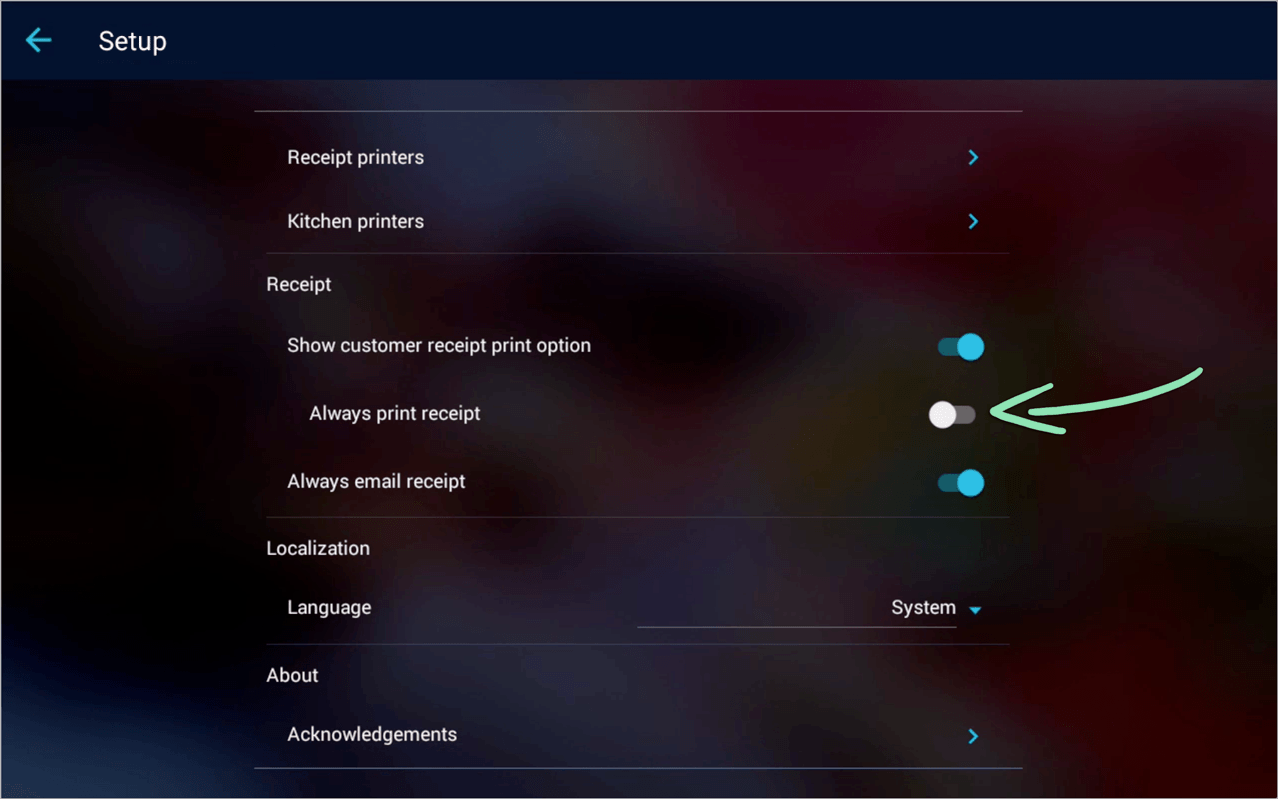
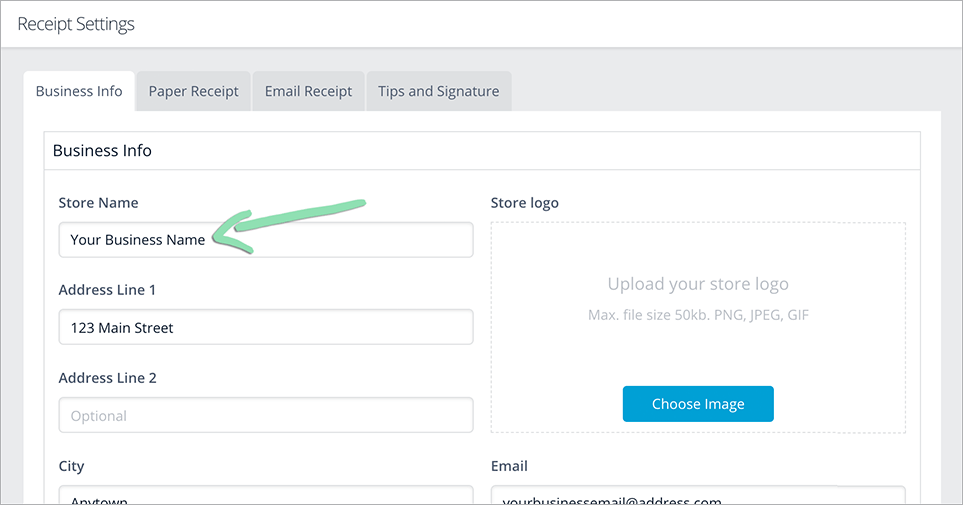
‘Print Receipt’ or ‘Email Receipt’ is automatically selected for every transaction.
Disable the register’s optional receipt settings to turn off automatic receipt printing or emailing. Cashiers will still be able to manually print or email receipts for transactions that need them.
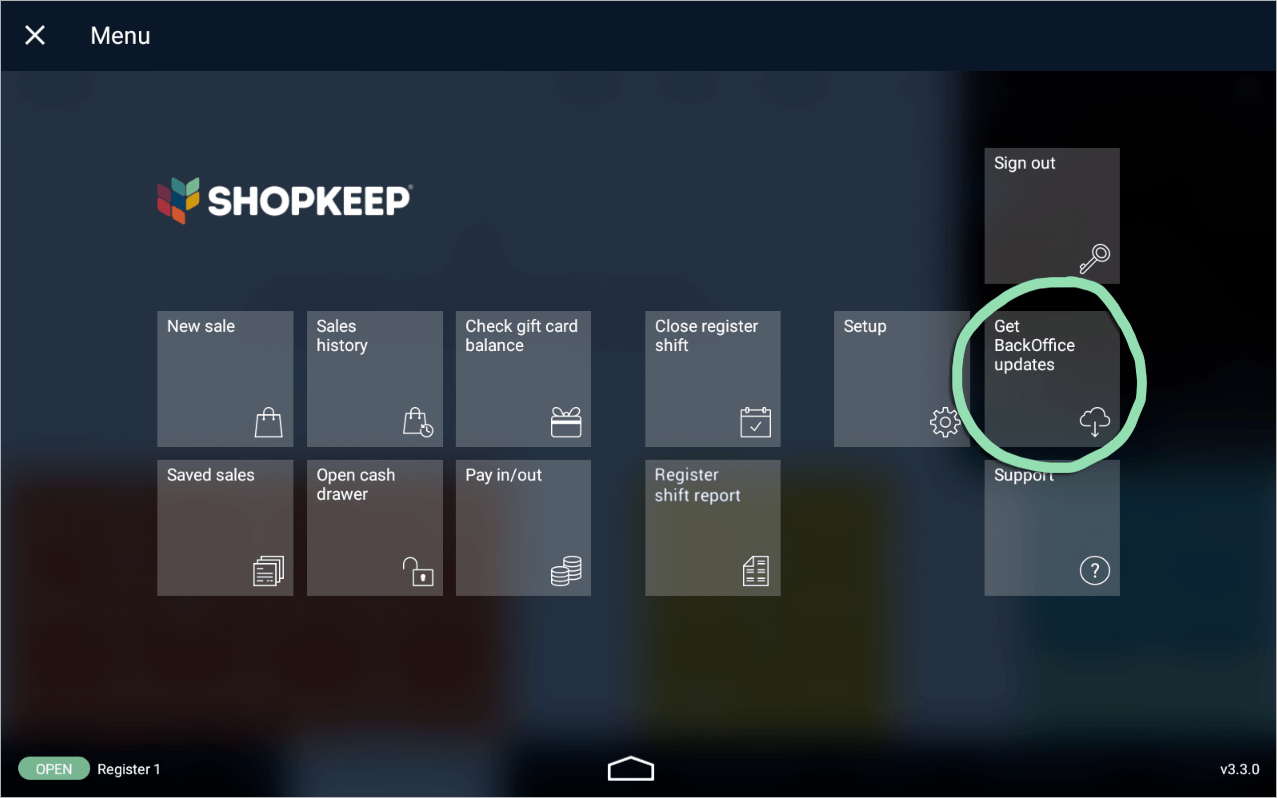
Sign into the Retail POS (S-Series) app as a register manager and tap ‘Setup’.
Click to Enlarge