Ticket Printer Troubleshooting

This guide focuses on diagnosing and solving problems that may arise after setting up the Star SP700 or Epson TM-U220B ticket printers.

Table of Contents

Networking Issues

This section covers how to solve problems related to how your printer, network, and iPad communicate.

My printer is not listed on the 'Printers' screen. / "No Printers Found"

There are a few reasons why this problem can occur. The printer may be disconnected, the iPad may be connected to the wrong network, or there could be a hardware issue.

Follow the steps below to troubleshoot this issue. After each step, check if the problem is resolved.

  1. Check that the printer is connected to power, plugged into your router, and switched on.

    Make sure all cables are plugged into the correct printer ports as outlined in the Star and Epson Ticket Printer articles. If the printer does not power on, follow these steps to troubleshoot:

  2. Verify that only the printer's 'POWER' light is solid.

    If ‘POWER’ is not solid or other lights are lit, follow the troubleshooting steps in the relevant section:

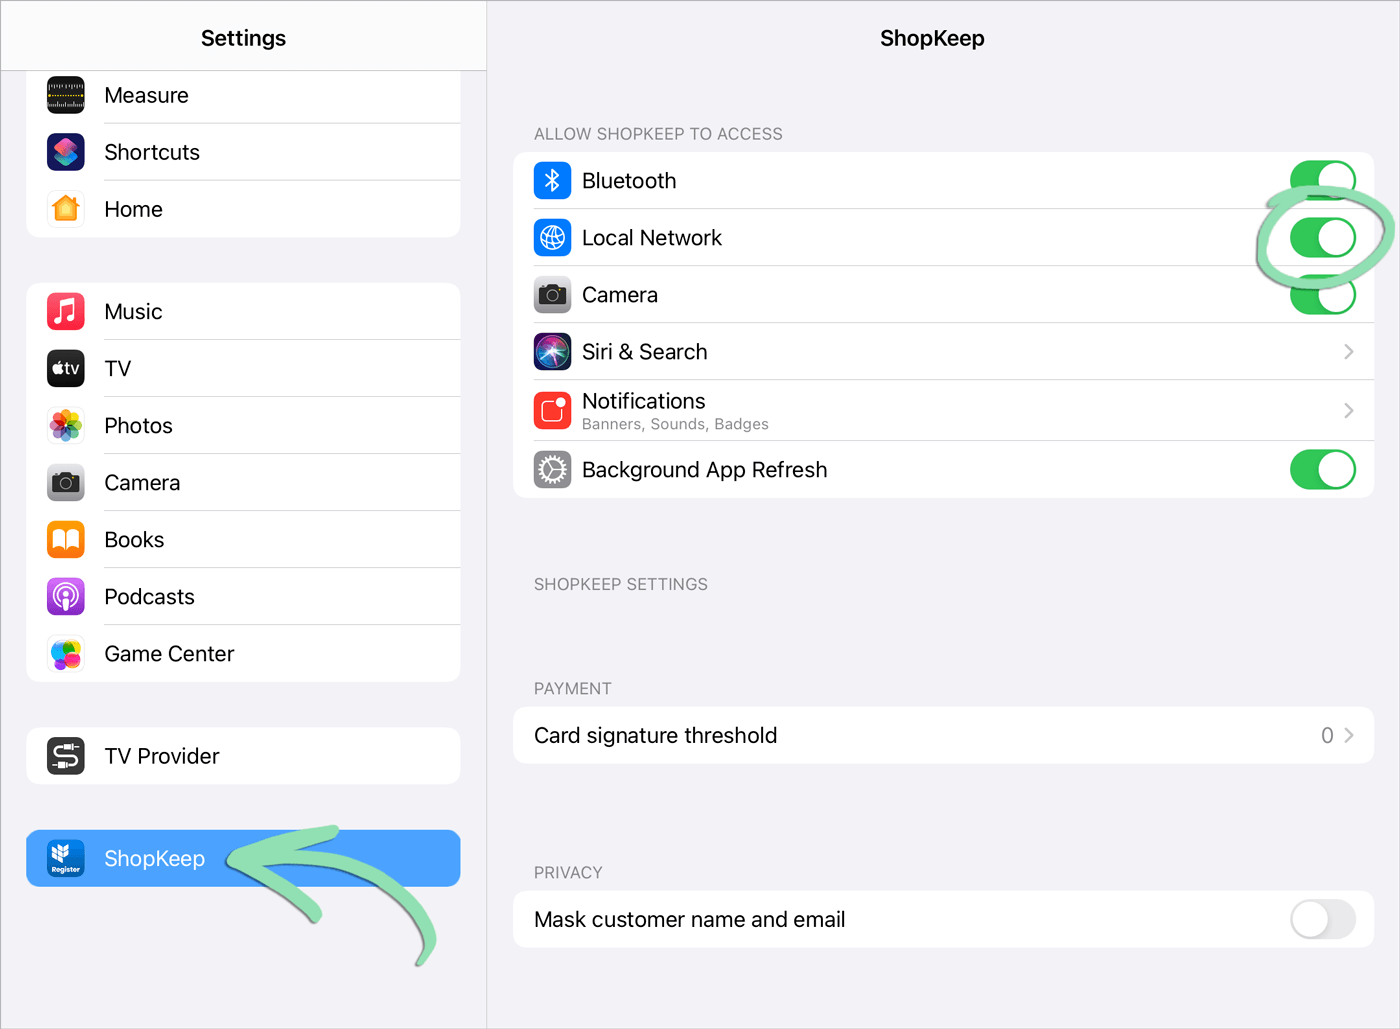
  3. Make sure the iPad is connected to the Wi-Fi network for the router the printer is plugged into.
    • Open the Settings app and tap ‘Wi-Fi’. If the iPad is NOT connected to the right network, tap the correct network name to connect. Then, follow these steps to forget all other networks.
    • If using a dual band router, try connecting the iPad to each of the router’s Wi-Fi networks.
  4. In the iPad Settings app, tap ‘Retail (S)’ and enable local network access for the Retail POS (S-Series) app.
    Click to Enlarge
  5. Force quit and reopen the Retail POS (S-Series) app.
  6. Try using a different ethernet cable and router port.
    • Unplug the ethernet cable from the printer and router, then connect a new cable.
    • Flip the printer’s power switch to turn it off, wait 10 seconds, and turn the printer back on.
  7. Restart your router.
    • Unplug the router from power, wait about 10 seconds, and plug it back in.
    • Once your router is back online, turn the printer off, wait about 10 seconds, and turn it back on.
  8. If the printer is connected to an extender or switch, try plugging it directly into your router.
    • Turn off the printer and unplug its ethernet cable from the extender or switch.
    • Plug the ethernet cable directly into the router, then power the printer back on.

"Could not connect to printer"

This error appears when you print a ticket to a printer that is disconnected.

  1. Follow these steps above to troubleshoot and resolve this issue.

"Printer Failure. Could not connect to..."

This error message appears on the Retail POS (S-Series) app when there is a problem communicating with the printer. Follow the steps below to resolve this issue.

  1. Force quit the Retail POS (S-Series) app.
  2. Power cycle the printer.

    Switch the printer off, count to 10, and turn the printer back on.

  3. Reopen the Retail POS (S-Series) app.
  4. On the Main Menu, tap 'Integrated Hardware'.
  5. Select 'Printers'.
  6. Tap the printer icon to check the printer's connection.

    If successful, this prints a slip of paper with the printer’s name and MAC address.

  7. If the error persists, follow the additional steps below:

Is my printer receiving an IP address?

Follow the steps below to check if your Star SP700 or Epson TM-U220B ticket printer is receiving an IP address from the router.

Instructions for Star SP700:
  1. Flip the power switch to turn off the printer.
  2. Hold down the FEED button and power the printer back on.
  3. Release the FEED button after the printer beeps.
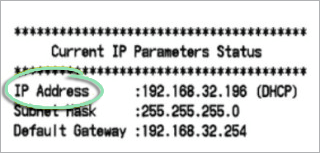
  4. Two sheets of paper will print. At the bottom of the second, look for 'Current IP Parameters Status'.

    The printout shows your printer’s IP Address and some other network details. If there is no IP Address, perform the troubleshooting steps below.

Instructions for Epson TM-U220B:
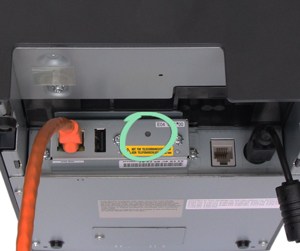
  1. With the printer powered on, hold the button on the back of the printer for 3 seconds.
  2. Release the button once the printer begins to print.
  3. At the bottom of the printout, look for 'TCP/IP Status'.

    The printout shows your printer’s IP Address and some other network details. If there is no IP Address, perform the troubleshooting steps below.

My printer is not receiving an IP address from the router.

Follow these steps to troubleshoot the connection between your printer and router if the printer is not receiving an IP address.

  1. Power the printer off.
  2. Verify the printer is physically connected to your router.
  3. If the printer is already plugged into the router, plug it into a different numbered port.
  4. Power the printer back on.
If the problem persists, follow the additional steps below:
  1. Power the printer off.
  2. Try using a different ethernet cable to connect the printer to your router.
  3. Power the printer back on.
  4. As a last resort, power off the printer and reboot your router.

Star SP700 Status Light Issues

This section covers issues communicated by the status lights on the front of the Star SP700 ticket printer.

The ERROR light is blinking and the POWER light is solid.

An ERROR light blinking about once per second means the printer has either run out of paper or is about to run out. If the ERROR light is blinking much quicker, it means there may be a paper jam.

  1. Power off the printer.
  2. Push the lever to open the printer's back cover.
  3. If the printer is out of paper, load a new roll and close the cover on the paper.
    • The paper must be loaded so it feeds up from the bottom of the roll.
    • Visit the Lightspeed Store if you need to buy more paper.
  4. If there is a paper jam, clear the jam and close the cover.
  5. Power the printer back on.

The ERROR light is solid and the POWER light is solid or flashing.

This combination of lights means one or both of the printer’s covers are open.

  1. Close the front and back covers to resume normal operation.
  2. If neither cover is open, open and close both covers to reset this warning.

Both the ERROR and POWER lights are blinking.

This error occurs when the printer is no longer receiving an IP address from your network.

  1. Follow these steps above to troubleshoot this issue.

The ERROR light is off, but the POWER light is blinking.

This combination of lights indicates the printer has overheated.

  1. Wait a few moments for the printer to cool down.

    Normal operation automatically resumes once the printer has cooled.

None of the Star printer's lights are lit.

If no status lights are lit, it means the printer is either turned off or not receiving power.

  1. Toggle the power switch to check if the printer is powered off.
  2. Make sure the power cable is plugged securely into the back of the printer.
  3. Plug the printer into a different power outlet.

Epson TM-U220B Status Light Issues

This section covers issues communicated by the status lights on the front of the Epson TM-U220B.

The ERROR light is solid.

If the ERROR light is solid red, it means one of the printer’s covers is open.

  1. Close the front and/or back cover to resume normal operation.
  2. If neither cover is open, open and close both covers.
  3. If the problem persists, power the printer off, wait a few seconds, and power it back on.

The ERROR and PAPER OUT lights are both solid.

This combination of lights can mean the printer’s back cover is open, the paper has run out, or the paper is about to run out.

  1. Push the lever to open the printer's back cover.
  2. If the printer is out of paper, load a new roll and close the cover on the paper.
    • The paper must be loaded so it feeds up from the bottom of the roll.
    • Visit the Lightspeed Store if you need to buy more paper.

The ERROR light is blinking.

A blinking ERROR light suggests there may be a paper jam or the printer might have overheated.

  1. Power off the printer.
  2. Push the lever to open the printer's back cover.
  3. If there is a paper jam, clear the jam and close the cover on the paper.
  4. Power the printer back on.
  5. If the error persists, wait a few moments for the printer to cool down.

    Normal operation automatically resumes once the printer has cooled.

None of the Epson printer's lights are lit.

If no status lights are lit, it means the printer is either turned off or not receiving power.

  1. Toggle the power switch to check if the printer is powered off.
  2. Make sure the power cable is plugged securely into the back of the printer.
  3. Plug the printer into a different power outlet.

Hardware Issues

This section covers problems that may arise with the printer itself, not related to how it connects to your network and iPad.

Tickets are printing very lightly.

If tickets suddenly begin printing lighter than usual, it means the printer is running low on ink.

  1. Load a new ink ribbon into the printer.

    Purchase replacement ink ribbons directly from the Lightspeed Store.

Tickets are printing blank or without ink.

This issue occurs if there is no ink ribbon installed in the printer or the existing ribbon is running low on ink.

  1. Lift open the printer's lid and make sure the ink ribbon is installed.
  2. Turn the ink ribbon's knob to tighten any slack in the ribbon.
  3. If the problem persists, load a new ink ribbon into the printer.

    Purchase replacement ink ribbons directly from the Lightspeed Store.

All tickets are printing in red ink.

Tickets normally print in black and red ink. If your tickets begin printing only in red ink, follow the steps below to resolve the issue.

  1. Turn the printer off.
  2. Force quit the Retail POS (S-Series) app.
  3. Turn the printer back on and open the Retail POS (S-Series) app.
  4. Follow the printer's setup guide to make sure it is properly connected.
  5. Print a kitchen ticket.

Duplicate tickets are printing for orders.

If tickets print multiple times for a single order, follow the steps below to resolve the issue.

  1. Force quit the Retail POS (S-Series) app.
  2. Re-open the Retail POS (S-Series) app.
  3. Print a kitchen ticket.
  4. If the problem persists, update to the latest version of the Retail POS (S-Series) app.

Other Issues

Here you’ll find miscellaneous ticket printing issues not related to networking or hardware.

How do I reprint a kitchen ticket?

Reprinting a ticket is necessary when the original ticket is not printed due to an error or when the ticket is printed but gets damaged or lost. Tickets can be reprinted for any saved sale currently on a register.

  1. Select a sale from the Saved Sales screen that needs to be reprinted.
  2. Tap the printer icon and select ‘Reprint Ticket’.
    Click to Enlarge

The ‘Reprint Ticket’ option is not available.

‘Reprint Ticket’ is only active for saved sales when all items on the sale have already been sent to the kitchen.

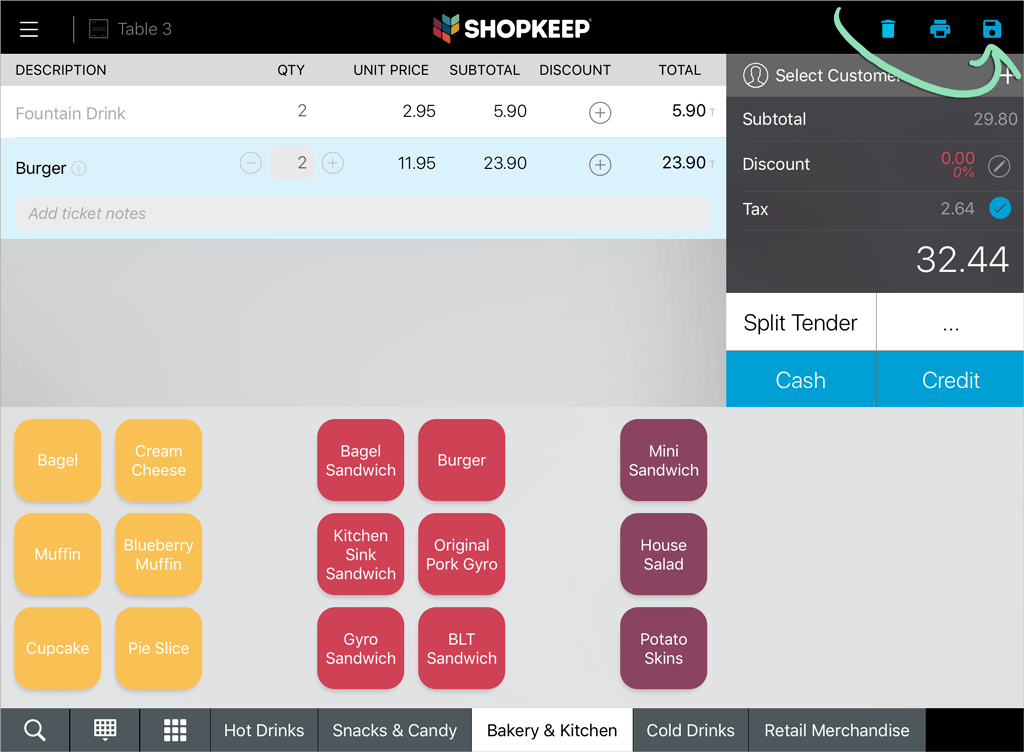
  1. Tap the disk icon to save changes to the sale.

    Tickets will automatically print for previously unsaved items assigned to a ticket printer.

    Click to Enlarge
  2. If necessary, reprint the kitchen ticket.

My printer is connected, but tickets do not print.

This problem can occur when you skip a step during the printer’s initial setup. If there are no error messages in the Retail POS (S-Series) app and no error lights lit on the printer, continue below to troubleshoot.

  1. Follow the steps here to check if the printer is listed on the 'Printers' screen in the Retail POS (S-Series) app.
    Click to Enlarge
    • If the printer is not listed, follow these steps to troubleshoot.
    • If the printer is listed but is not switched on, tap the switch to toggle it on.
    • If the printer is listed and is already switched on, go to step 2.
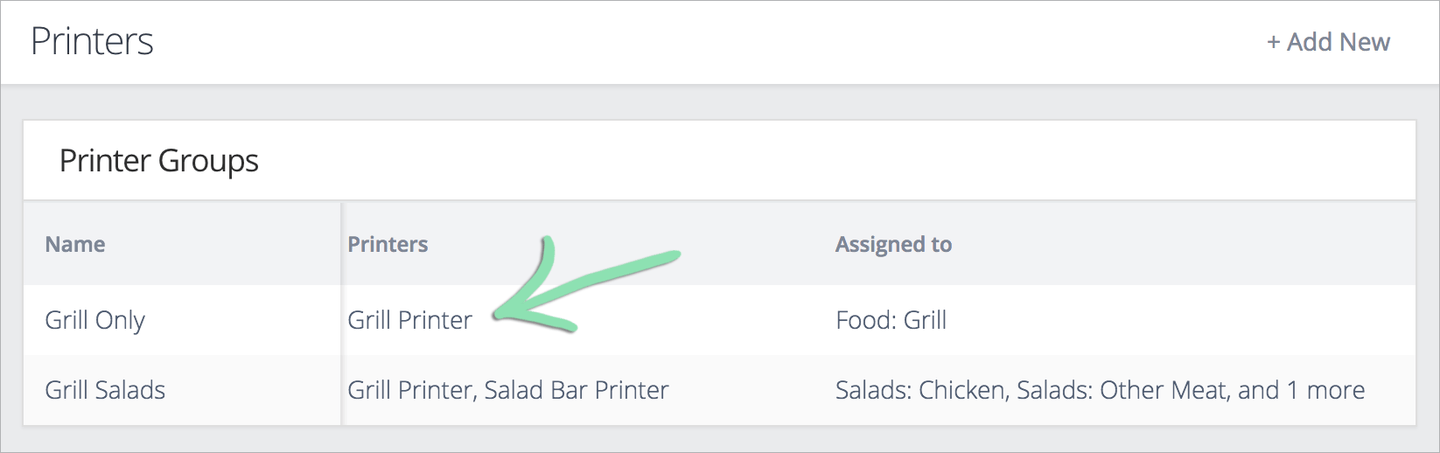
  2. In BackOffice, make sure Printer Groups are properly set up. Learn how to set up Printer Groups here.

    Printer Groups allow you to manage which items print to the ticket printer. Each Printer Group must have at least one department or category of items and one or more ticket printers assigned to it.

    Click to Enlarge
  3. Get updates on the iOS or Android register to sync printer group changes from BackOffice.

Tickets print for some items, but not for others.

If some items do not print and there are no error messages, it means those items are not set up for ticket printing. Follow the steps below to check an item’s department and category and assign it to a printer group.

  1. In BackOffice, click ‘Items’ and select ‘Item List’.
    Click to Enlarge

  2. Search for and select an item that is not printing to the ticket printer.
    Click to Enlarge
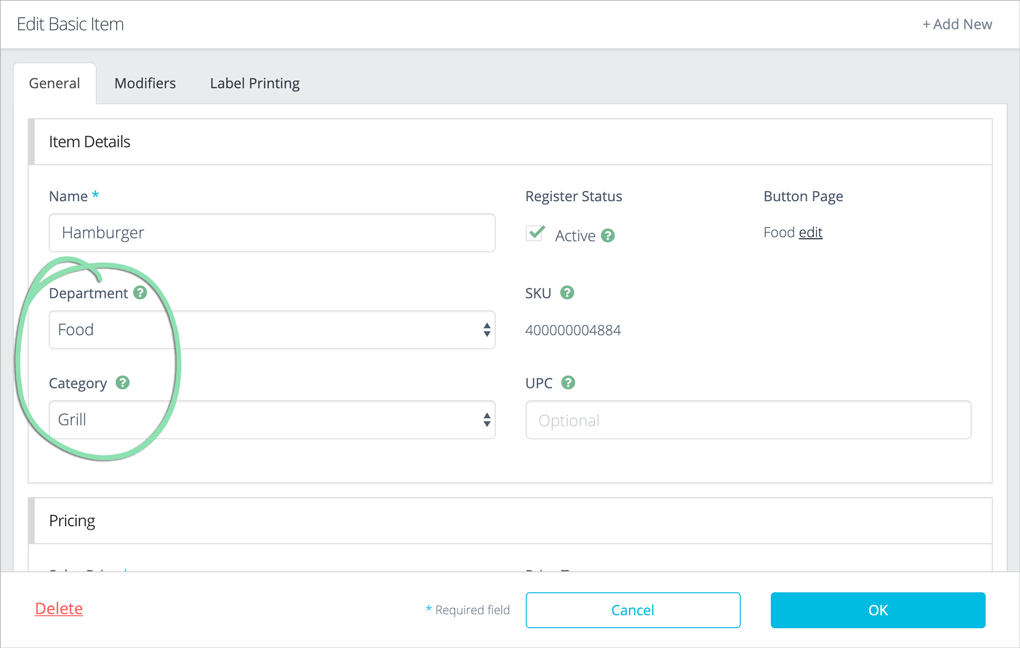
  3. Make note of the item’s department and category.
    Click to Enlarge
  4. Click ‘Settings’ and select ‘Printers’.
    Click to Enlarge
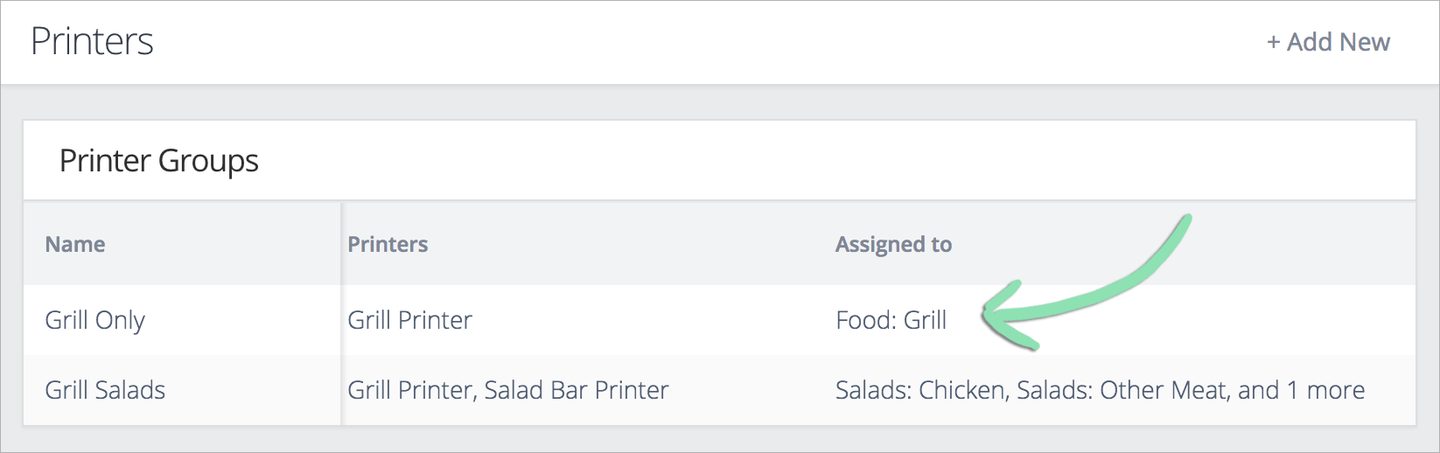
  5. Check if the item’s department or category is assigned to a printer group.

    If it is not, click to edit a group and assign the department or category. Don’t want to assign the entire department or category? Visit our setup article to learn how to assign individual items.

    Click to Enlarge
  6. Check that the item’s printer group has the correct printer assigned.

    If it does not, click to edit the printer group and assign a printer.

    Click to Enlarge
  7. Get updates on the iOS or Android register to sync printer group changes from BackOffice.

When multiple orders are sent to a printer, tickets print for only one order.

Because tickets do not queue, sending more than one order to a printer at the same time will always result in some tickets not printing.

  1. If an order is saved as a saved sale, reprint the ticket.
  2. To avoid this issue in the future, do not simultaneously save or tender multiple sales with items for the same ticket printer.