This feature is only available for Lightspeed Retail merchants on select pricing packages.
Lightspeed eCom (E): Advanced Topics
After your Lightspeed eCom (E) Integration is set up, learn how to manage, market, and grow your online webstore. Organize products into categories, control where you ship orders, offer discount coupons, set up your store on an existing domain or WordPress site, customize emailed order notifications, advertise and sell products on sites like Facebook and Amazon, and offer webstore gift cards to online customers.
Table of Contents
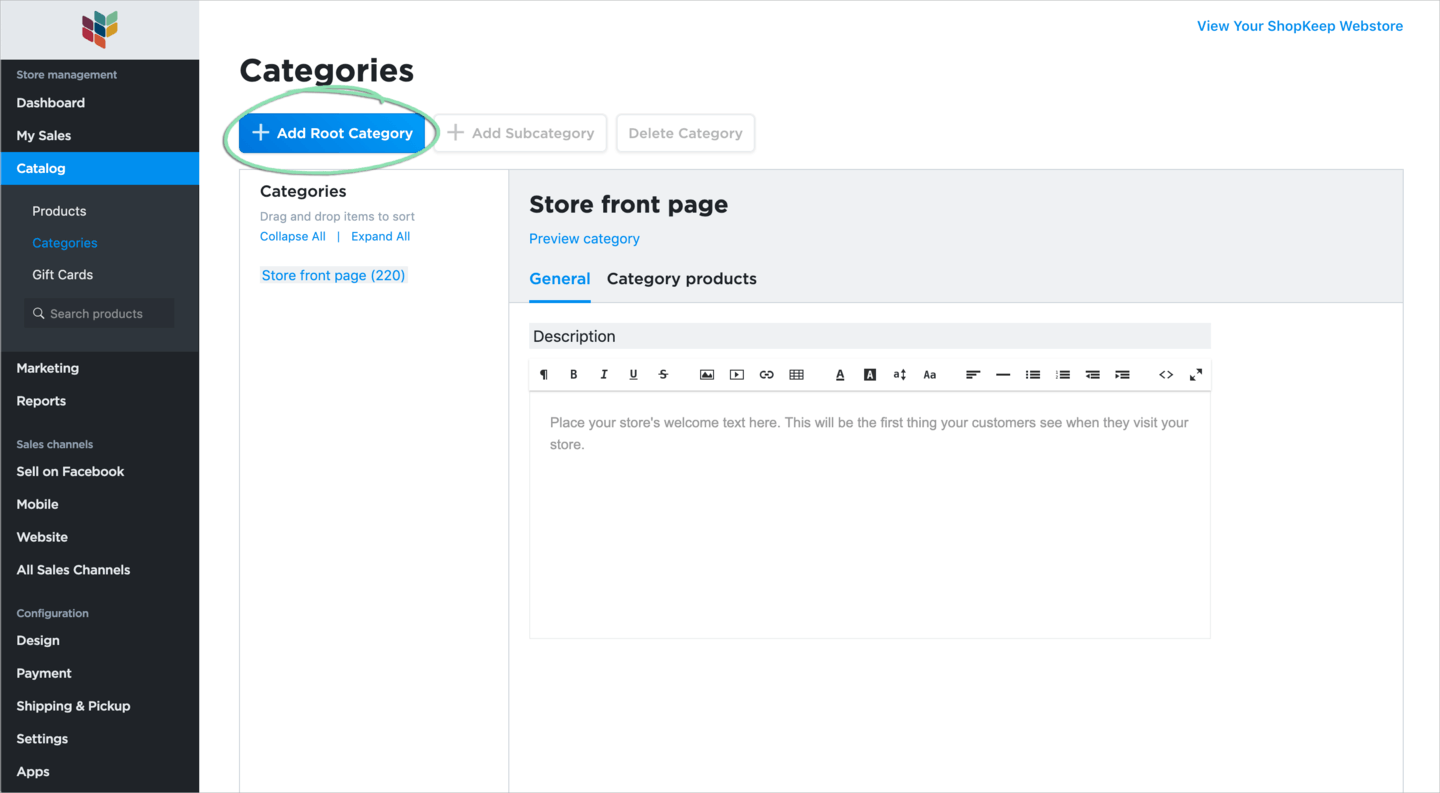
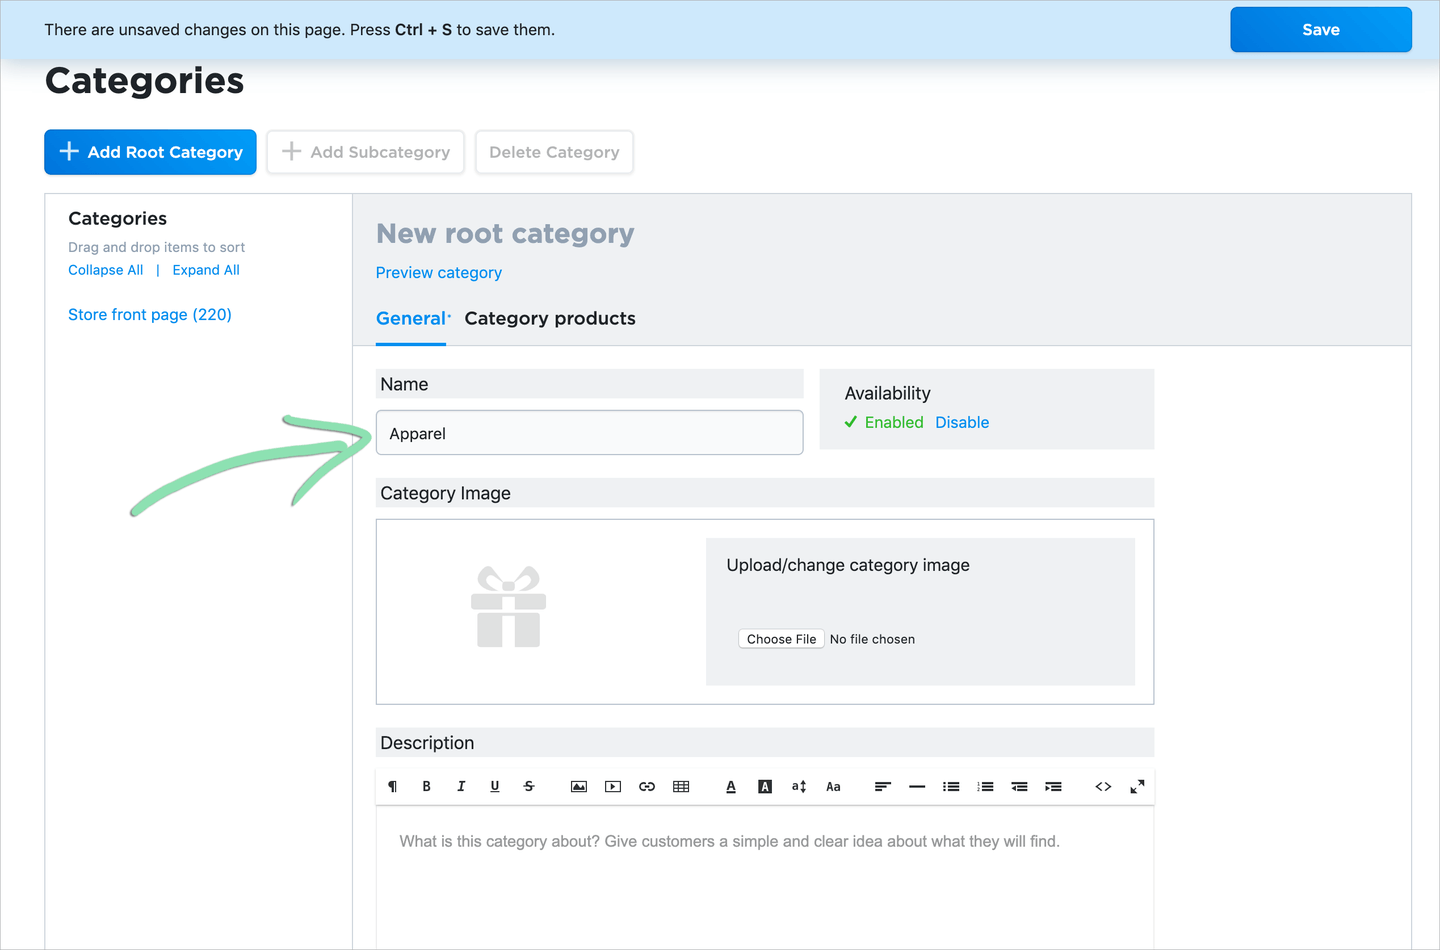
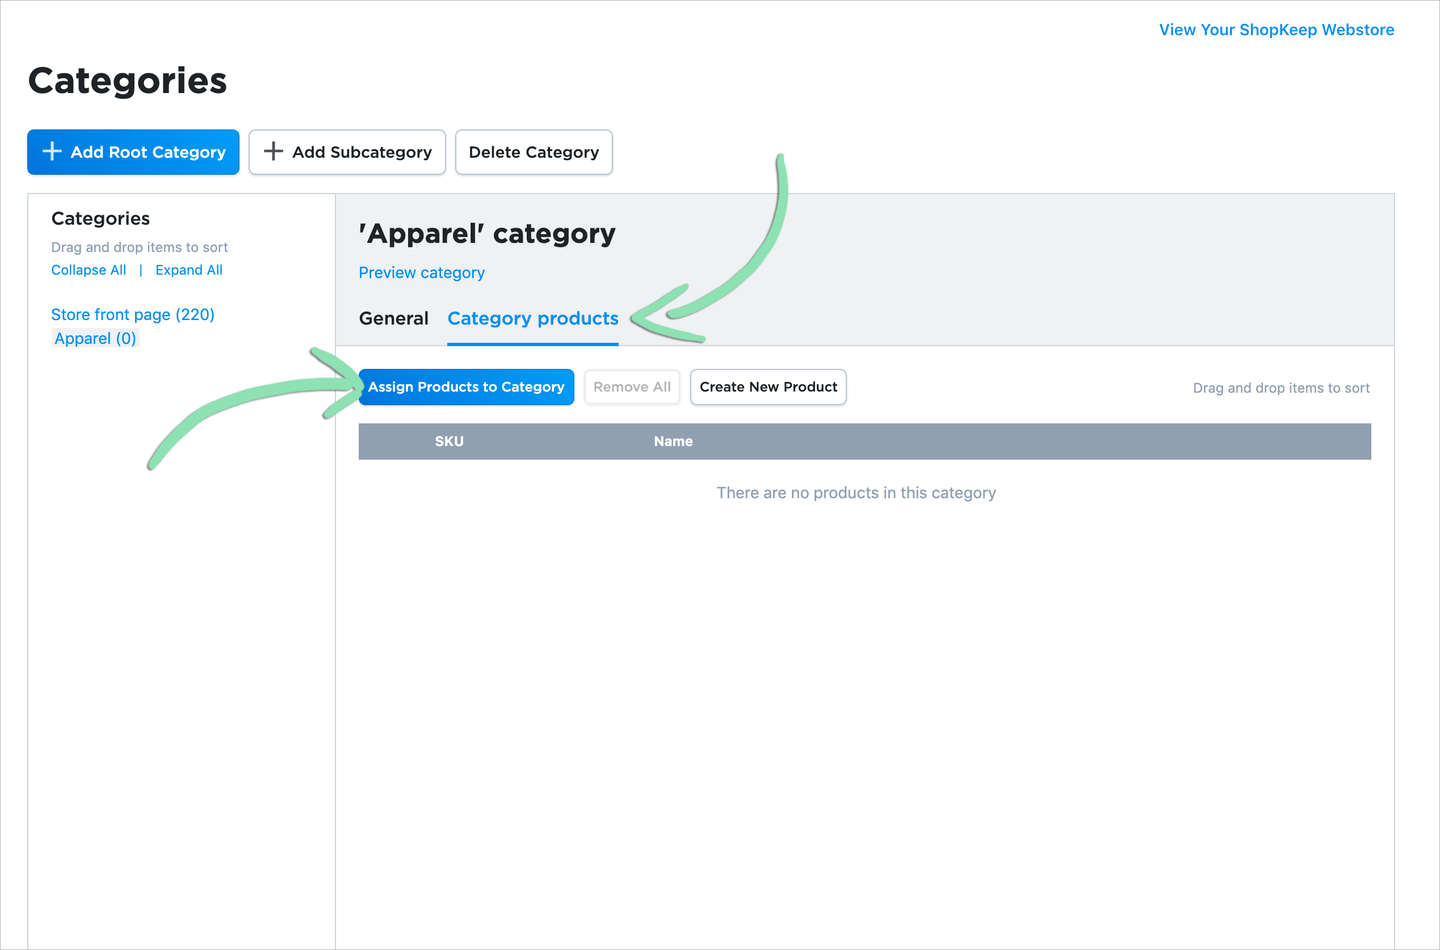
Product Categories
Assign products to categories in Lightspeed eCom (E) to help customers navigate the online store. Customers can click a category to view the products contained in it, allowing them to quickly find what they are looking for.
Not sure what type of categories to set up? Visit the Departments and Categories page in BackOffice to use your BackOffice department and category assignments as a guide.
Learn how to create subcategories, change the order in which categories appear, and learn about other ways to manage categories here.
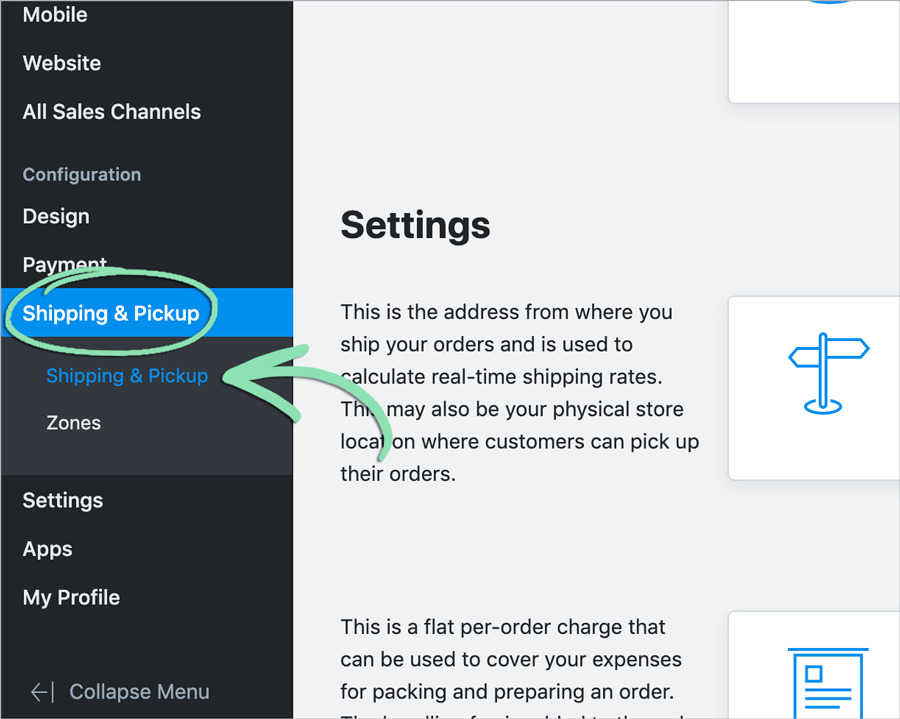
Manage Shipping Regions
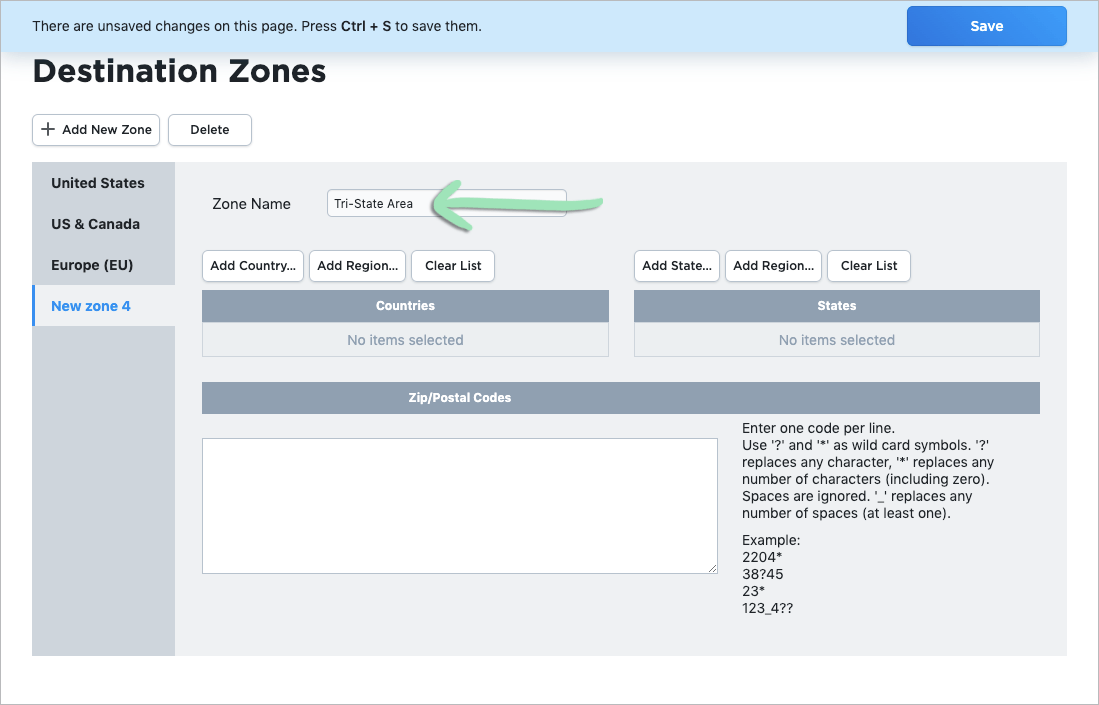
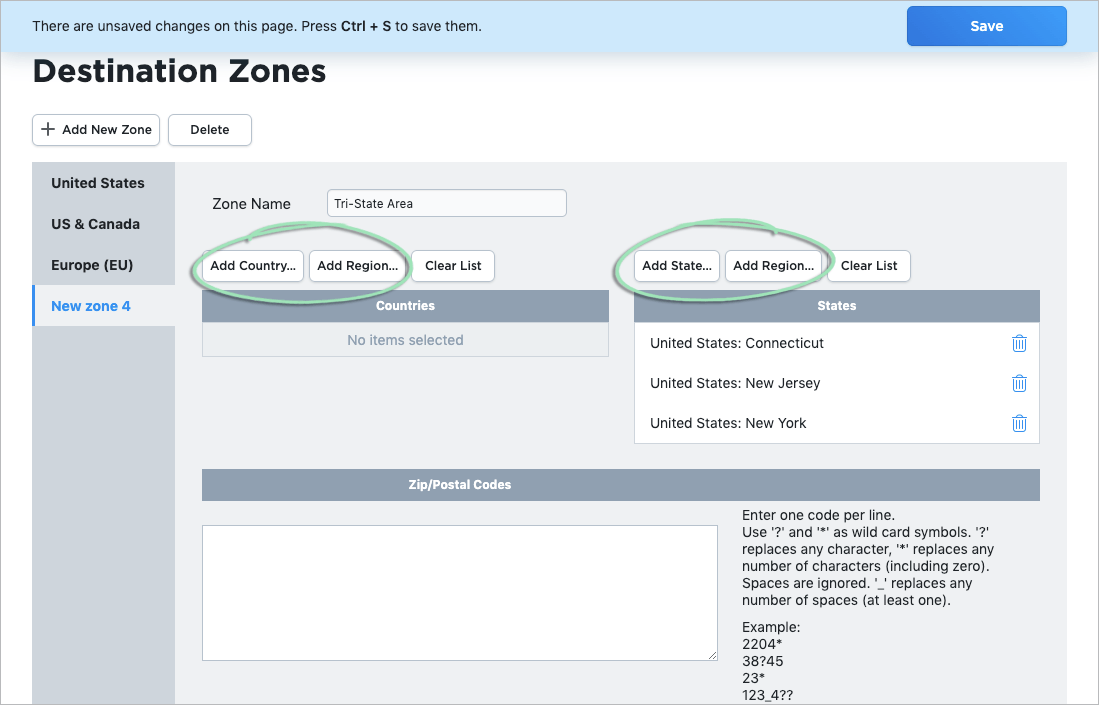
Set up a destination zone to restrict the regions to which the business will ship or deliver orders and control which shipping methods apply to each region.
If you ship to all 50 US states or to all of the US and Canada, skip steps 1 – 5 as these destination zones are set up by default for all online stores.
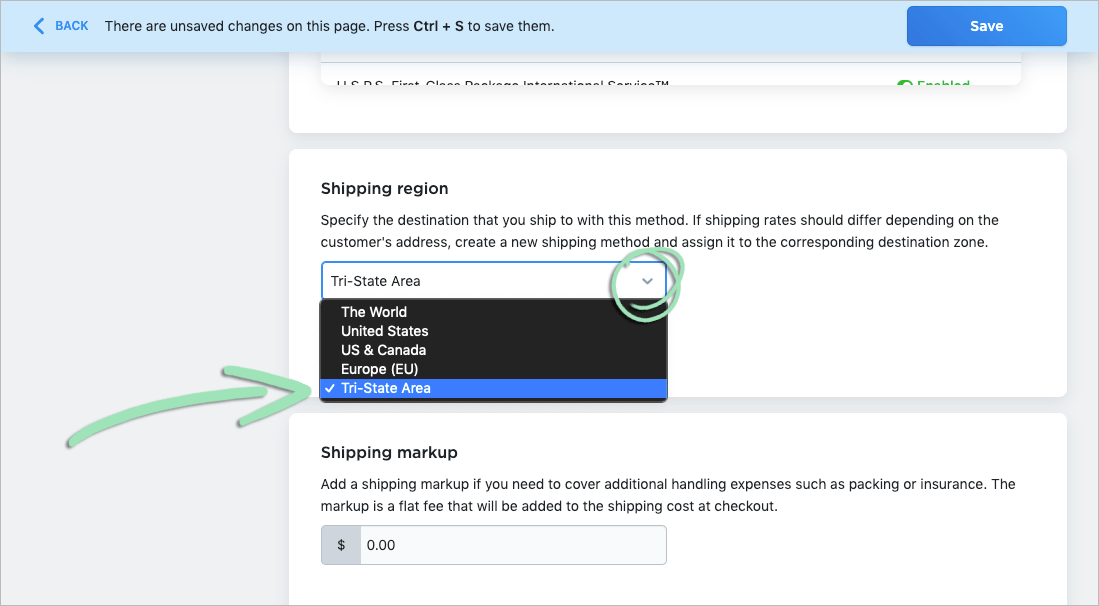
From the 'Shipping Region' drop-down, select the destination zone you are able to ship or deliver to for the selected shipping method.
Click to Enlarge
Click 'Save'.
(Optional) Repeat steps 1 - 9 as needed to restrict shipping regions for other shipping methods.
Need additional help? Learn more about managing destination zones and shipping methods here.
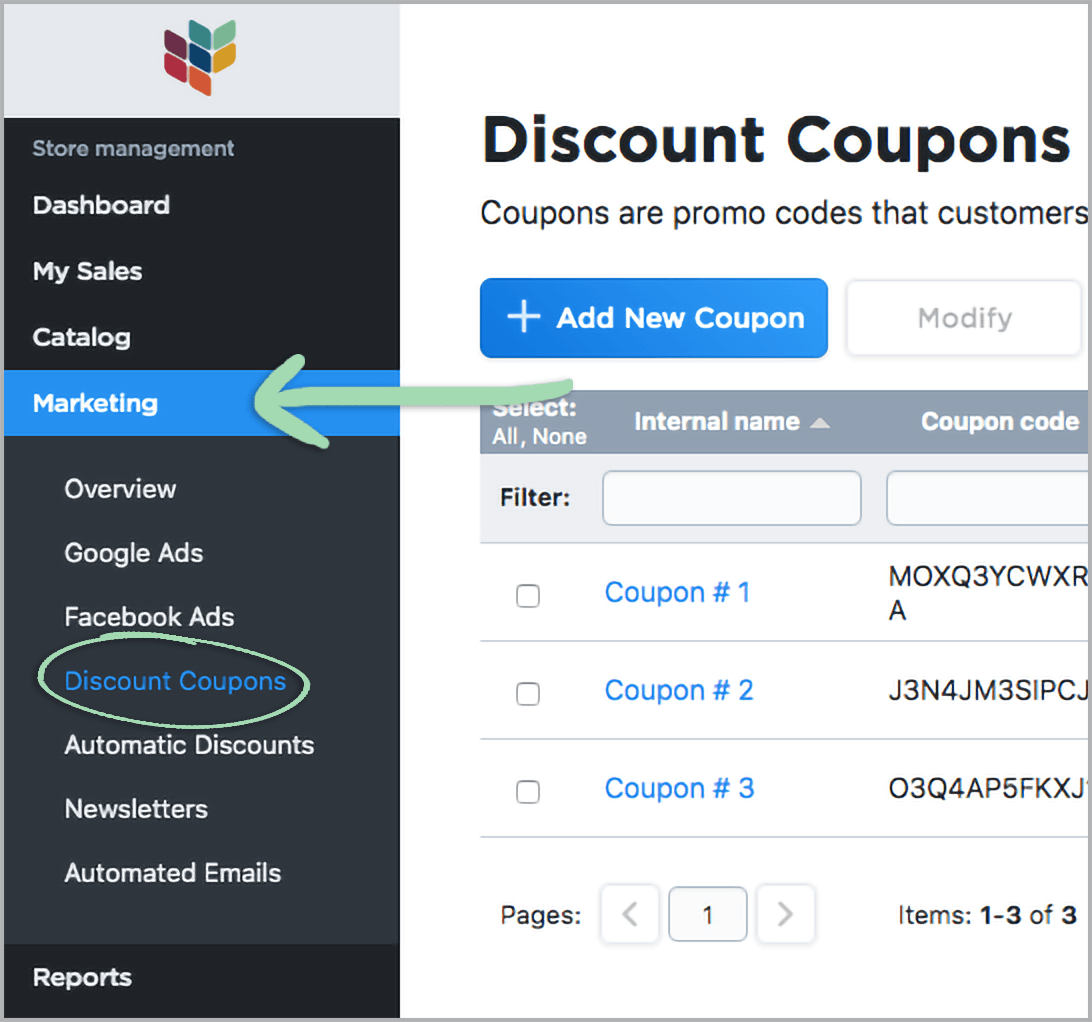
Online Discount Coupons
Increase sales and build customer loyalty by offering Discount Coupons in Lightspeed eCom (E) for your online store. Customers can enter a coupon code at checkout to get a discount on their purchase. Learn how to add Discount Coupons to your store below.
Lightspeed eCom (E) Discount Coupons are online-only and cannot be redeemed in person using the Retail POS (S-Series) app.
This feature requires an upgraded Lightspeed eCom (E) plan. For information on upgrading, visit our Lightspeed eCom (E) setup article.
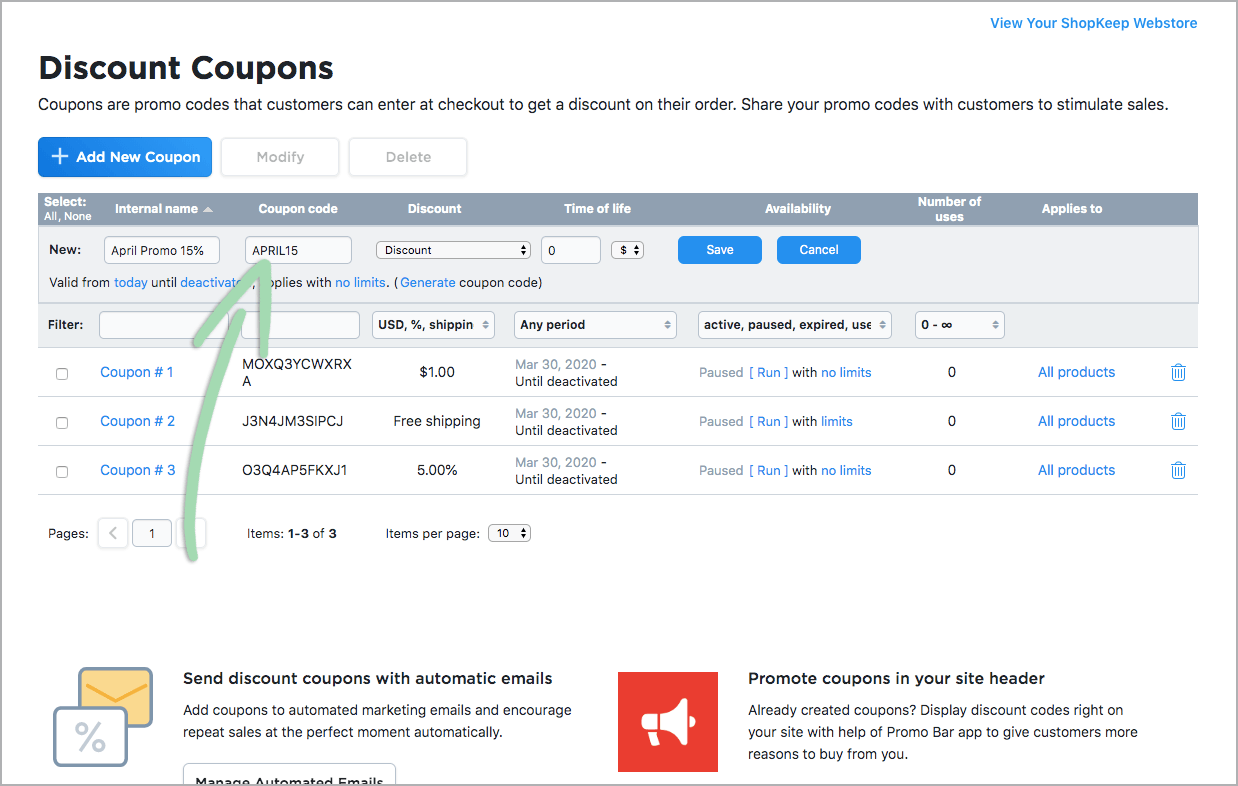
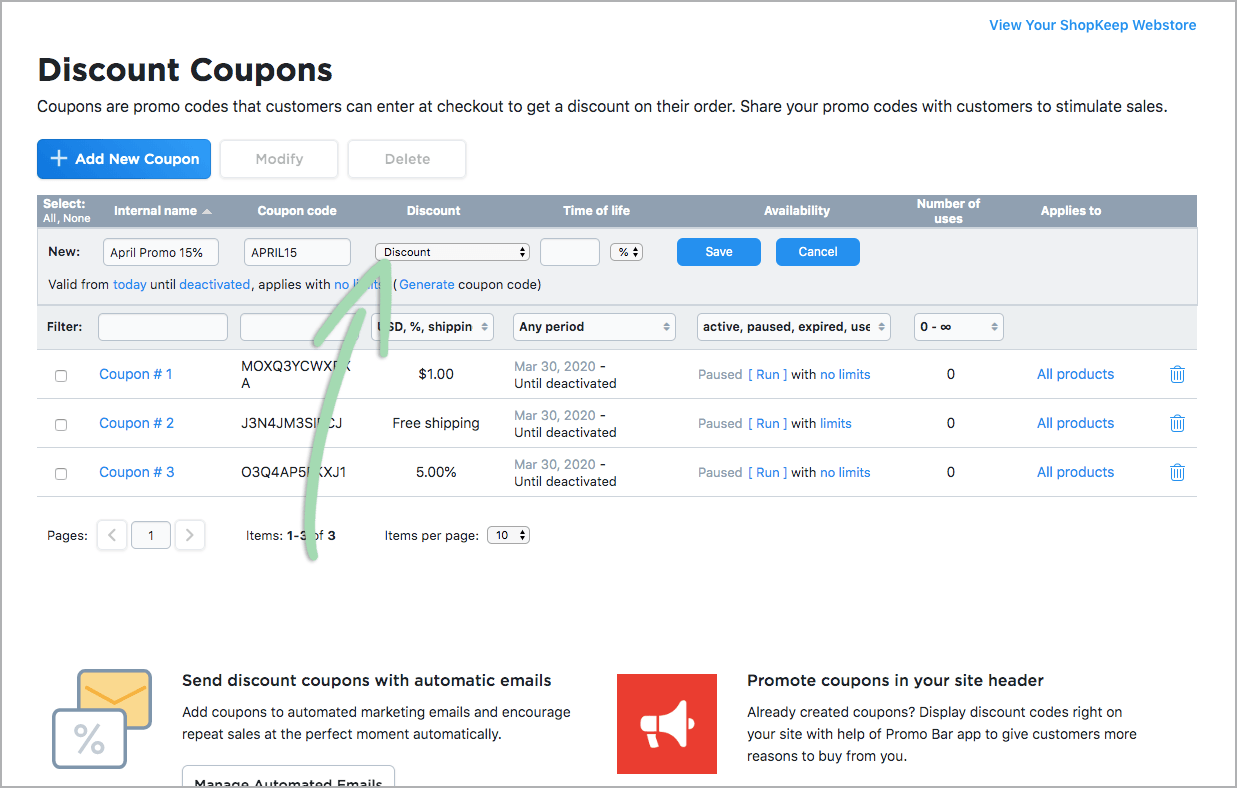
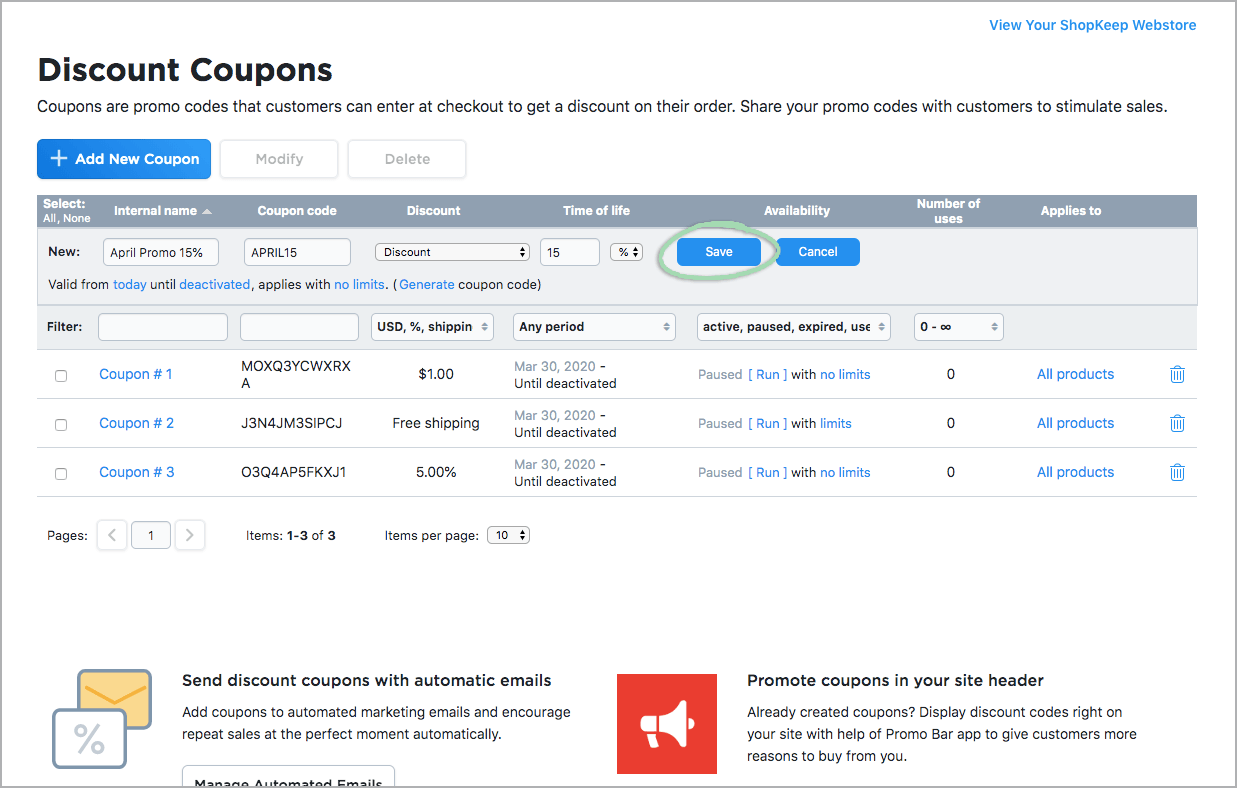
Click the dropdown menu and select a discount option.
Click to Enlarge
Discount | A fixed value (e.g. $10 off) or percentage (e.g. 15% off) discount. Free shipping | No additional charge for shipping. Free shipping + Discount | No additional charge for shipping, and either a fixed value or percentage discount.
From the dropdown menu, select ‘$’ for a fixed value discount or ‘%’ for a percentage discount, and enter a discount value.
If ‘Free shipping’ was selected in the previous step, skip this step as the dropdown will be disabled.
After creating a discount, learn how to add restrictions, modify and delete discounts, manage discount coupons, and more here.
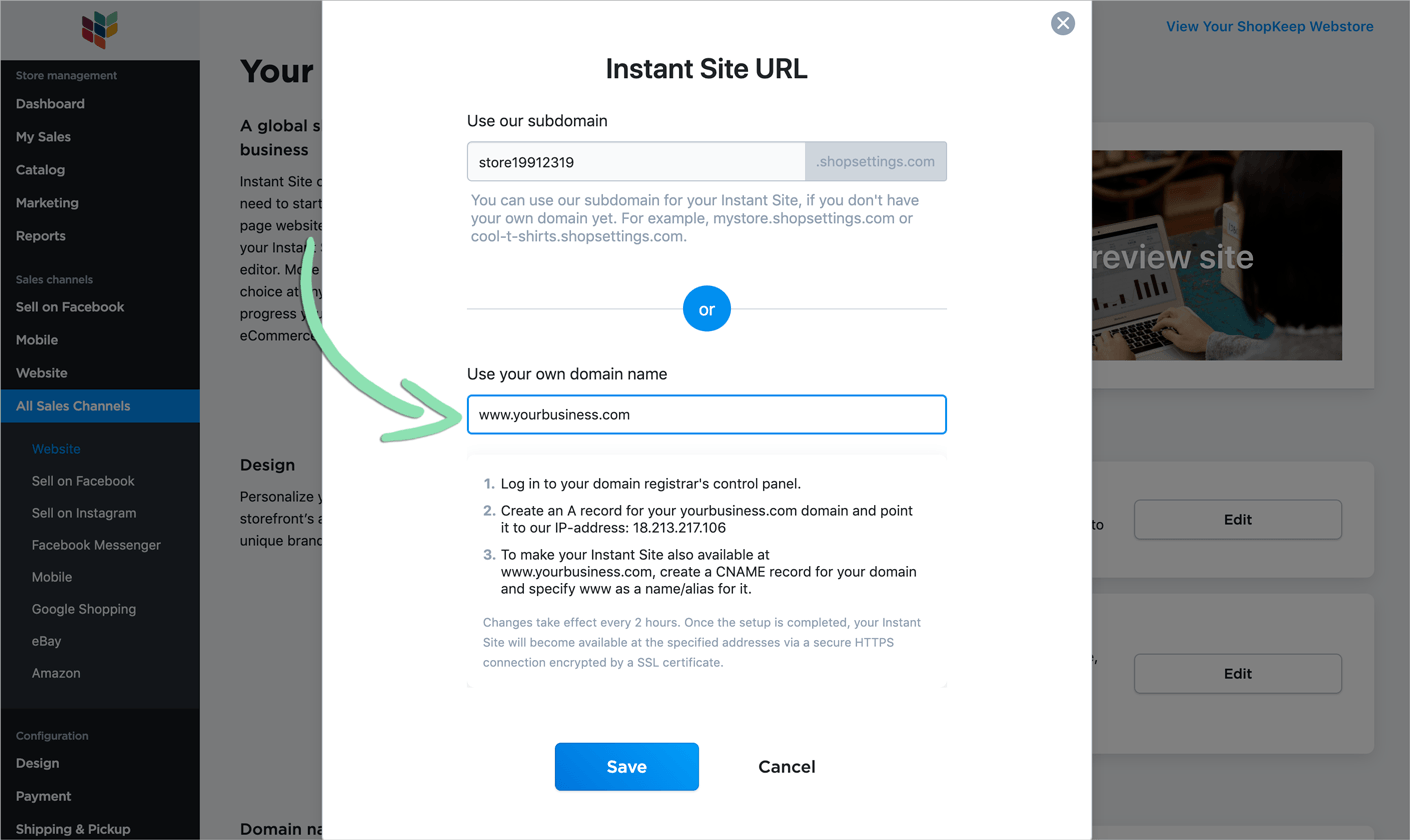
Use Your Own Domain
If you own a domain name, connect it to Lightspeed eCom (E) so customers can visit that domain or one of its subdomains to access your online store. Once setup is complete, your online store will be available to customers at the specified URL via a secure HTTPS connection encrypted by an SSL certificate.
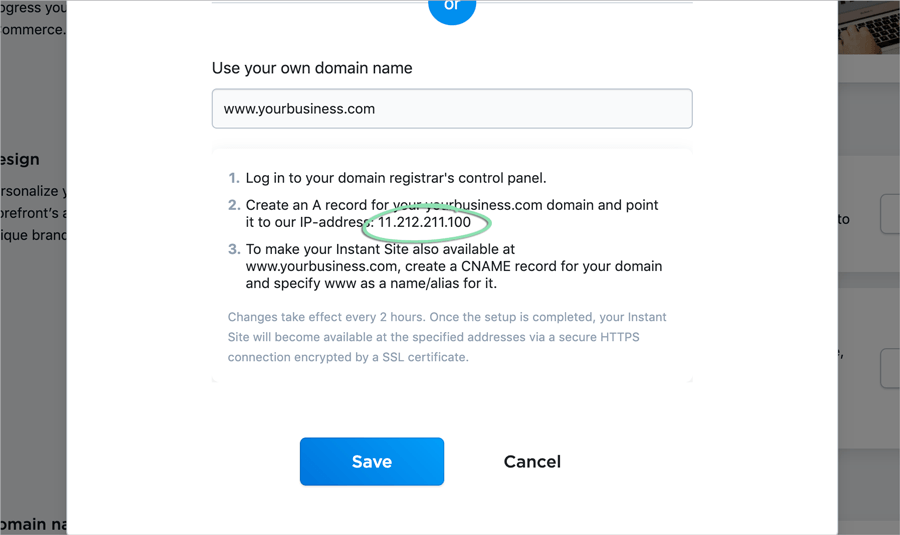
In the registrar's control panel, create an A record for the domain or subdomain entered in step 3.
If using a domain (e.g. www.yourbusiness.com), create a CNAME record for your domain using 'www' as the name or alias.
For help for steps 7 and 8, contact your domain registrar for support.
Wait 2 hours for all changes to be applied.
Need additional help? Learn more about connecting a domain name or subdomain here.
WordPress Plugin
Businesses using WordPress for their website or blog can install a WordPress plugin to add their Lightspeed eCom (E) online store to the WordPress platform.
Click here to download the online store WordPress plugin.
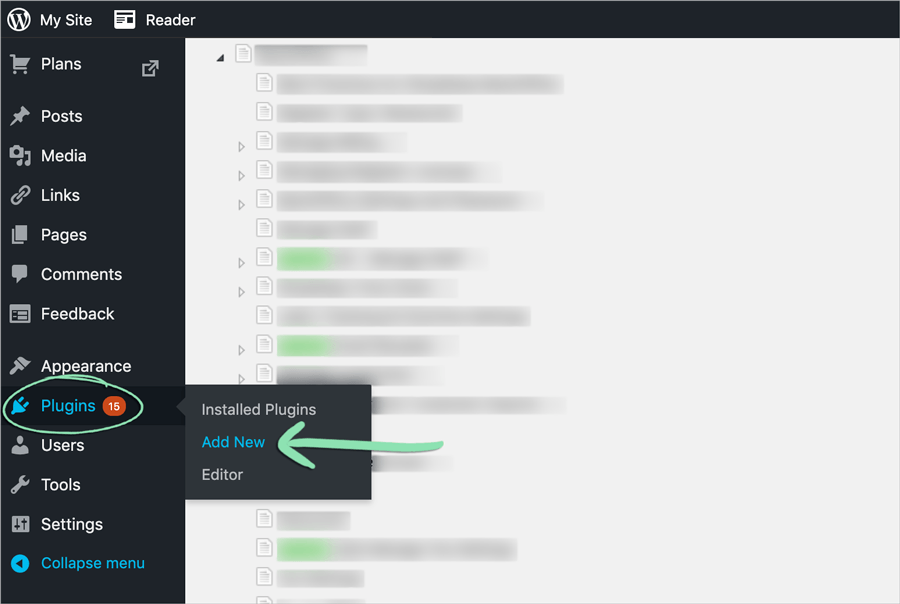
From the WordPress Admin page, click 'Plugins' and select 'Add New'.
Click to Enlarge
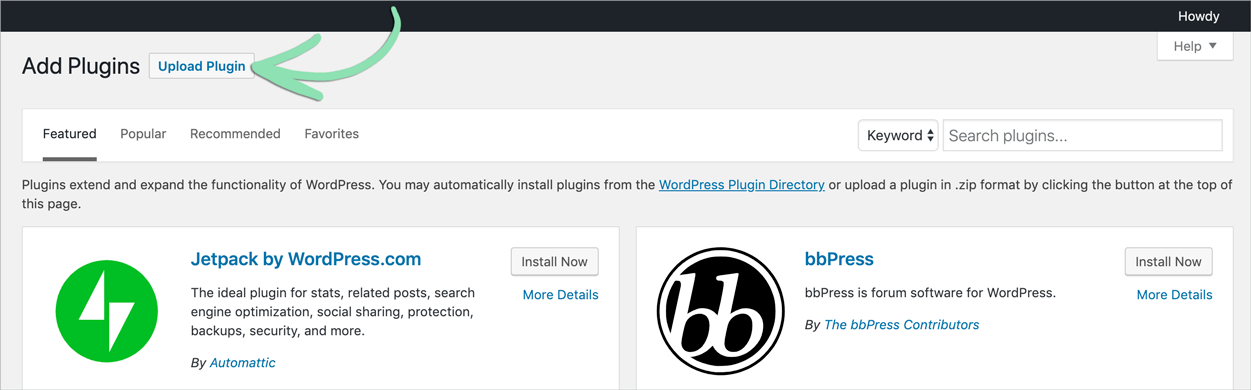
Click 'Browse' and select the .ZIP file downloaded in step 1.
Click to Enlarge
Click 'Install Plugin'.
After the plugin is installed, click 'Activate Plugin'.
On the WordPress side menu, click 'Online Store' and select 'Setup'.
Click 'Connect' and follow the prompts to assign your online store to WordPress.
A new ‘Store’ page will be added to WordPress, from which the online store can be accessed, after completing this step.
Learn how to add products to other WordPress pages and about other ways to manage the online store in WordPress here.
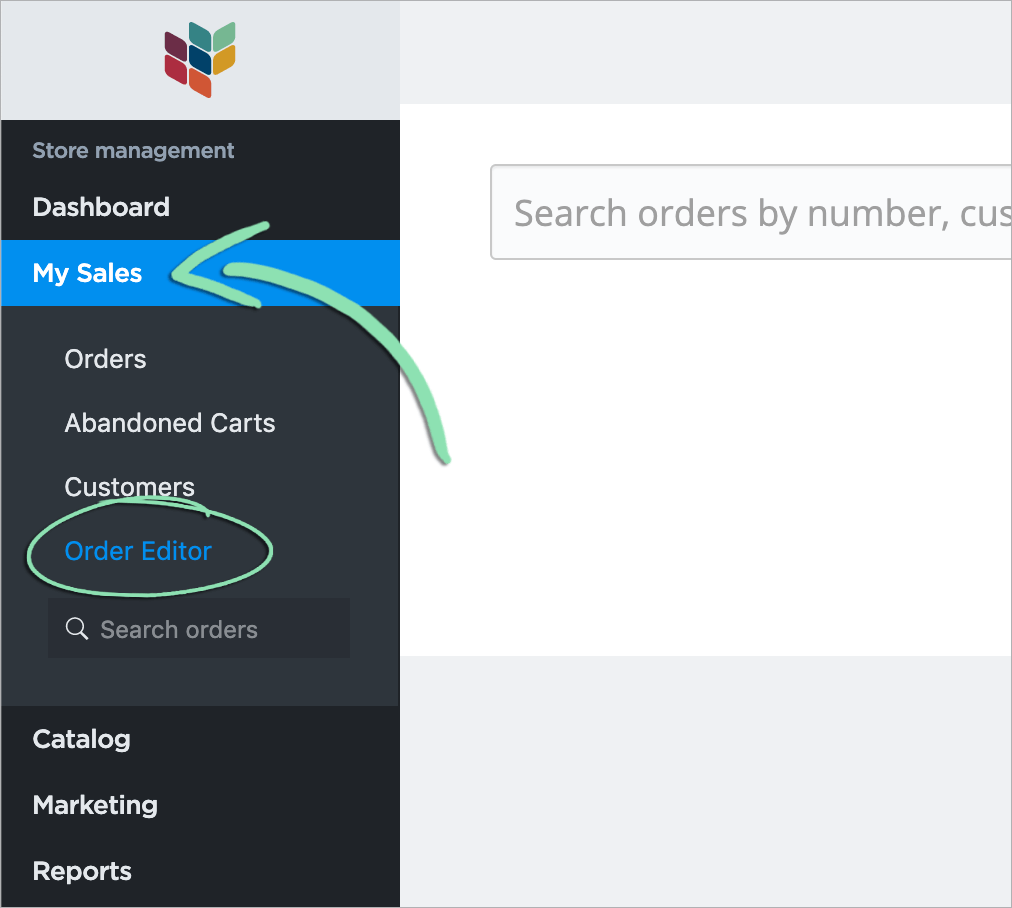
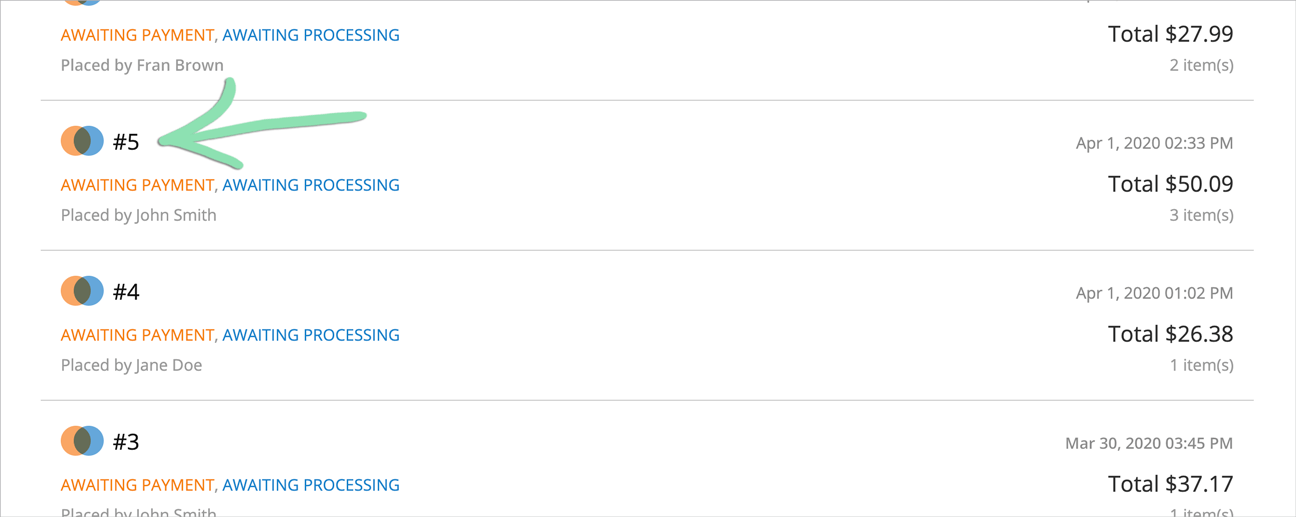
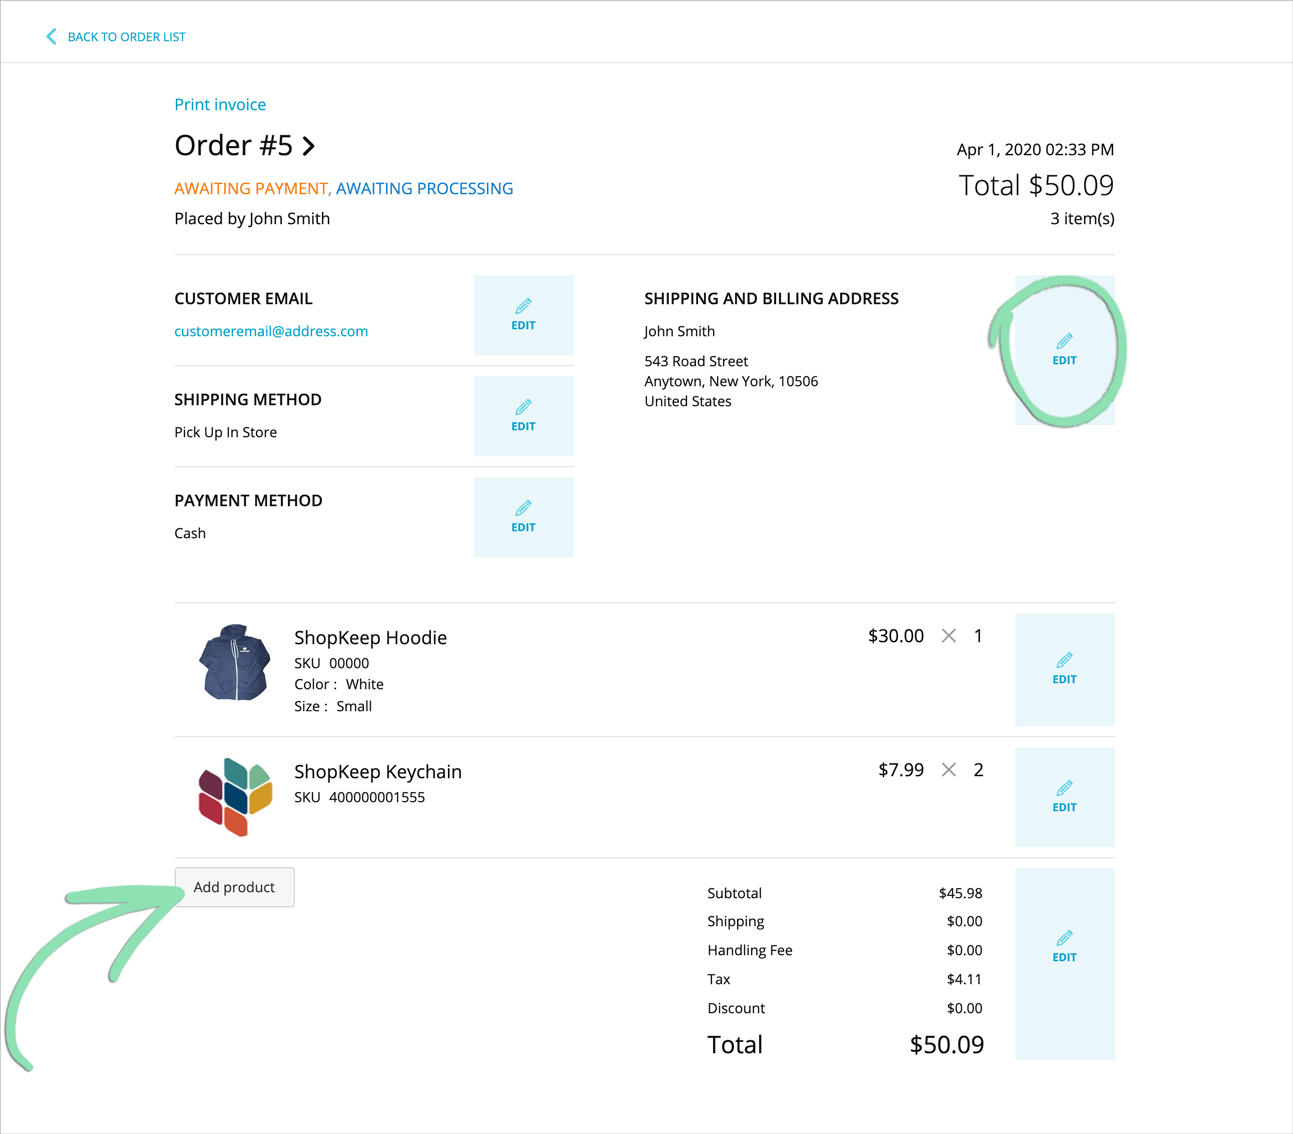
Edit Existing Orders
Edit a customer’s order to fix any mistakes they made when placing it. The customer’s email, address, shipping details, payment method, and order products can all be modified as needed.
Order edits made in the eCommerce Dashboard do not sync to the Retail POS (S-Series) app via the eCommerce online ordering feature. Order edits made after an order is marked ‘Paid’ in the eCommerce Dashboard do not appear in BackOffice or Lightspeed Pocket reporting.
This feature requires an upgraded Lightspeed eCom (E) plan. For information on upgrading, visit our Lightspeed eCom (E) setup article.
Click ‘Edit’ to edit a specific section or product or click ‘Add product’ to add new products to the order.
Click to Enlarge
Click ‘Save changes’ or ‘Add product’ to save changes made.
If the order total changes, charge or refund the customer the difference.
Refunds and additional charges must be manually processed outside of Lightspeed eCom (E).
If adding, removing, or changing the quantity of products, manually update the quantity of each item in BackOffice to reflect the correct amount left on hand after editing the order.
Editing products on an order will not automatically update the quantity on hand of those products in Lightspeed eCom (E) or BackOffice.
Learn more about editing orders, such as how to remove products, here.
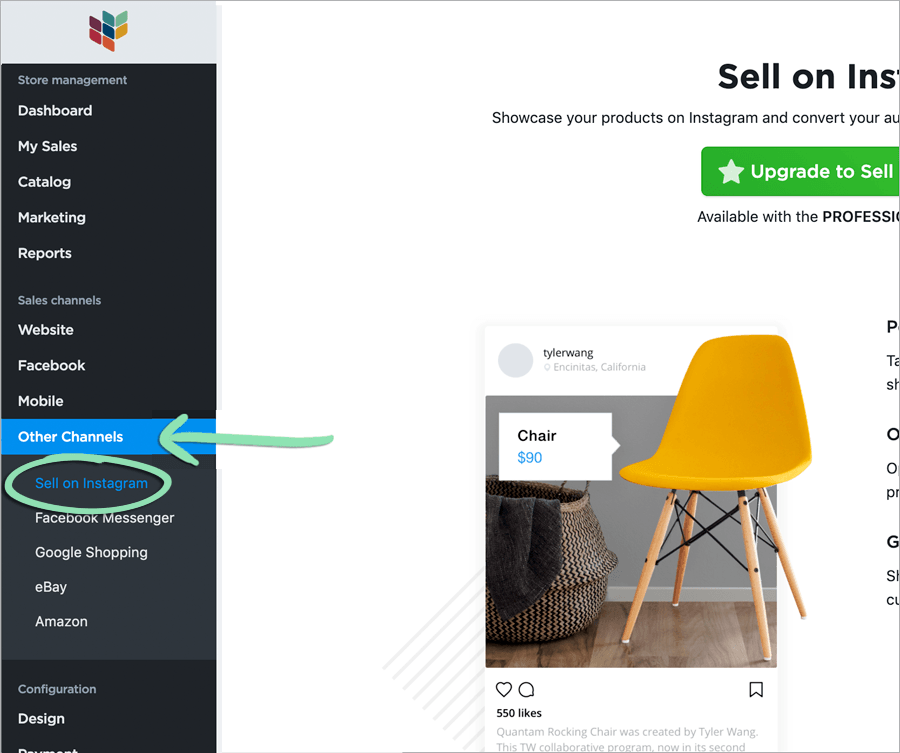
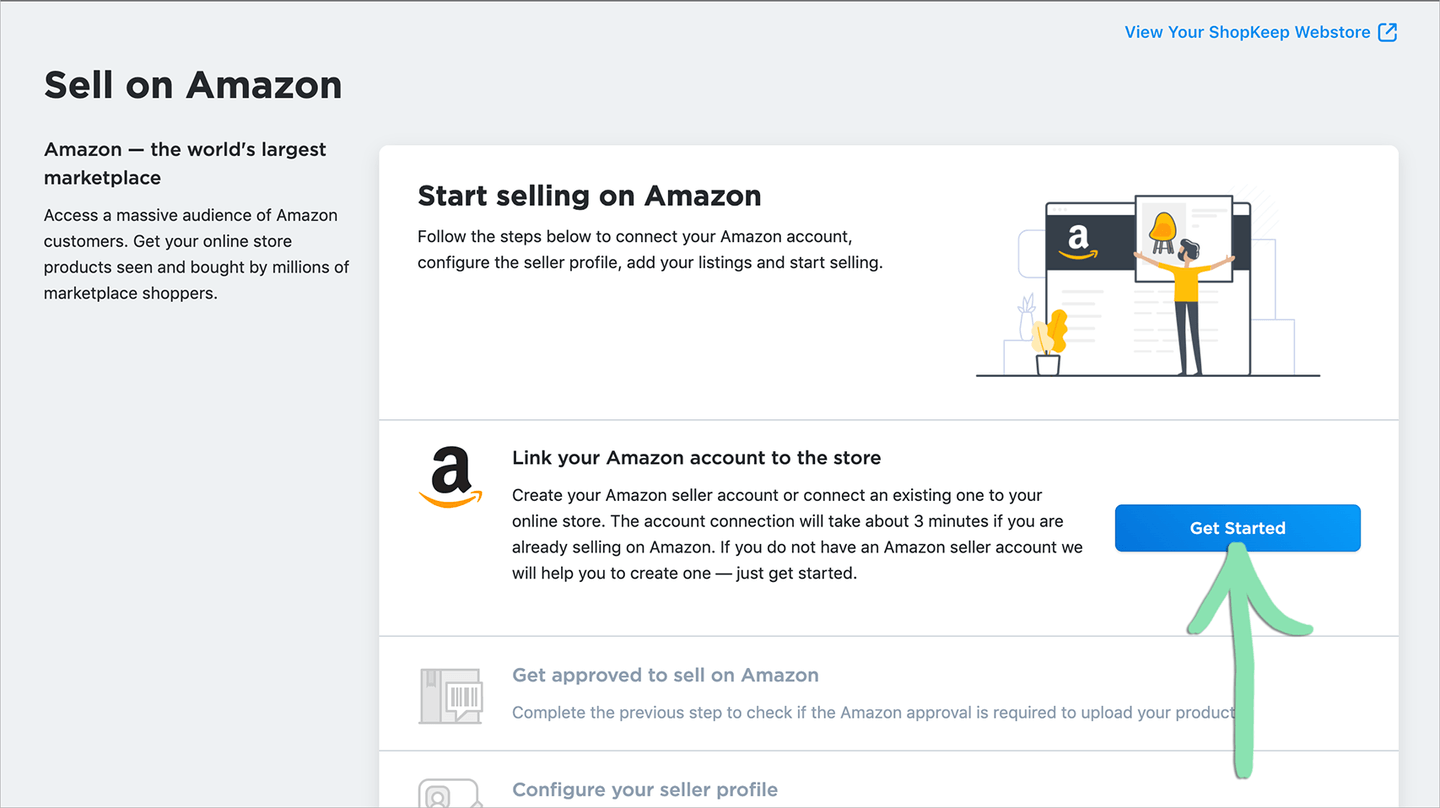
Sell on Facebook, Instagram, and Amazon
Sell the products in your online store on Facebook, Instagram, and/or Amazon to open up new sales channels and reach more customers.
This feature requires an upgraded Lightspeed eCom (E) plan. For information on upgrading, visit our Lightspeed eCom (E) setup article.
Facebook
To be able to sell products on Facebook, you must:
If you already have a ‘Shop’ section on the Facebook page for the business, connecting an online store will overwrite all existing products in that section.
Follow the prompts to set up a Google ad campaign.
Customize Email Notifications
Email notifications are fully customizable automatic emails that are sent to the Business Owner or customers to update on important events that happen in the store. Automatically send order confirmation notifications to customers, receive notifications when an order is placed or changed by a customer, when an item’s quantity is getting low, and more.
This feature requires an upgraded Lightspeed eCom (E) plan. For information on upgrading, visit our Lightspeed eCom (E) setup article.
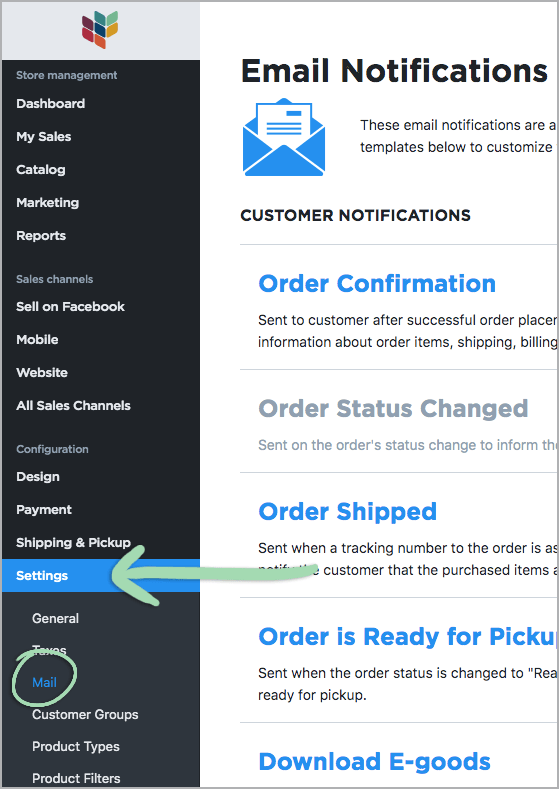
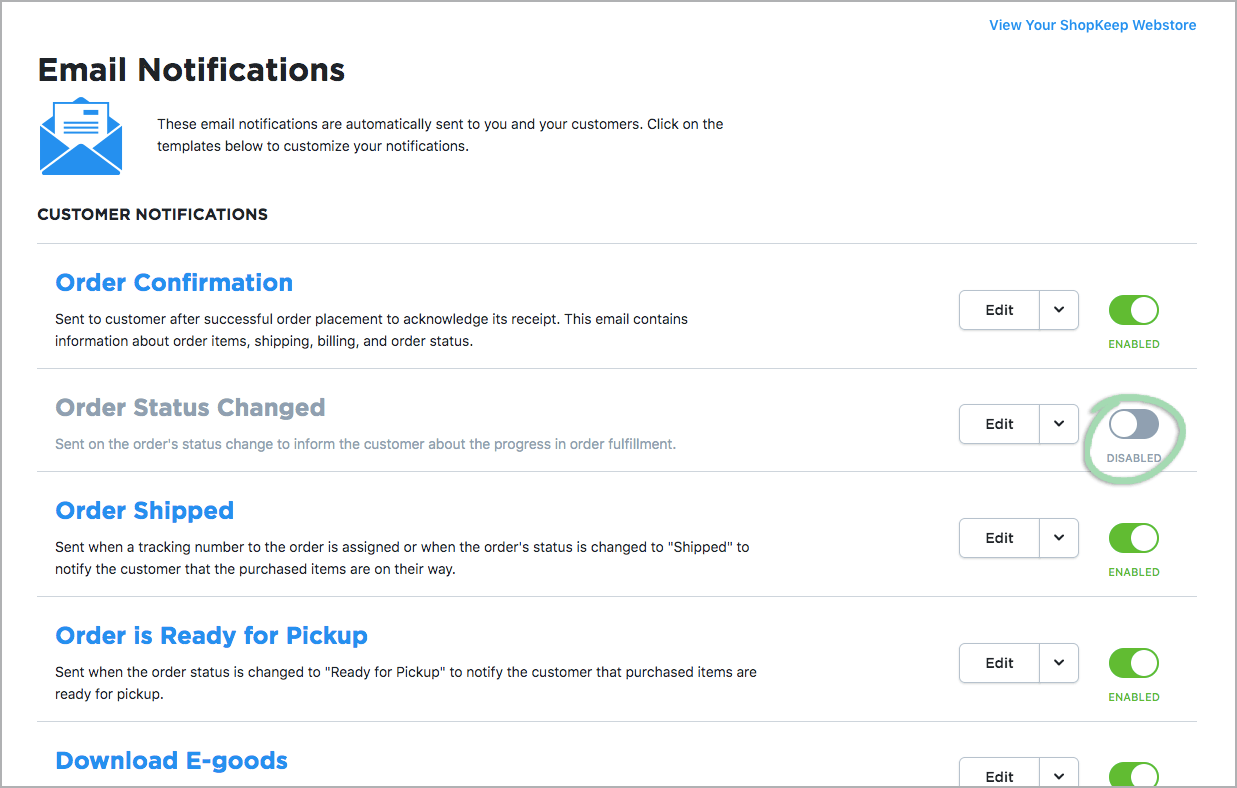
Customer & Admin Notifications
Customize the content of notification emails sent to the Business Owner or customers. By default, the Business Owner email address receives an email notification when an order is placed, and when stock is running low for an item.
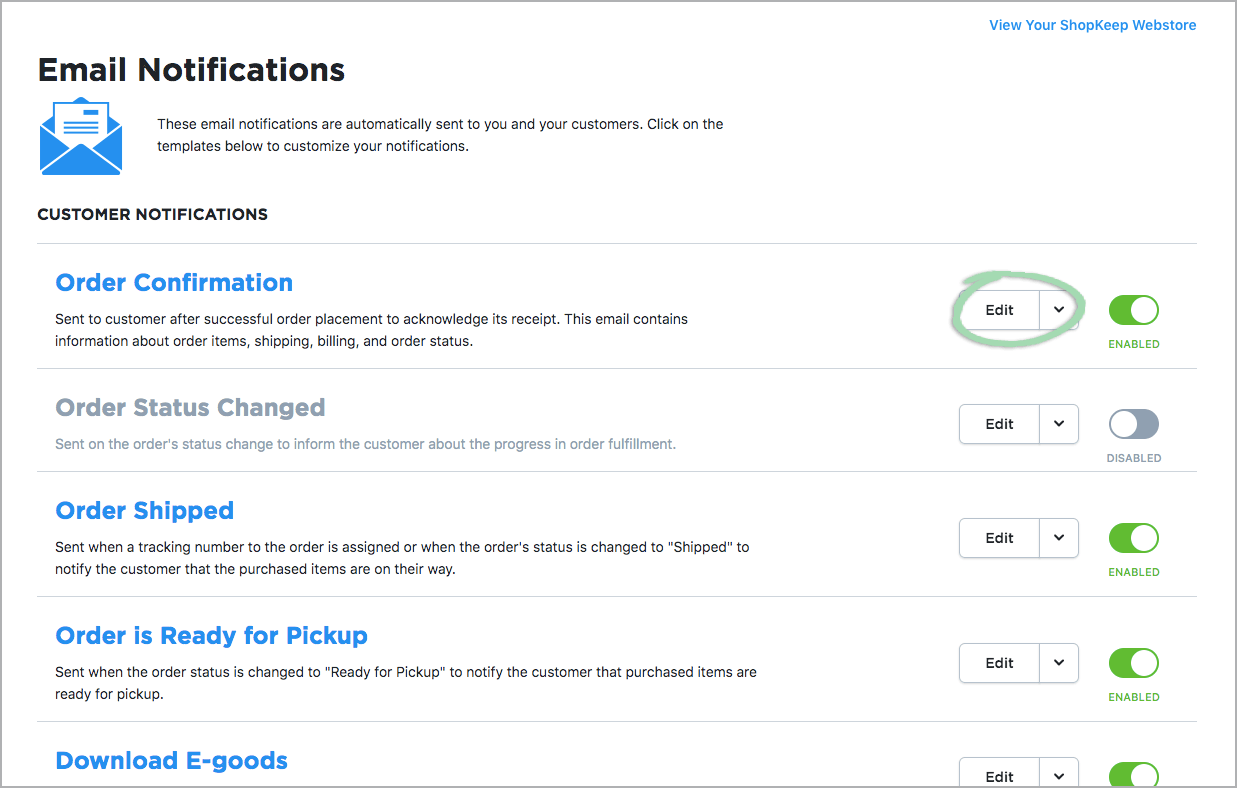
Click ‘Edit’ next to the email notification you want to customize.
Click to Enlarge
Read this detailed guide to learn more about editing the email notification templates and how to customize the email content.
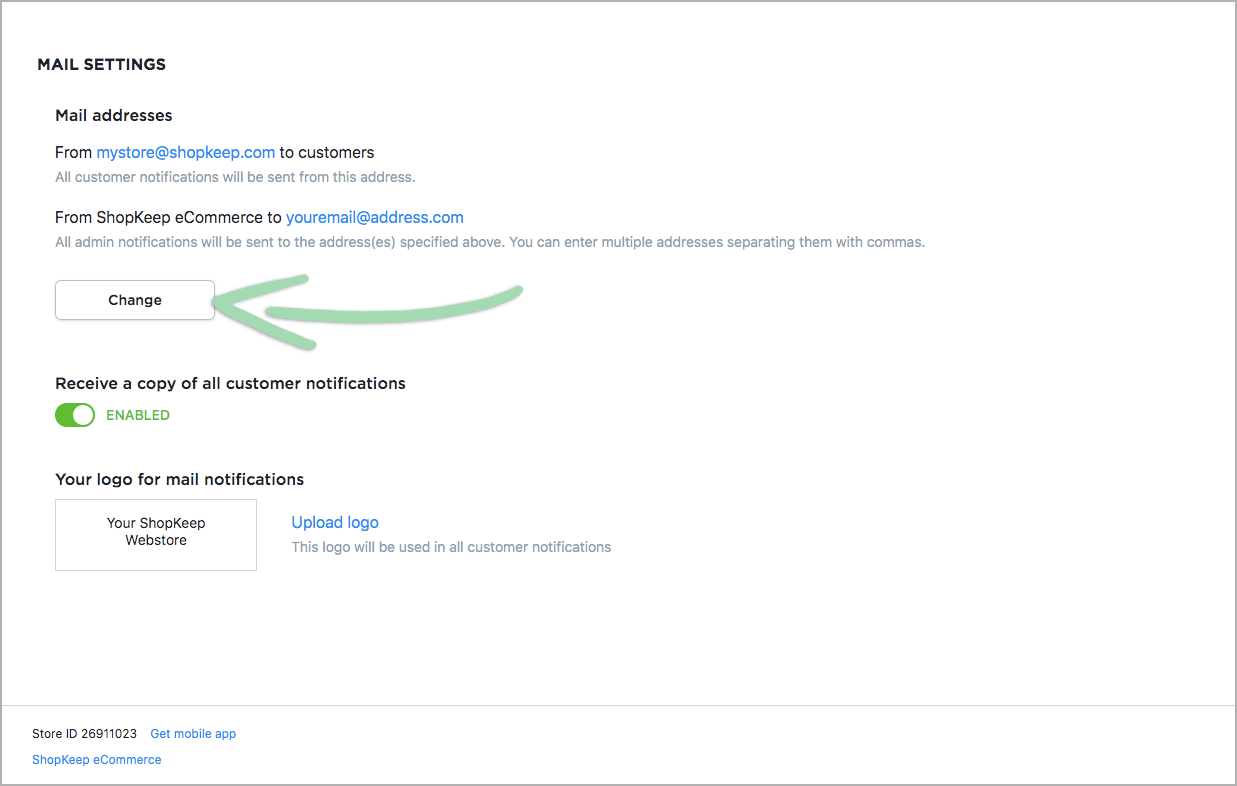
Mail Settings
Customize the email address customers receive email notifications from, the email address(es) that receives business owner email notifications, and add a logo to display on all customer notifications.
Scroll to the ‘Mail Settings’ section, then click ‘Change’.
Click to Enlarge
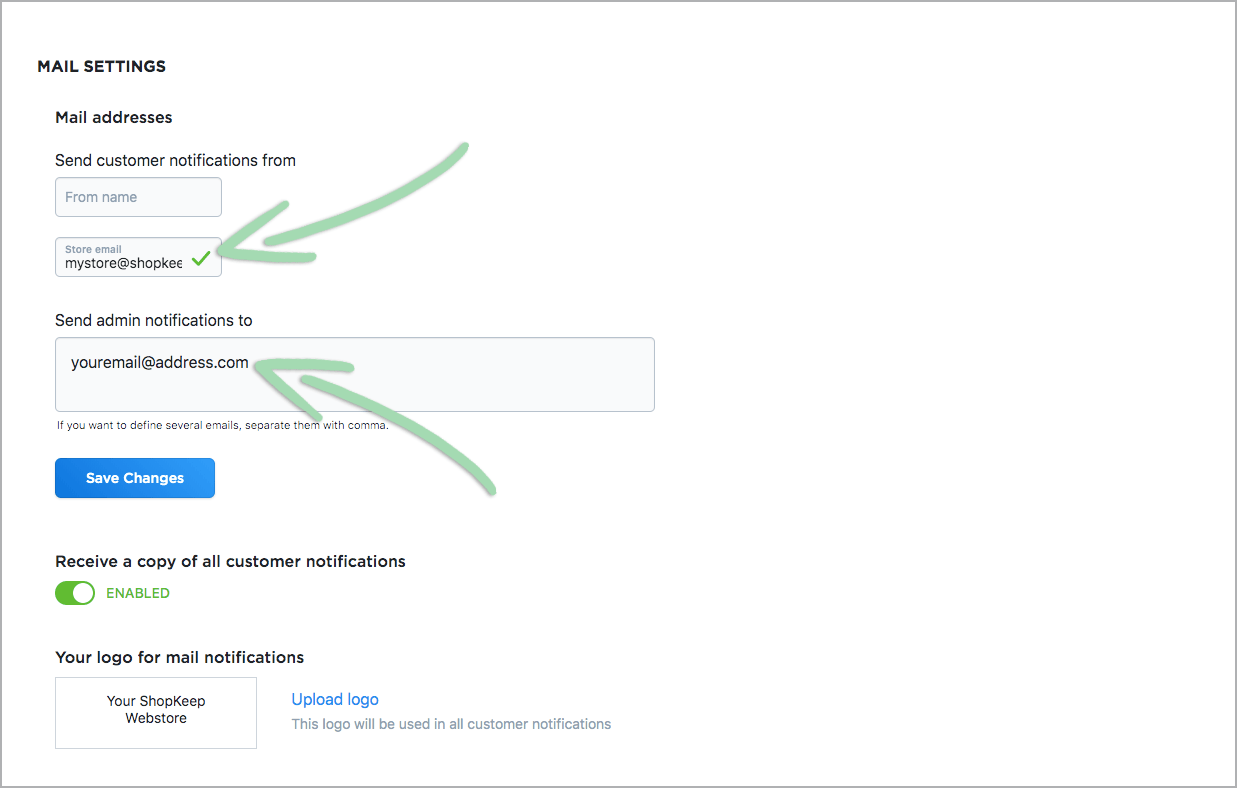
Edit the email address(es) you wish to change.
Edit ‘Store email’ to change the email address customers see on received email notifications. (Optional) As well as an email address, add a ‘From name’ to add a name to email notifications customers receive.
Edit the ‘Send admin notifications to’ email to change the email address(es) that will receive Business Owner email notifications. Receive email notifications to multiple email addresses by adding more, separated by a comma.
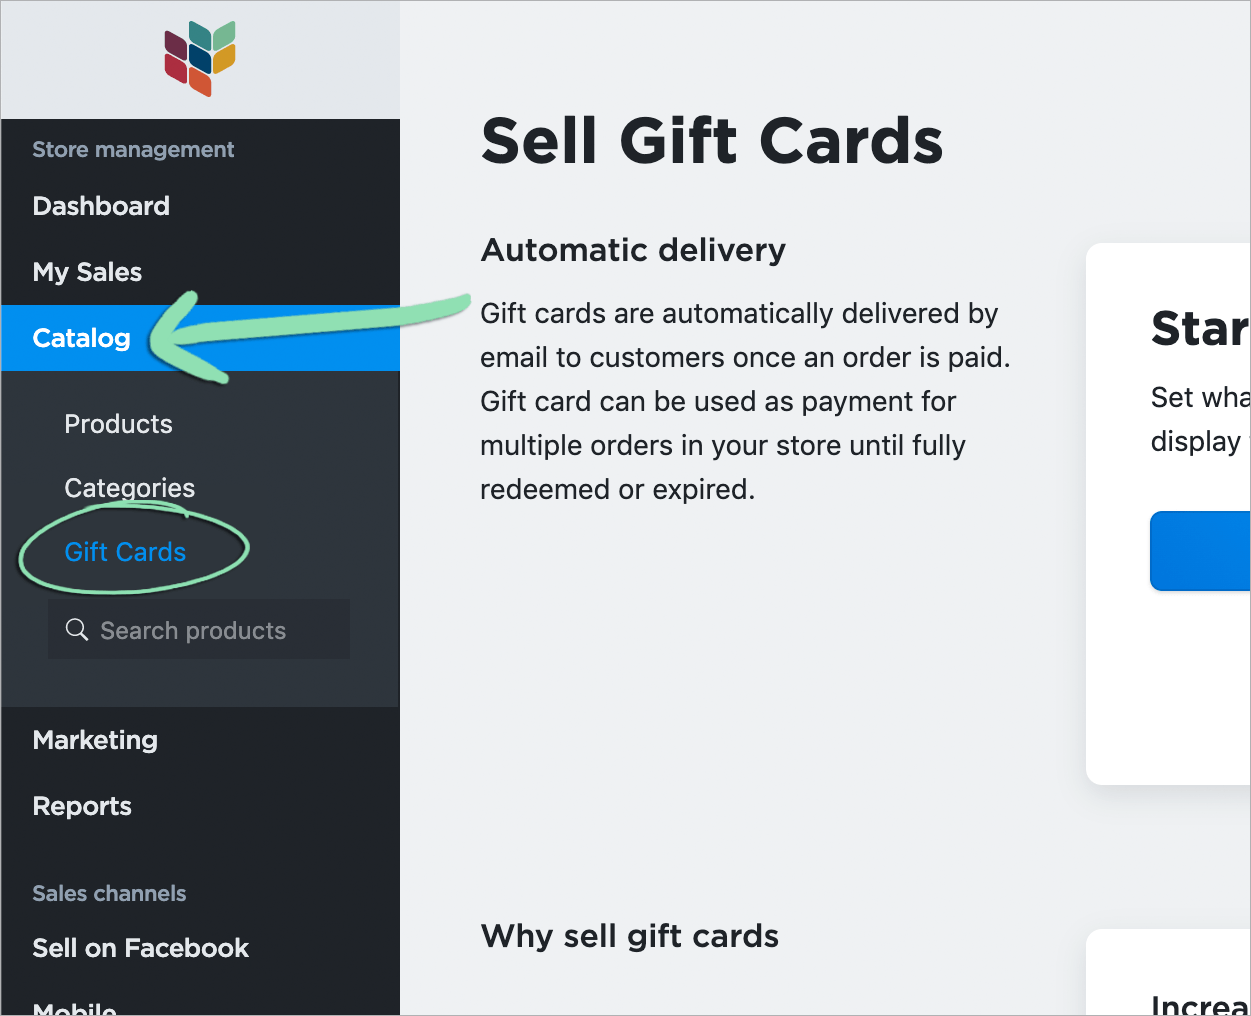
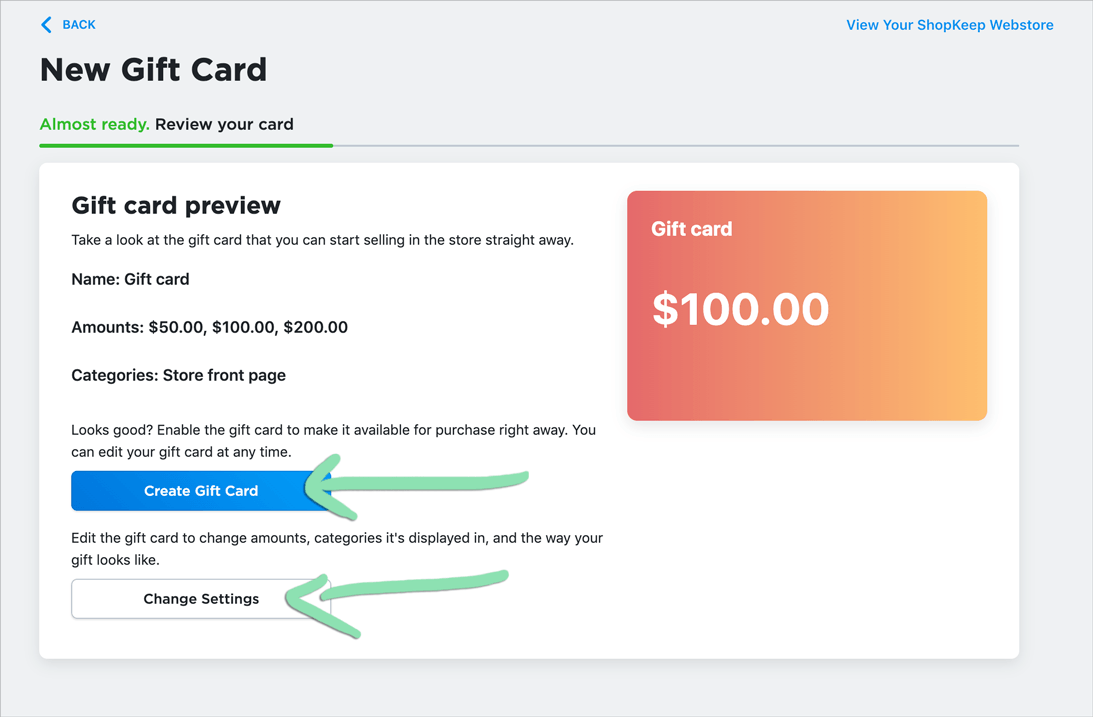
With Lightspeed eCom (E) gift cards, you can sell webstore-only gift cards in your online store that customers can redeem online for merchandise.
Lightspeed eCom (E) webstore gift cards are online-only and cannot be purchased or redeemed in person using the Retail POS (S-Series) app. Integrated Gift Cards are in-store only and cannot be purchased or redeemed online in your webstore.
To enable gift cards for sale immediately using the default settings listed, click ‘Create Gift Card’. To modify gift card values, descriptions, and settings before starting to sell gift cards, click ‘Change Settings’.
Click to Enlarge
Learn how customers purchase and redeem gift cards, how to manage sold gift cards, and read answers to frequently asked gift card questions here.
BackOffice and Pocket Reporting
Learn how Lightspeed eCom (E) orders appear in BackOffice and Lightspeed Pocket reporting and about the differences between how orders appear when eCommerce online ordering is enabled or disabled.
With eCommerce online orderingenabled, all orders processed at the register will appear in BackOffice and Lightspeed Pocket reporting.
Orders automatically appear in reporting after they are closed at the register.
Shipping, delivery, and pickup charges are reported as an item called ‘Custom amount’, discounts and discount coupons are reported as a discount called ‘Open Amount’, and taxes are reported as tax rates beginning with ‘Online’.
Tips and gratuity for orders paid online by credit card are added to the ‘Non-Cash Gratuity’ total available on select BackOffice reports and in Lightspeed Pocket. For orders not paid online by credit card (e.g. cash orders), tips do not appear in Lightspeed Retail reporting but can be viewed from the eCommerce Dashboard ‘Orders’ page.
The ‘eCommerce’ payment tender is used in reporting for orders paid online, if it is enabled in BackOffice. If the ‘eCommerce’ tender is not enabled, the ‘Other’ tender is used. Orders not paid online are reported under the tender selected at the register to close the sale.
The employee closing an order at the register is credited in reporting for performing that sale.
Orders are assigned to the register shift open on the register where they are closed.
With eCommerce online orderingdisabled, only supported orders will appear in BackOffice and Lightspeed Pocket reporting.
Supported orders which appear in BackOffice reporting automatically are those paid online and those manually marked ‘Paid’ via the eCommerce Dashboard.
Unsupported orders that do not appear in reporting include orders with tax charged on shipping costs, multiple tax rates, eGift card purchases or redemptions, and orders created with an initial Fulfillment Status other than ‘Awaiting Processing’. To view all orders placed through your webstore, visit the eCommerce Dashboard, click ‘My Sales’, and select ‘Orders’.
Shipping, delivery, and pickup charges are reported as an item called ‘Custom amount’, discounts and discount coupons are reported as a discount called ‘Open Amount’, and taxes are reported as tax rates beginning with ‘Online’.
The ‘eCommerce’ payment tender is used in reporting for all orders, if enabled in BackOffice. If the ‘eCommerce’ tender is not enabled, the ‘Other’ tender is used.
The orders are not assigned to a register shift or employee, and they do not appear on the following reports: Sales by Employee, Shifts Summary, and the ‘Register Summary’ tile on the Dashboard.
Help us improve Lightspeed Support. Was this article helpful?