This feature is only available for US Lightspeed Retail merchants who upgraded to a paid pricing package.
Online and Mobile Payments
Set up online and mobile payments through ShopKeep Payments by Lightspeed to accept credit and debit cards online for sales run using emailed invoices, orders placed via a Lightspeed eCom (E) webstore, and Pay by Link sales run in the Retail POS (S-Series) app.
The Lightspeed Retail account owner can fill out the payments application and connect a bank account in BackOffice, and must perform additional steps to enable payments in a webstore. Once set up, a statement will be emailed to you each week summarizing the online and mobile payments processed.
Merchants who signed up for Lightspeed Retail before February 8, 2021, can also use the Lightspeed Pocket (S) app to process mobile payments. If you signed up after February 8, 2021 and want to run sales on a mobile device, use Lightspeed Pay.
Table of Contents
Set Up Payments
Submit your business and bank account information in BackOffice to get approved to process credit payments for sales run using emailed invoices and Pay by Link sales run in the Retail POS (S-Series) app for iOS. Additional steps are required to accept credit payments in a Lightspeed eCom (E) webstore.
This feature is only available for US Lightspeed Retail merchants on paid pricing packages. To upgrade to a paid account, click ‘Upgrade’ in BackOffice or at the register.
After signup and approval, you will be able to access all methods of online and mobile payments. Additional steps are required to accept credit payments in a Lightspeed eCom (E-Series) webstore.
BackOffice Setup Method
Lightspeed Retail Business Owners can access the online and mobile payments setup flow in BackOffice to get approved for processing credit payments for emailed invoices, orders placed via a Lightspeed eCom (E-Series) webstore, and Pay by Link sales run in the Retail POS (S-Series) app for iOS.
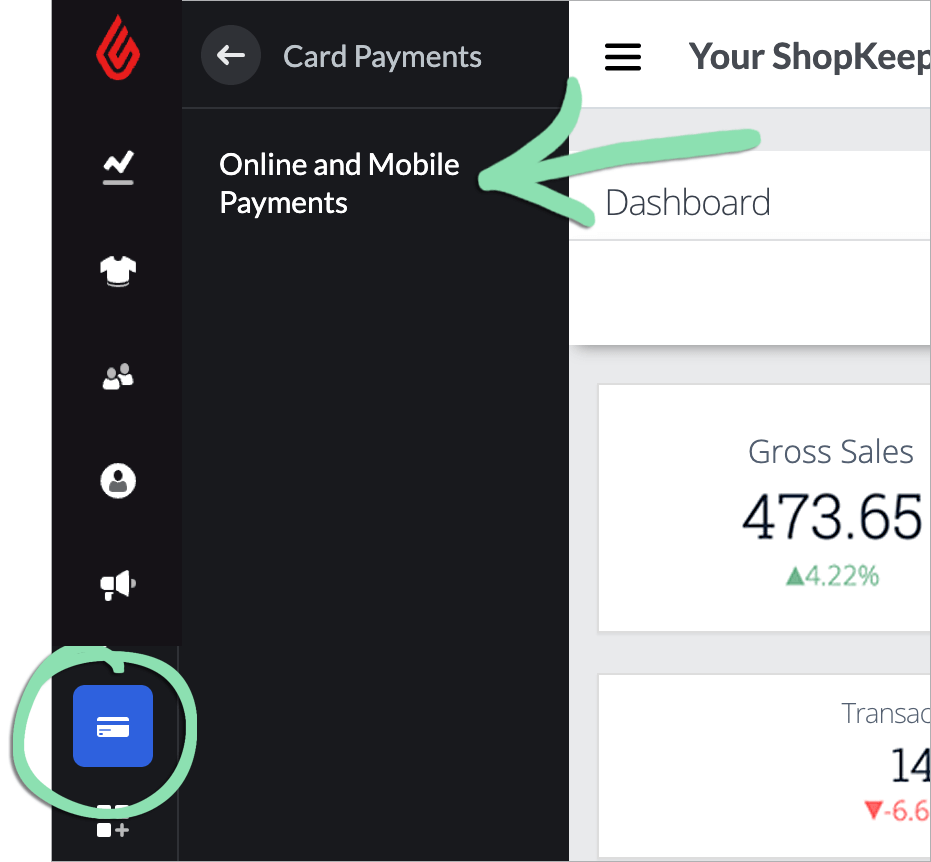
Sign into BackOffice as the Business Owner.
Click ‘Card Payments’, then select ‘Online and Mobile Payments’.
Don’t see ‘Online and Mobile Payments’ when signed in as the Business Owner? Upgrade to a paid Lightspeed Retail plan in BackOffice or at the register to be able to set up and run online and mobile payments.
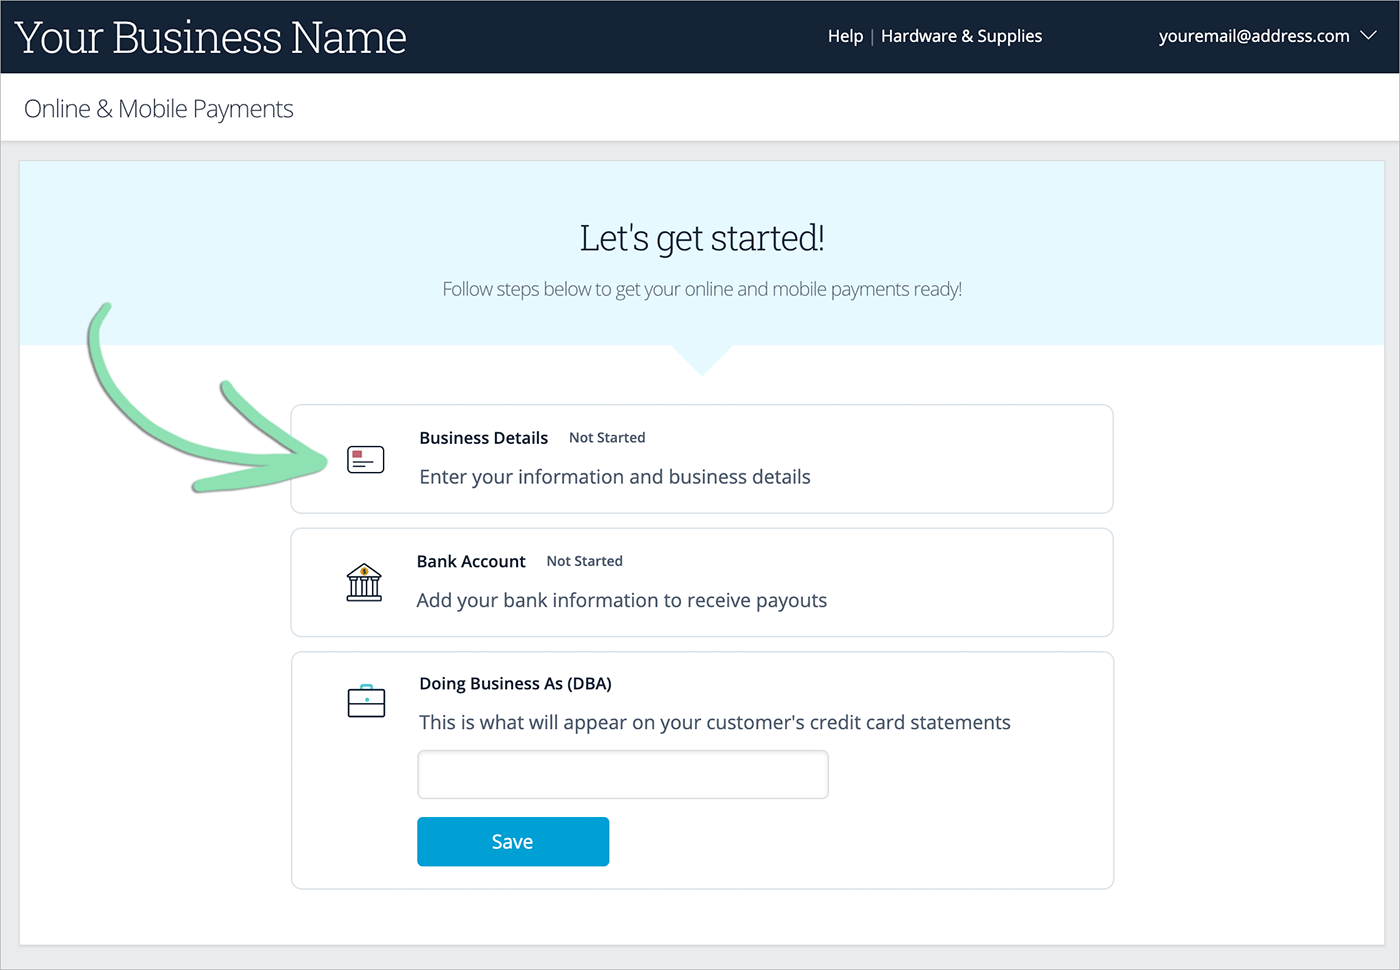
Click ‘Bank Account’, then follow the prompts to enter the details for the bank account where you want to receive deposits.
Provide your long-term choice of deposit account as this information cannot be updated in BackOffice. To learn how to change this account, contact [email protected].
For this step, you will need to enter the:
Routing number and account number of the bank account
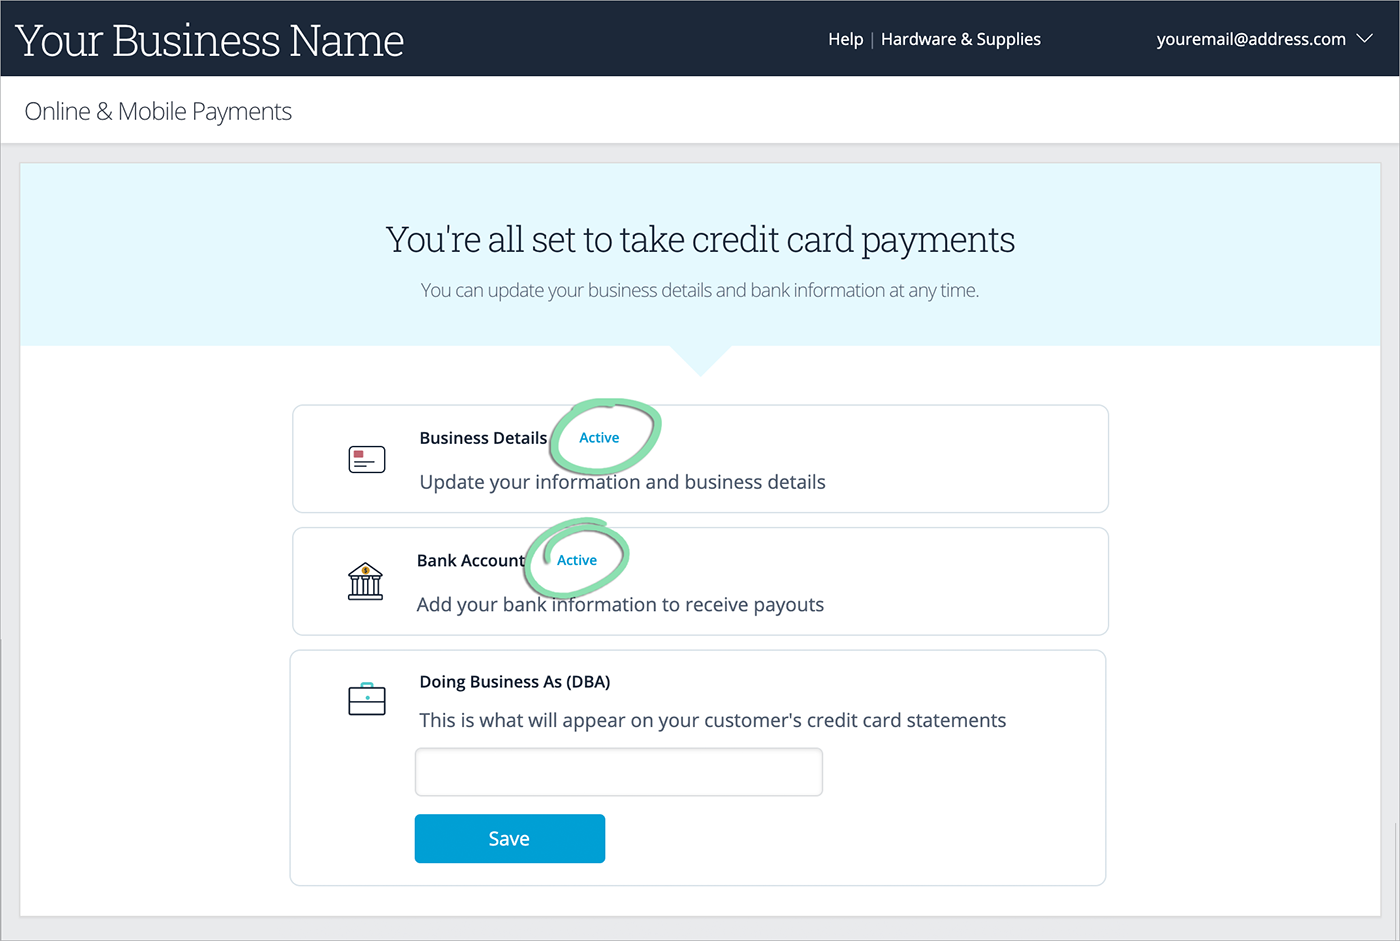
Wait for ‘Active’ to appear next to ‘Business Details’ and ‘Bank Account’, indicating approval for payments.
Most merchants will be approved within moments. If either status shows ‘Pending’, check back in 1 – 3 business days or wait to receive email confirmation that you were approved.
Once you begin running transactions, you will receive a weekly email statement summarizing the online and mobile payments processed the previous week.
Enter the DBA for your business in the ‘Doing Business As’ field, then click ‘Save’ to save changes.
The DBA must be 5 – 22 characters long, contain no special characters, and have at least 1 letter.
The DBA, or ‘doing business as’ name, appears on customer credit card statements next to each online and mobile payment charge from your business.
By default, the DBA is set to the website entered in the ‘Business Details’ section (see step 4). If you did not enter a website and do not update your DBA, it will default to ‘ShopKeep’.
(Optional) Follow the steps in the eCommerce Setup section below to enable payments for your Lightspeed eCom (E-Series) webstore.
(Optional) Follow the steps here to run a test transaction.
Learn more about how to accept payments in Lightspeed Pocket here, about online payments for invoices here, and about eCommerce integration here.
eCommerce Setup Method
After being approved for online and mobile payments, enable your payments account for use in Lightspeed eCom (E) to accept credit payments online for orders placed in your Lightspeed eCom (E-Series) webstore.
This feature is only available for Lightspeed Retail merchants on select pricing packages.
The platform for our eCommerce integration accepts the following credit card types through ShopKeep Payments by Lightspeed: Visa, Mastercard, Amex, Discover, Diners Club, JCB, and UnionPay.
Follow the steps in the section above to set up payments in BackOffice.
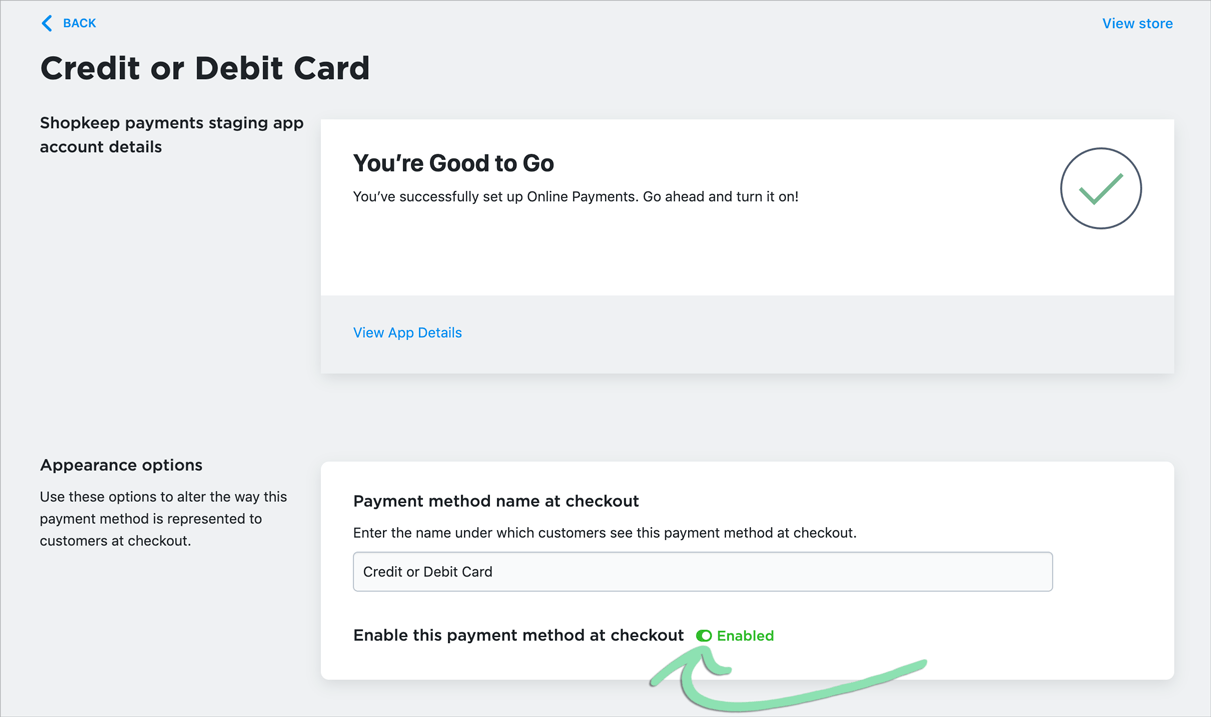
Check that the page prompts you to turn on online payments.
If we cannot verify your onboarding status, click ‘Set Up Online Payments’ and follow the steps in the section above to complete the online and mobile payments setup flow in BackOffice.
Once you begin running transactions, you will receive a weekly email statement summarizing the online and mobile payments processed the previous week.
The DBA, or ‘doing business as’ name, is the business name that appears on customer credit card statements next to each online and mobile payment charge from your business. Enter or update the DBA so customers will be able to easily identify purchases made at your store.
By default, the DBA is set to the website entered in the ‘Business Details’ section when setting up online and mobile payments. If you did not enter a website and do not update your DBA, it will default to ‘ShopKeep’.
Sign into BackOffice as the Business Owner.
Click ‘Card Payments’, then select ‘Online and Mobile Payments’.
Enter the DBA for your business in the ‘Doing Business As’ field, then click ‘Save’ to save changes.
The DBA must be 5 – 22 characters long, contain no special characters, and have at least 1 letter.
After setting up online payments, run an optional test transaction to confirm the setup was successful.
You only need to use one of the methods below to run a test transaction and confirm that online and mobile payments setup was successful.
After running a test transaction, either perform a return at the register to balance out the net sales amount for that day or exclude that day when running sales reports. Register and Lightspeed Pocket transactions will appear in reporting and cannot be deleted. Paid invoices also cannot be deleted from BackOffice or reporting.
Online and mobile payments cannot currently be refunded back to the card used in the original payment via the Lightspeed Pocket or Register apps, BackOffice, or the eCommerce Dashboard. To request a refund for an online or mobile payment, contact [email protected].
Lightspeed Pocket Test Transaction
Ring up a sale in Lightspeed Pocket, tender it to ‘Credit’, and manually enter a credit card to process a test transaction and confirm that online and mobile payments are working properly.
Only merchants who signed up for Lightspeed Retail before February 8, 2021, can use the Pocket app to run sales. If you signed up after February 8, 2021, use one of the other methods in this article to run a test transaction.
From the Dashboard tab in the Lightspeed Pocket (S) app, tap ‘+ New Sale’.
Enter a sale amount of $0.50 or above, then tap ‘Credit’.
All credit transactions run in Lightspeed Pocket require a minimum total amount of $0.50.
Enter a card number.
The credit or debit card used for the test transaction cannot be tied to the bank account used to set up online and mobile payments.
Enter the card’s expiration date and CVV number, then tap ‘Done’.
Select a receipt option to finish up.
aTo send an email receipt, tap ‘Email Address’, enter your email address, then tap ‘Email Receipt’.
bTo skip sending a receipt, tap ‘No Receipt’.
Tap ‘Go to Dashboard’ to return to the Dashboard tab.
For detailed, step-by-step help with using Lightspeed Pocket to process transactions, visit our Running Sales in Lightspeed Pocket article.
Invoice Test Transaction
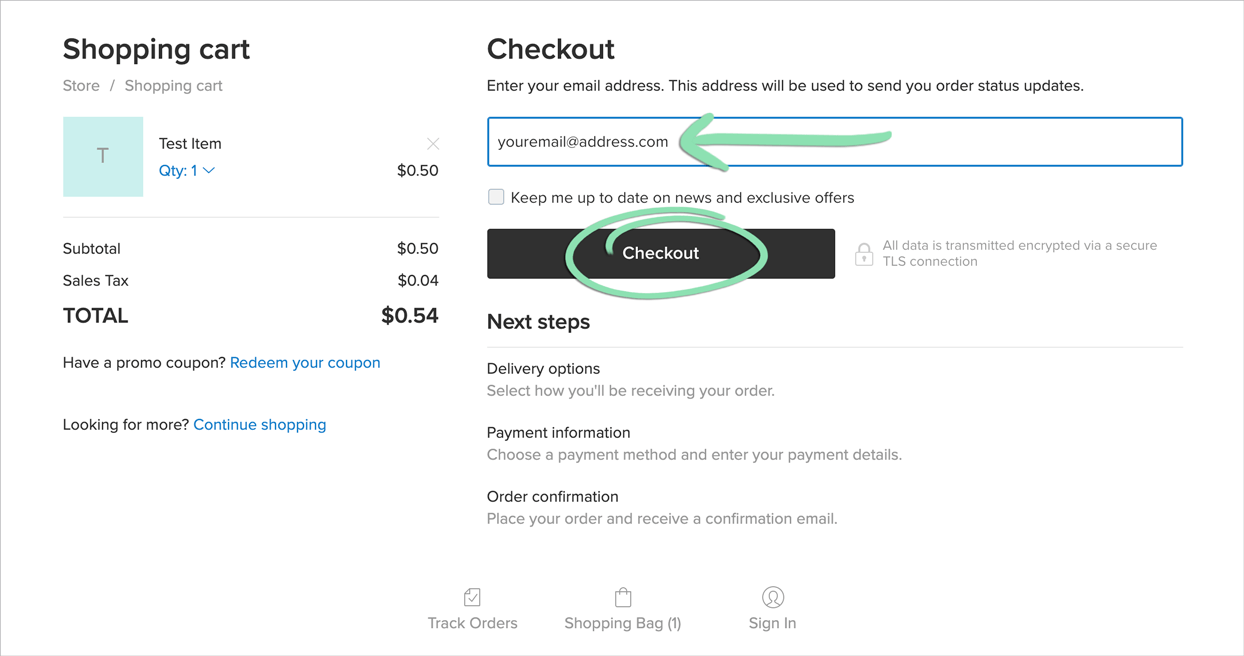
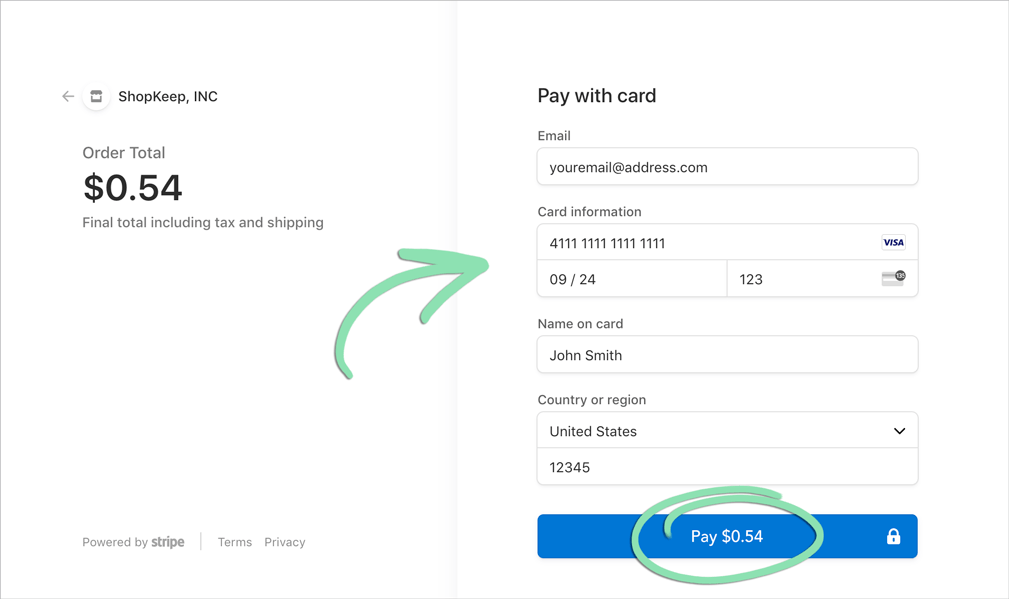
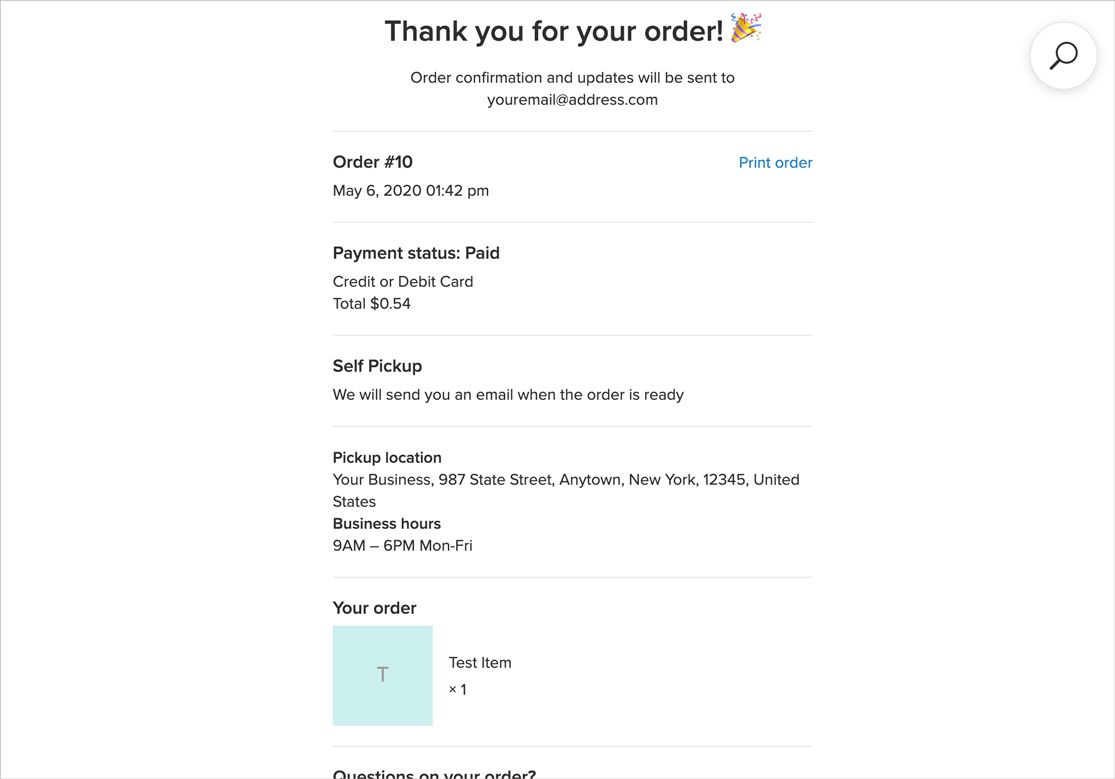
Create a new invoice, send it to yourself, and pay for it online using manual card entry, Apple Pay, or Google Pay to confirm that online and mobile payments are working properly.
This feature is only available for Lightspeed Retail merchants on select pricing packages.
Create a new invoice, then enter your email in the ‘Bill To’ drop-down and click ‘Add new customer’.
Don’t see ‘Add new customer’? Select your name or email from the drop-down.
The platform for our eCommerce integration accepts the following credit card types through ShopKeep Payments by Lightspeed: Visa, Mastercard, Amex, Discover, Diners Club, JCB, and UnionPay.
Follow the steps here to disable the item created in step 1 to remove it for purchase from the webstore.
Card Processing Statement Email
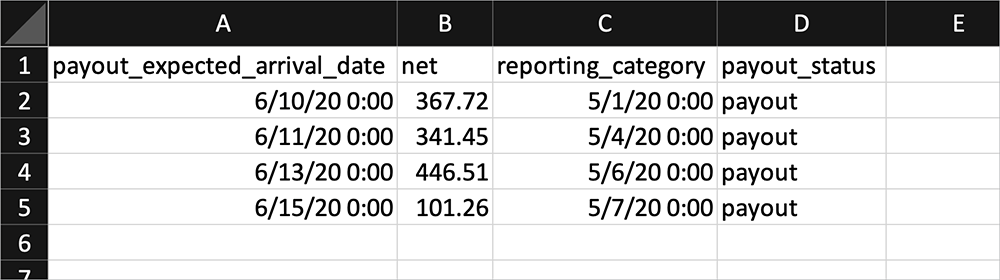
The Weekly Lightspeed Online & Mobile Card Processing Statement email gives an overview of all online and mobile payments processed from Sunday to Saturday and is emailed to the Business Owner every Monday of the following week. The email sent contains two downloadable spreadsheets: one that lists each payout deposited into your bank account and another that shows the individual transactions in each payout.
Check your inbox for the Weekly Lightspeed Online & Mobile Card Processing Statement email.
The email is sent every Monday morning to the Business Owner and covers all online and mobile payments processed from 12 AM Sunday to 11:59 PM Saturday of the previous week, based on the time zone set in BackOffice.
Open the email and download the attached .CSV spreadsheet files.
The Payouts Report shows each deposit, or payout, made into your bank account. Payouts contain all online and mobile payment transactions run on a specific day.
The Balance Report shows individual online and mobile payment sales run, including the gross amount and processing fee for each, refunds, and chargebacks.
payout_expected_arrival_date | Date and time a payout was deposited to your bank account. net | Net dollar amount of a payout after subtracting processing fees. reporting_category | ‘payout’ (indicates a successful payout) or ‘payout_reversal’ (indicates a failed payout). payout_status | ‘paid’ (payout was successfully deposited into the bank account), ‘failed’ / ‘cancelled’ (there was a problem depositing the payout), ‘pending’ (payout was not yet submitted to the bank for deposit), or ‘in transit’ (payout was submitted to the bank and is waiting to be processed).
created | Date and time a transaction occurred. available_on | Date and time the transaction settled to your ShopKeep Payments by Lightspeed account. gross | Dollar amount of a transaction before subtracting processing fees. fee | Processing fee calculated and removed from a transaction. net | Net dollar amount of a transaction after subtracting fees. reporting_category | ‘charge’ (transaction was charged to a customer’s credit card), ‘refund’ (transaction was refunded to a customer’s credit card), ‘dispute’ (a chargeback was filed for the transaction), or ‘dispute_reversal’ (a chargeback was resolved in your favor).


 b To skip sending a receipt, tap ‘No Receipt’.