This feature is only available to Lightspeed Retail merchants on select pricing packages.
Integrated gift cards can only be issued and redeemed in store at a Lightspeed Retail POS. Learn about online e-gift cards for your Lightspeed eCom (E) webstore here.
Integrated Gift Cards
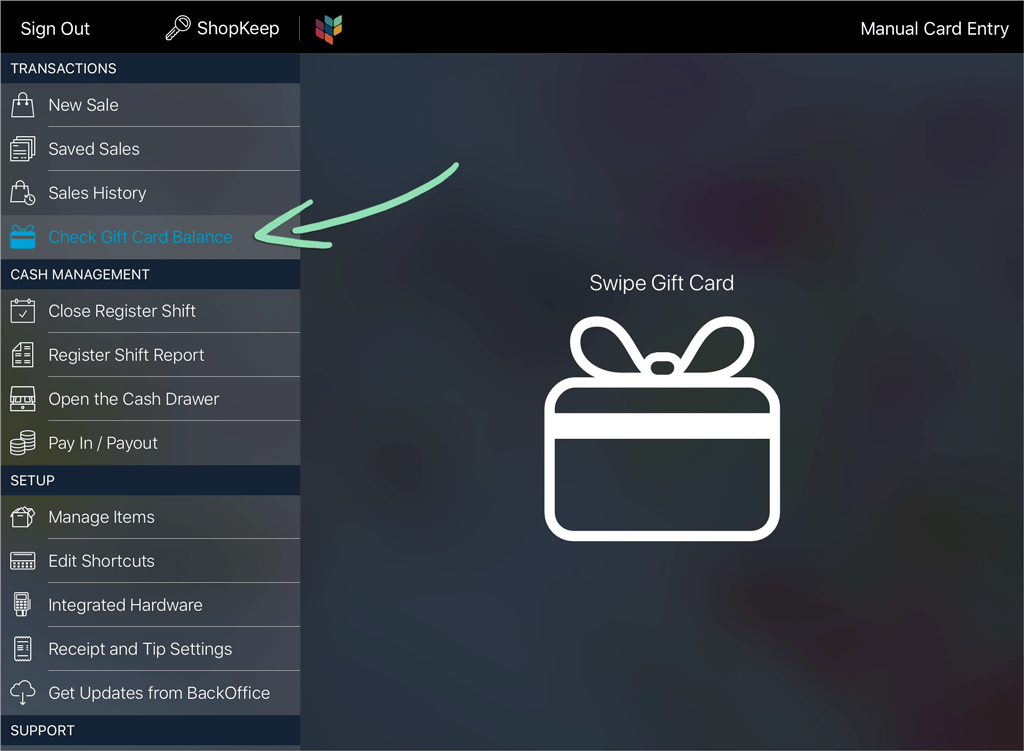
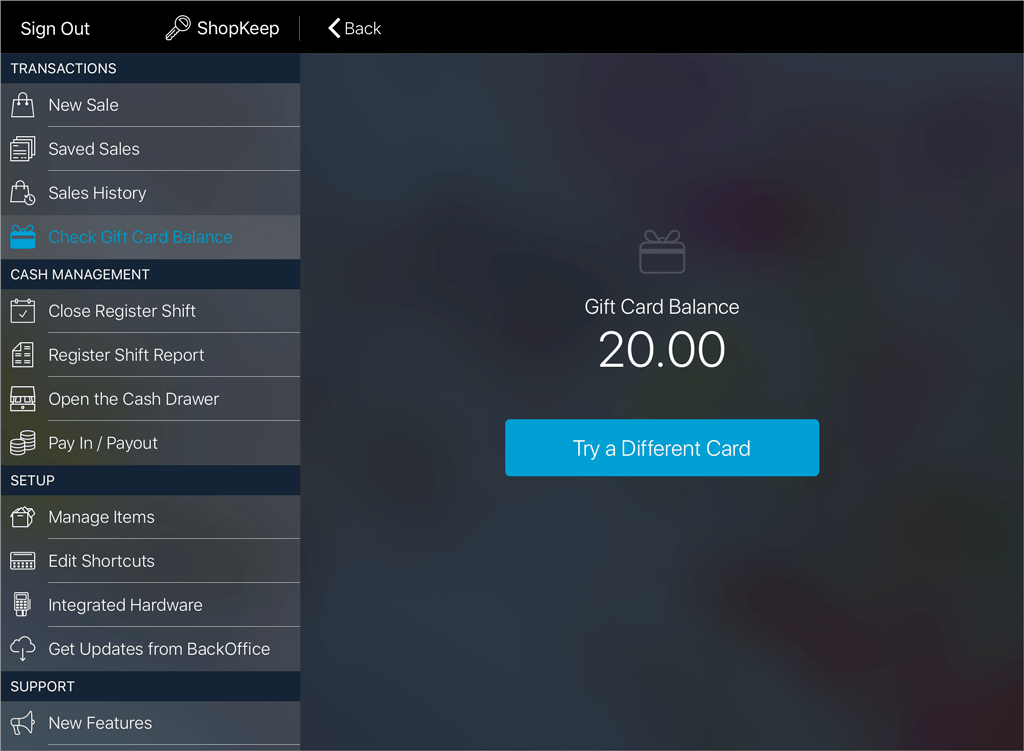
Set up integrated gift cards to be able to issue and redeem gift cards directly from the Retail POS (S-Series) app. At the register, you can also check gift card balances and refund sales to gift cards to issue store credit for returns. Visit the dedicated reporting portal to view issue and redemption totals, individual transactions, and other gift card usage information.
Need more gift cards for your existing gift cards account? Visit the Lightspeed Store to place an order.
Table of Contents
Upgrade to Add Gift Card Processing
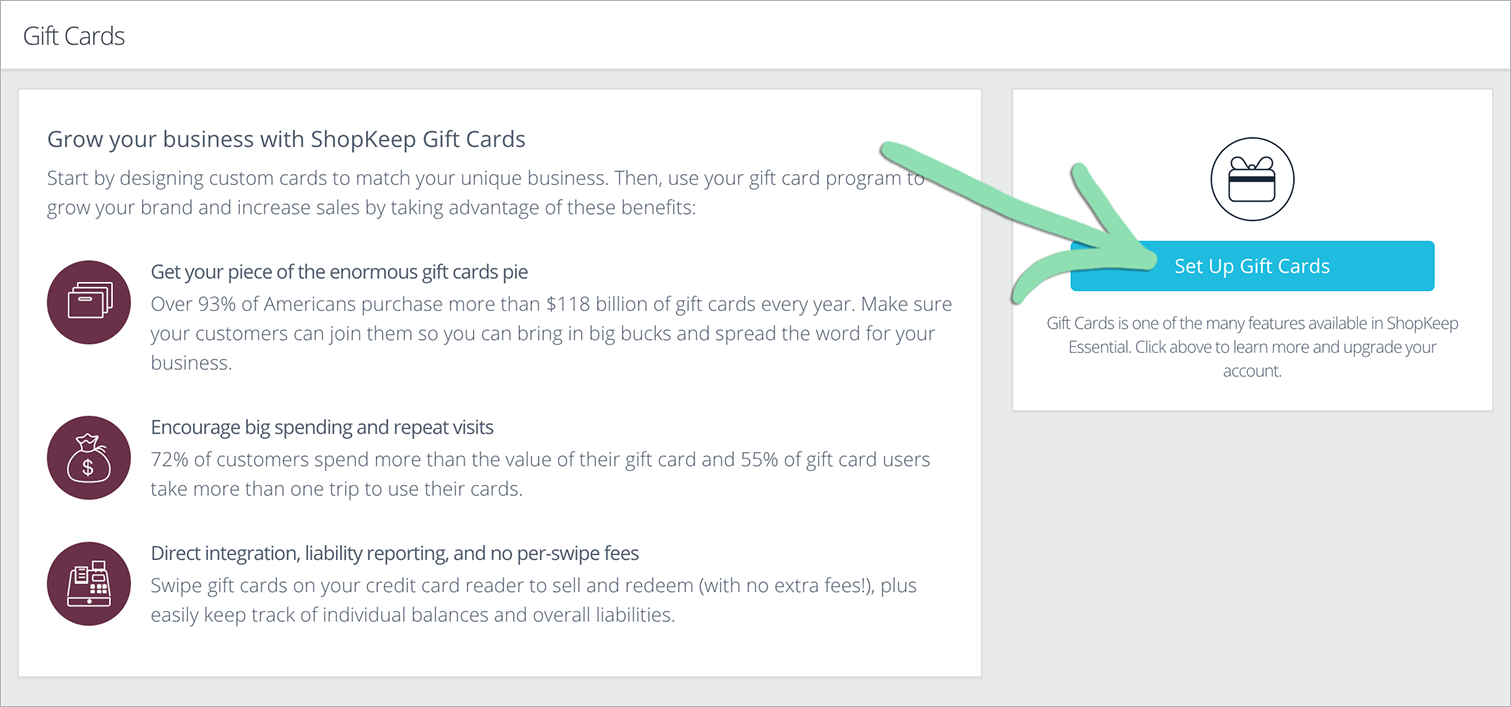
If integrated gift cards are not part of your current pricing package, follow the steps in this section to upgrade to a package that includes gift card processing.
If gift cards are part of your pricing package, skip this section and follow the steps in the Set Up Gift Cards section below to complete setup.
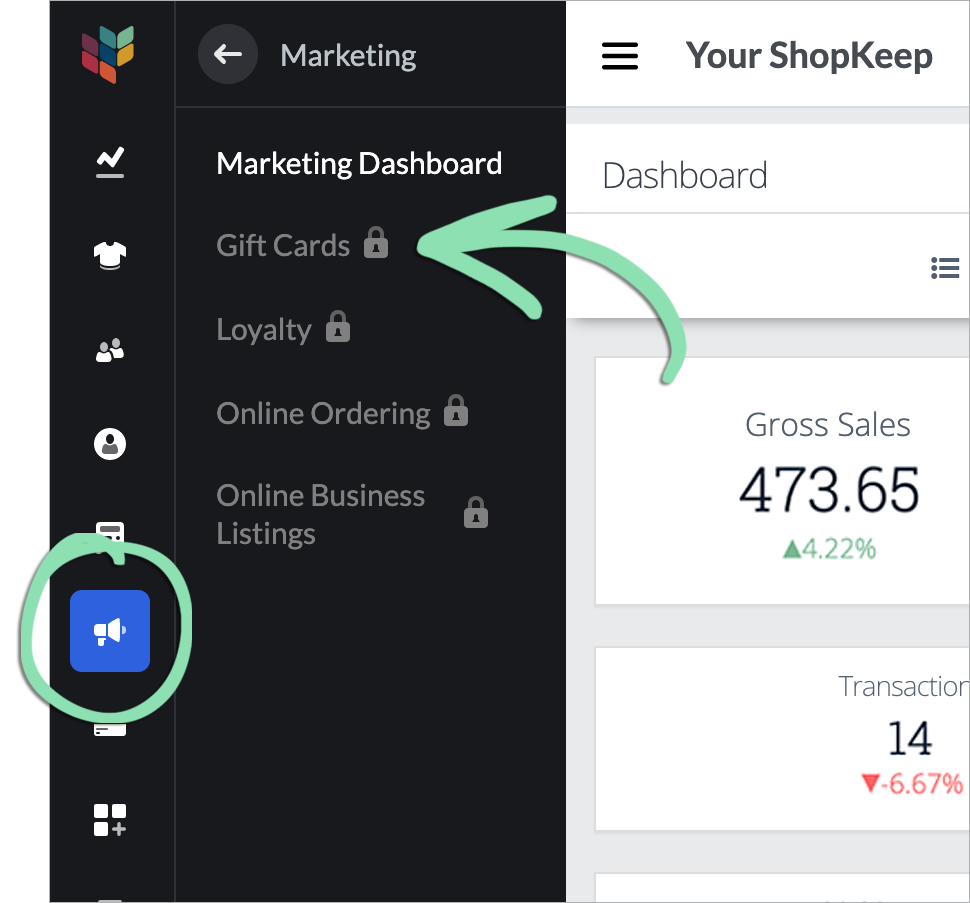
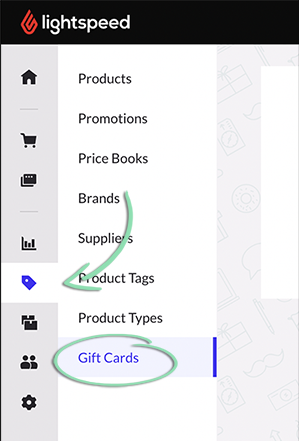
Sign into BackOffice as the Business Owner or an employee with the 'Manage Account' permission.
Don’t see ‘Gift Cards’? Either your account is already set up for gift cards, the signed-in user does not have the proper permissions, or you need to contact us for help.
Don’t see ‘Gift Cards’? Either your account is already set up for gift cards, the signed-in user does not have the proper permissions, or you need to contact us for help.
Wait for an email from Lightspeed within 3 - 5 business days confirming setup is complete and containing instructions for ordering gift cards.
When we process the setup form, we will enable the ‘Gift Card’ tender for your account and create the ‘Gift Card’ liability item you will use to issue gift cards at the register. Already have an item called ‘Gift Card’? The liability item will be named ‘Gift Card (Integrated)’ instead.
(Optional) Add an item shortcut to the register for the ‘Gift Card’ or ‘Gift Card (Integrated)’ item.
Get updates on the iOS or Android register to sync changes to the register.
If you receive an error while getting updates, visit our troubleshooting guide for help.
Once you’re set up, learn how to issue, check the balance of, redeem, and return to gift cards at the register.
Integrated gift cards can only be issued and redeemed in store at a Lightspeed Retail POS. Learn about online e-gift cards for your Lightspeed eCommerce (E-Series) webstore here.
Issue a Gift Card
Sell the gift card item created during gift card setup to issue a new gift card or reload an existing one. Open pricing lets you choose the value of the gift card when you sell it.
Revenue from issuing a gift card is not included in your total sales until the customer comes back to redeem the card. Learn how liabilities like gift cards are accounted for in BackOffice reporting here.
Add the Gift Card item to a sale.
Use the keypad to enter an amount to load on the card, then tap 'Done'.
Click to Enlarge
(Optional) Repeat steps 1 - 2 to issue additional gift cards during the same sale.
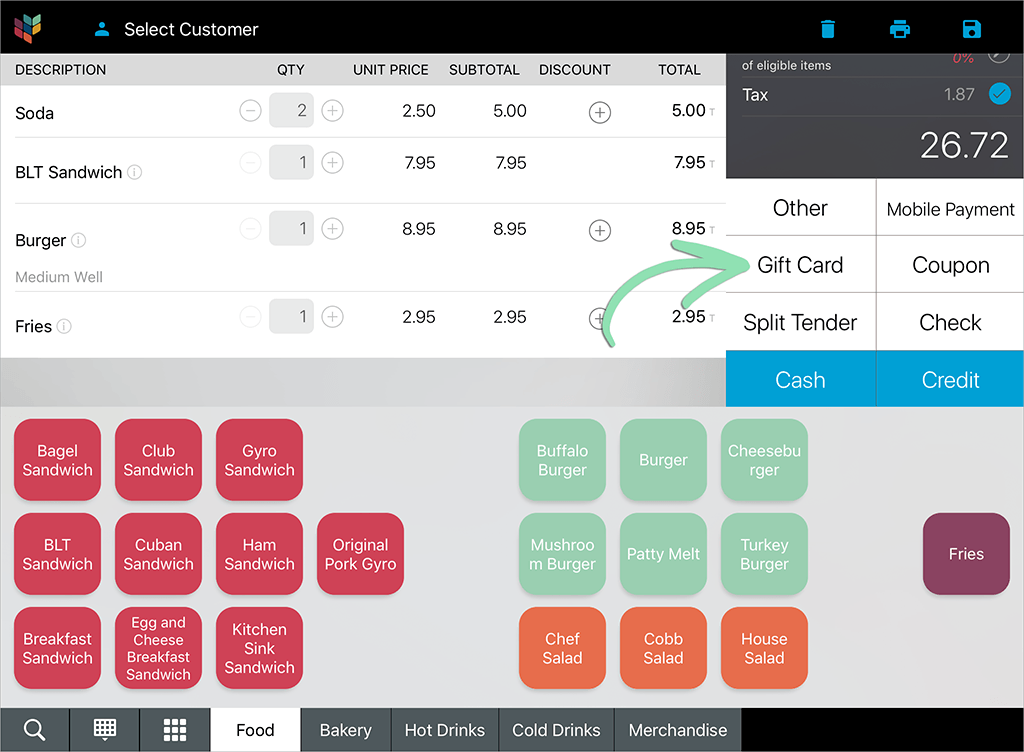
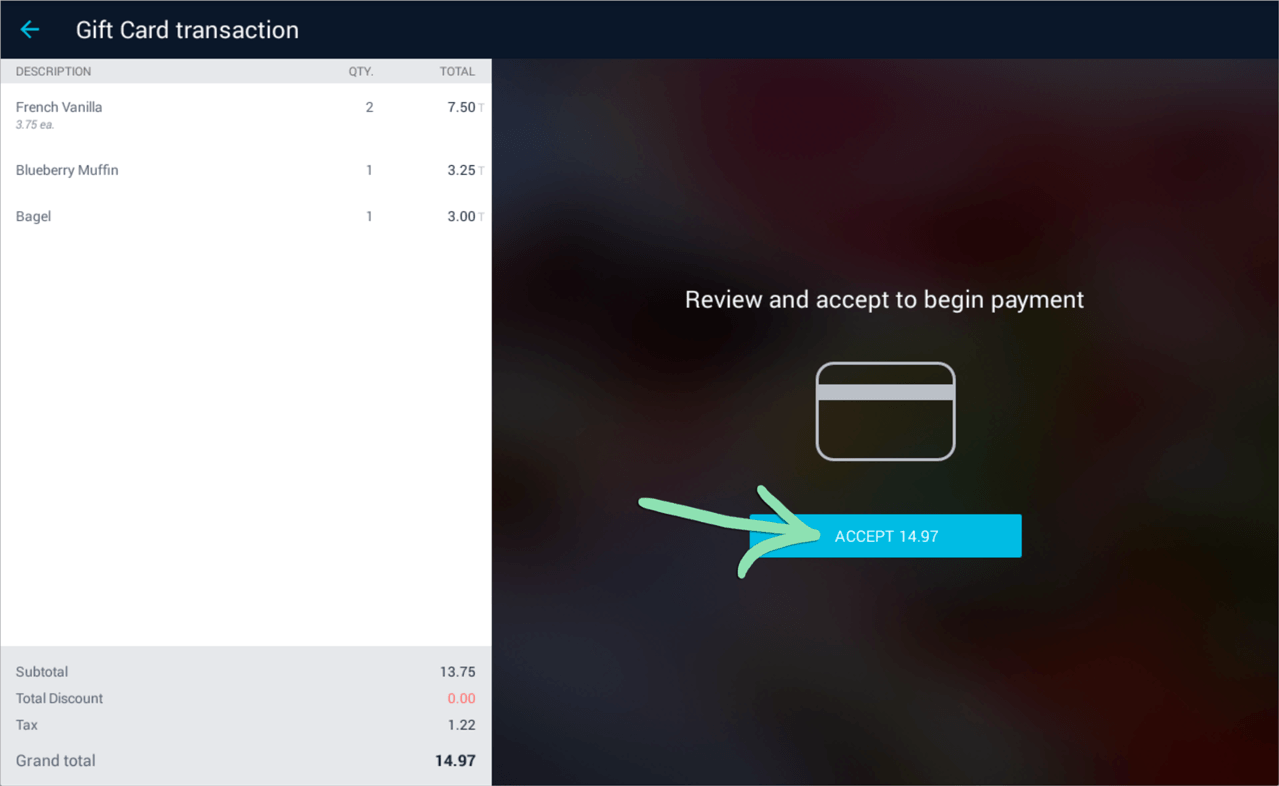
Select the customer’s payment tender to process the sale.
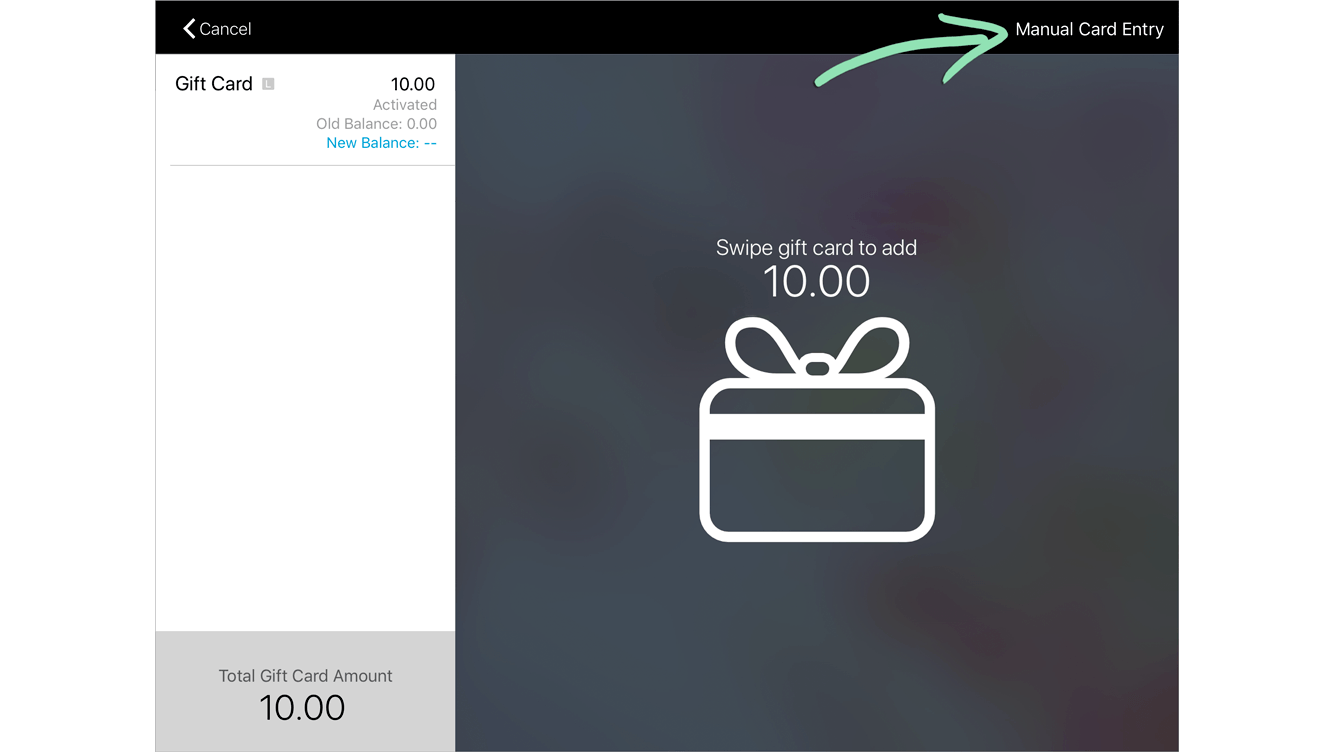
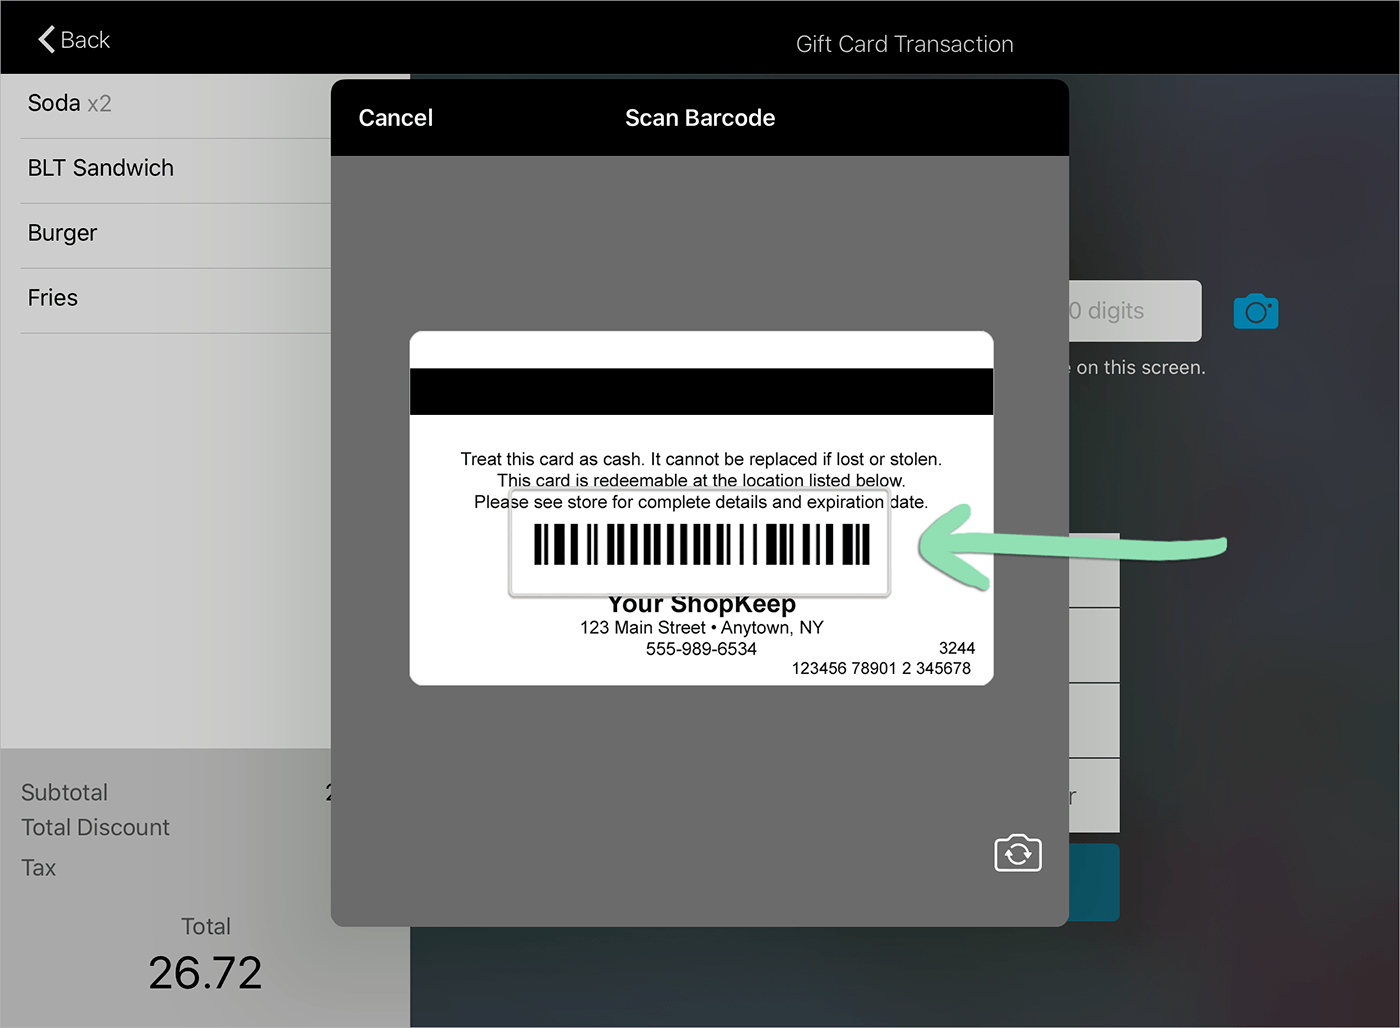
When prompted, swipe a gift card through your card reader, manually enter the gift card number, or scan the barcode on the gift card with a barcode scanner or the built-in camera on the register.
Swiping gift cards is not supported on the Clover Go credit card reader.
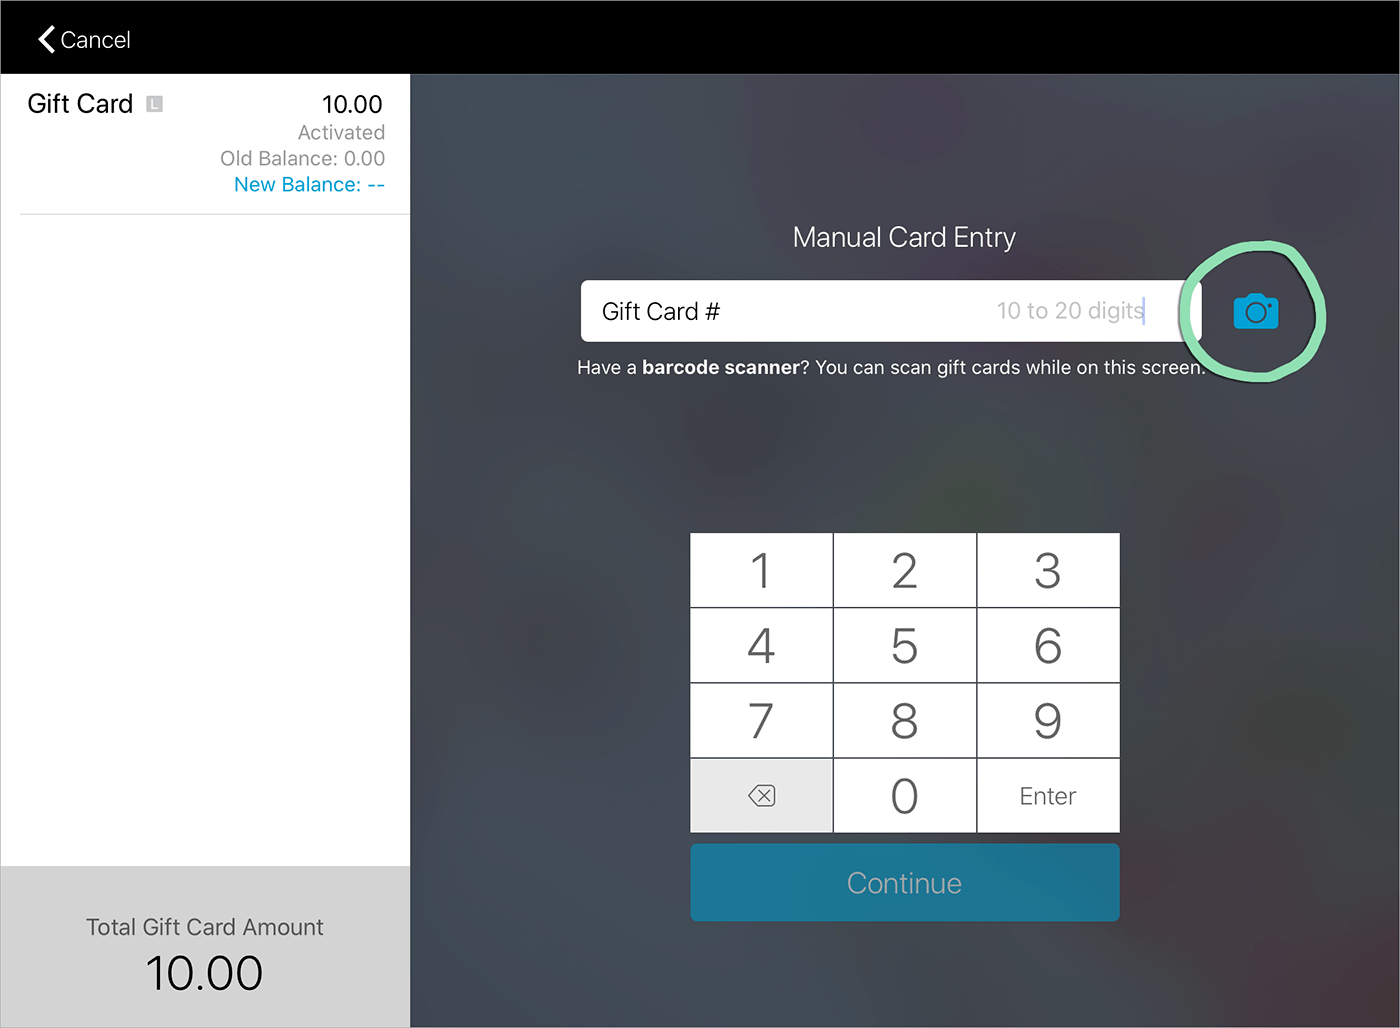
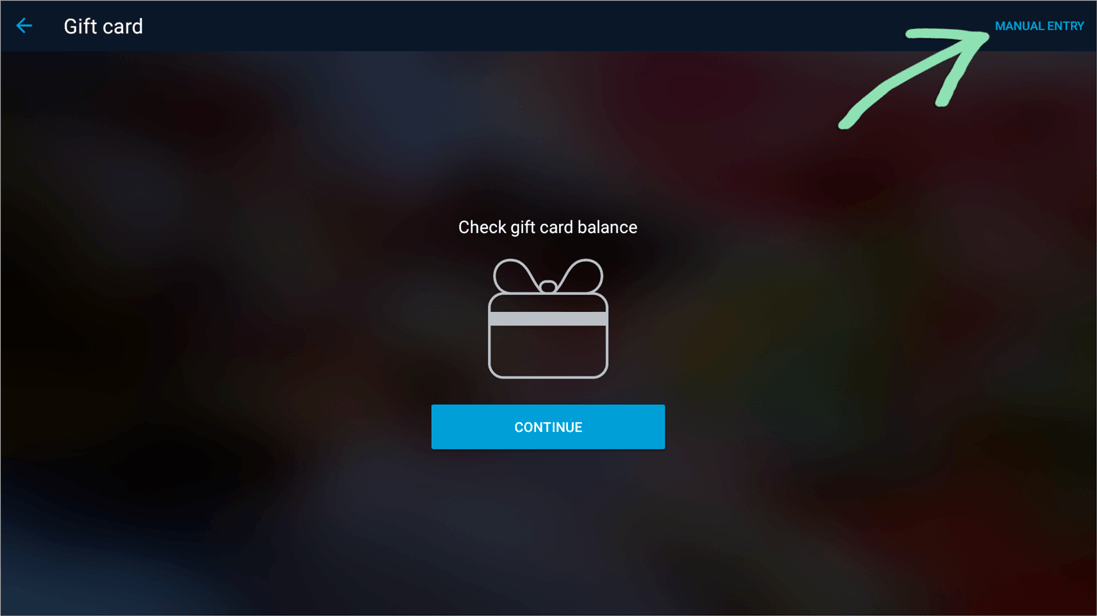
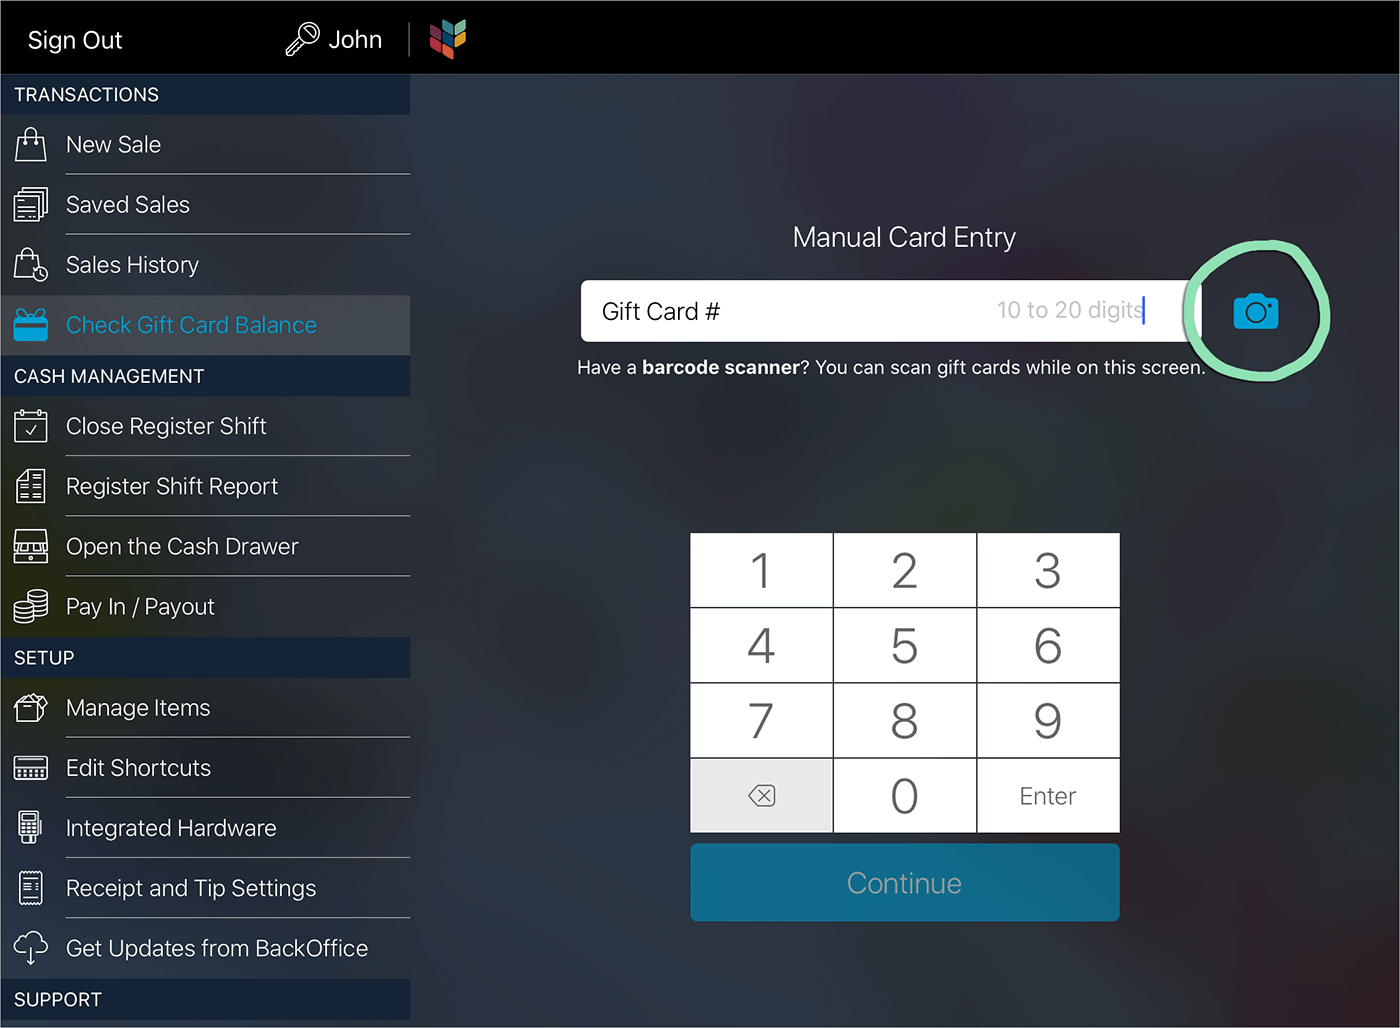
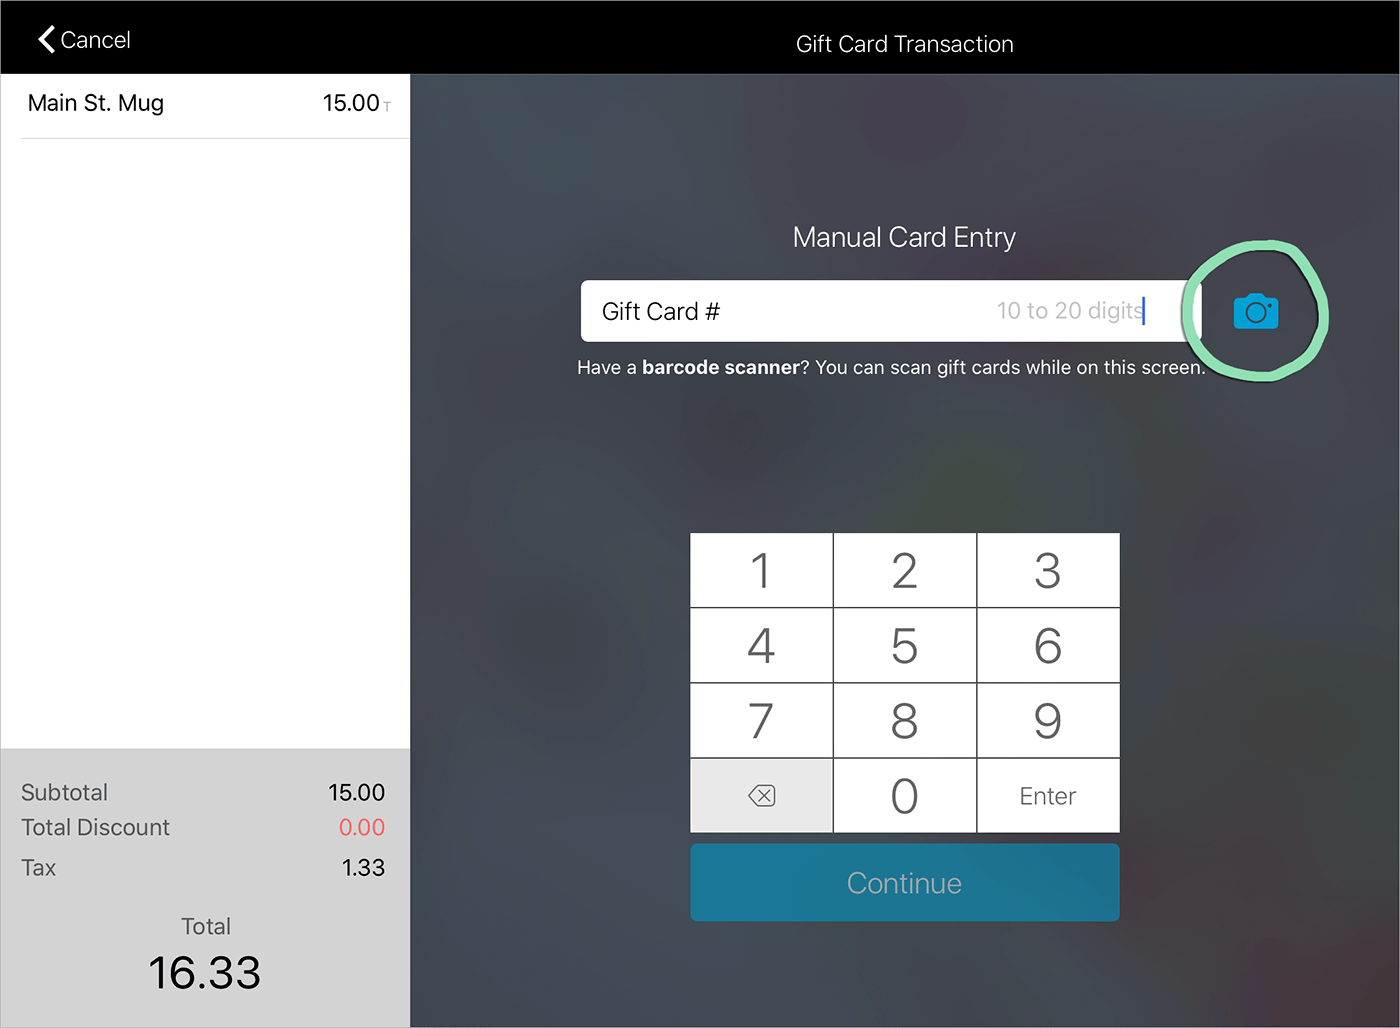
To manually enter or scan the gift card with a barcode scanner, tap ‘Manual Card Entry’ (iOS) or ‘Manual Entry’ (Android). Enter the gift card number or scan the gift card barcode, then tap ‘Continue’ or ‘Submit’.
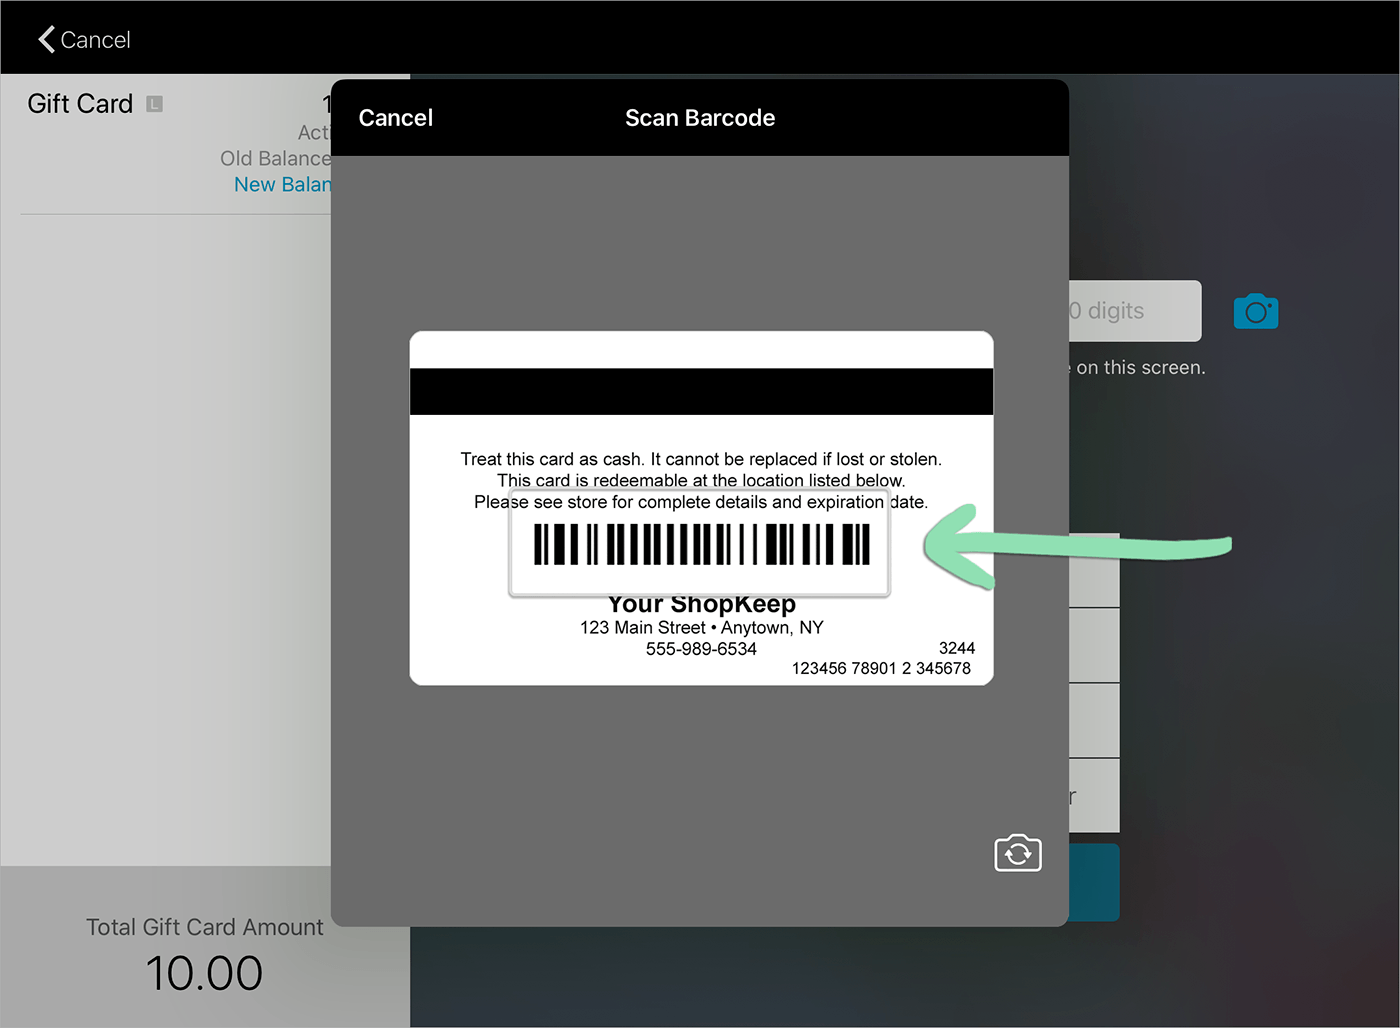
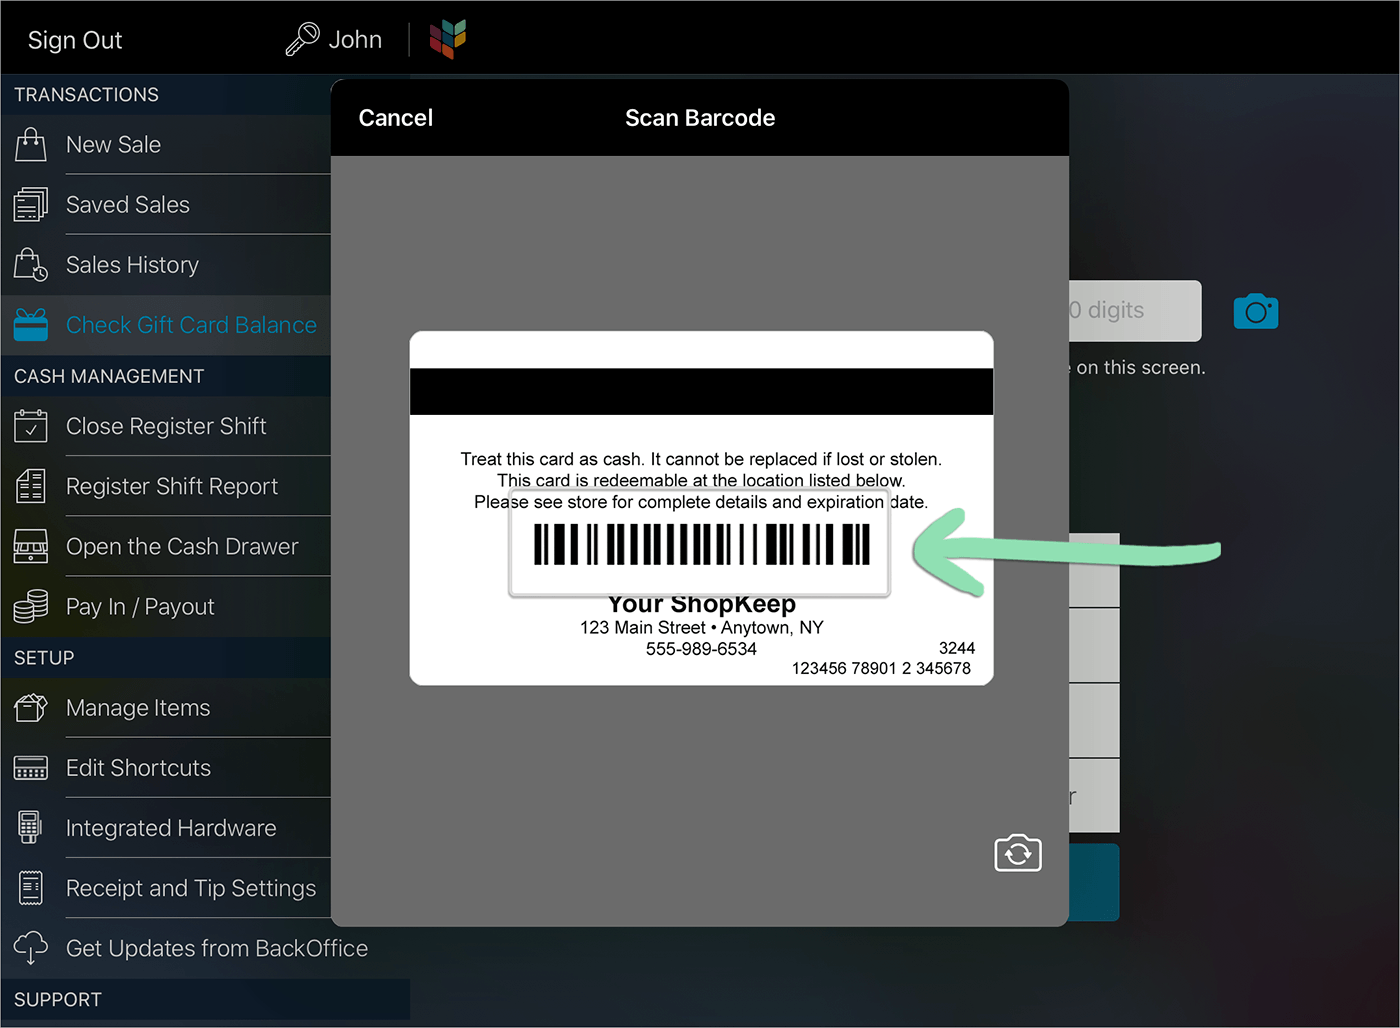
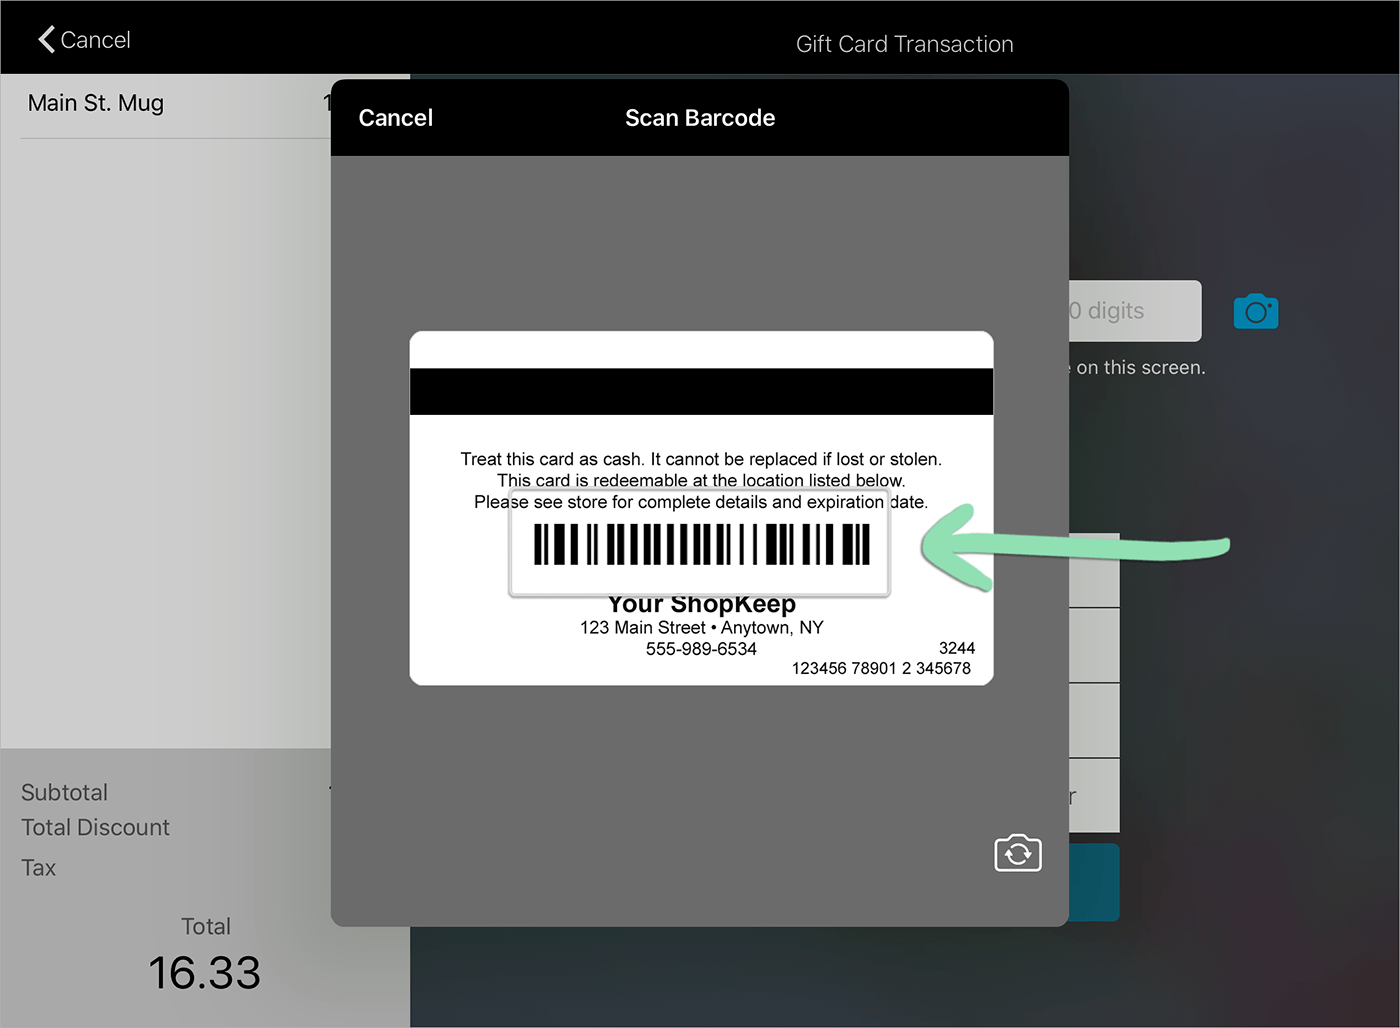
To scan the gift card with the register camera(only available on devices with a built-in camera), tap ‘Manual Card Entry’ or ‘Manual Entry’ as shown above. Tap the camera icon (iOS) or ‘Scan’ (Android), then align the gift card barcode with the box (iOS) or red line (Android) on screen. After the gift card number appears in the entry field, tap ‘Continue’ or ‘Submit’. Scanning works best in well-lit areas. On the Retail POS (S-Series) app for iOS, you must allow camera access after tapping the camera icon for the first time and can toggle between the rear-facing and front-facing cameras by tapping the switch camera icon.
When prompted, swipe the gift card through your card reader, manually enter the gift card number, or scan the barcode on the gift card with a barcode scanner or the built-in camera on the register.
Swiping gift cards is not supported on the Clover Go credit card reader.
To manually enter or scan the gift card with a barcode scanner, tap ‘Manual Card Entry’ (iOS) or ‘Manual Entry’ (Android). Enter the gift card number or scan the gift card barcode, then tap ‘Continue’ or ‘Submit’.
To scan the gift card with the register camera(only available on devices with a built-in camera), tap ‘Manual Card Entry’ or ‘Manual Entry’ as shown above. Tap the camera icon (iOS) or ‘Scan’ (Android), then align the gift card barcode with the box (iOS) or red line (Android) on screen. After the gift card number appears in the entry field, tap ‘Continue’ or ‘Submit’. Scanning works best in well-lit areas. On the Retail POS (S-Series) app for iOS, you must allow camera access after tapping the camera icon for the first time and can toggle between the rear-facing and front-facing cameras by tapping the switch camera icon.
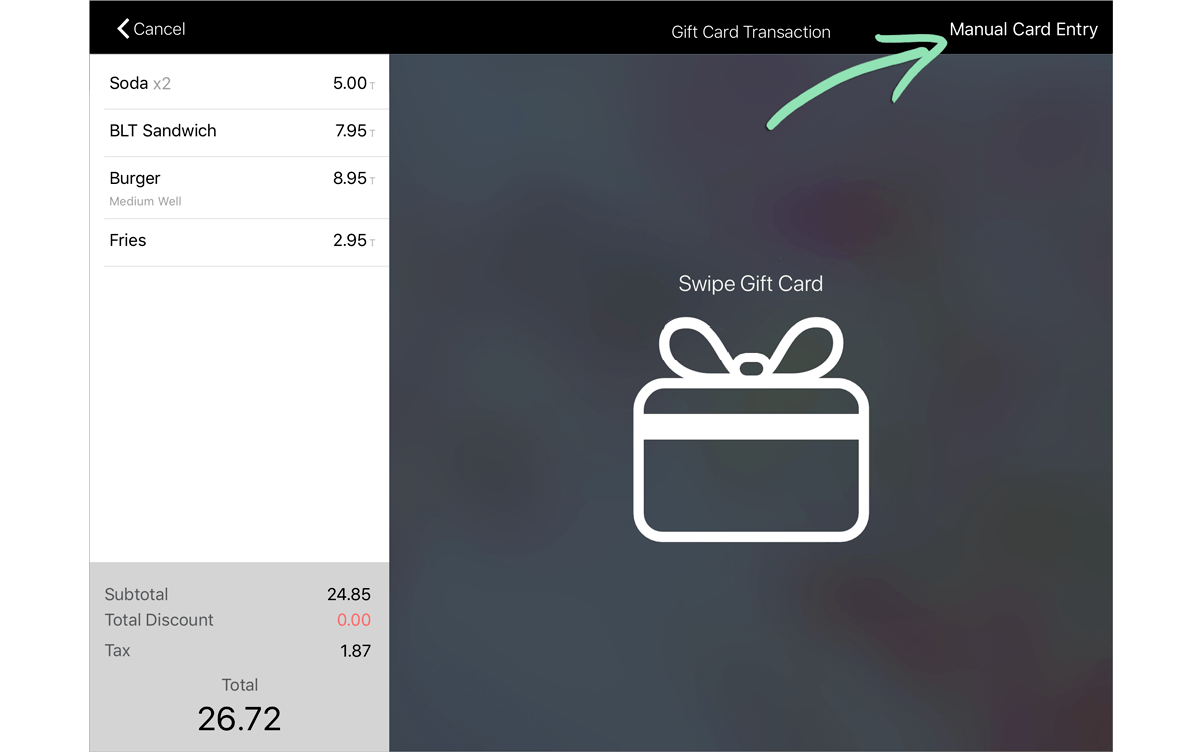
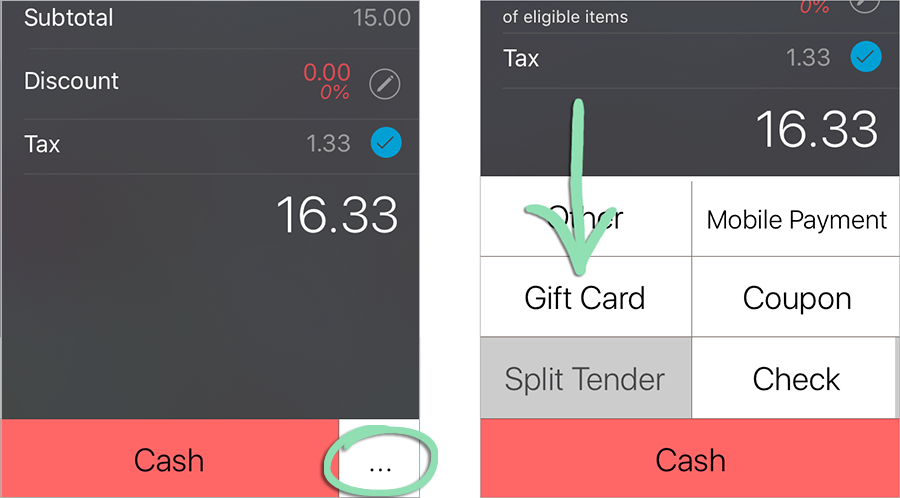
Tap '...' and select 'Gift Card' or ‘Gift Card manual’ (Android devices only).
In the Retail POS (S-Series) app for Android, ‘Gift Card manual’ allows the cashier to manually enter or scan a gift card instead of swiping it through a card reader. In the Retail POS (S-Series) app for iOS, manual entry can be selected later in the sale (step 5). Swiping gift cards is not supported on the Clover Go card reader.
When prompted, swipe a gift card through your card reader, manually enter the gift card number, or scan the gift card barcode with a barcode scanner or the built-in camera on the register.
Swiping gift cards is not supported on the Clover Go credit card reader.
To manually enter or scan the gift card with a barcode scanner, tap ‘Manual Card Entry’ (iOS) or tender the sale to ‘Gift Card manual’ (Android). Enter the gift card number or scan the gift card barcode, then tap ‘Continue’ or ‘Submit’.
To scan the gift card with the register camera(only available on devices with a built-in camera), tender the sale to manual entry as shown above. Tap the camera icon (iOS) or ‘Scan’ (Android), then align the gift card barcode with the box (iOS) or red line (Android) on screen. After the gift card number appears in the entry field, tap ‘Continue’ or ‘Submit’. Scanning works best in well-lit areas. On the Retail POS (S-Series) app for iOS, you must allow camera access after tapping the camera icon for the first time and can toggle between the rear-facing and front-facing cameras by tapping the switch camera icon.
If the balance is insufficient, select an available option to complete the sale.
In the Retail POS (S-Series) app for iOS, tap ‘Add an additional Payment’ to finish the sale as a split tender transaction or ‘Try a Different Card’ to use a different gift card.
In the Retail POS (S-Series) app for Android, tap ‘OK’ to return to the New Sale screen. From there, either perform a split tender transaction, tender the sale to ‘Gift Card’ and use a different card, or pay for the sale with a different tender.
Return a sale to a gift card to issue a customer store credit for the total amount of their return. Do this if your return policy prohibits returning the tender used in the original sale or if the customer paid with a gift card and you want to refund them with another gift card.
To tender the return, tap ‘...’ and select ‘Gift Card’ or ‘Gift Card manual’ (Android devices only).
On Android devices, ‘Gift Card manual’ allows the cashier to manually enter or scan a gift card instead of swiping it through a credit card reader. On the Retail POS (S-Series) app for iOS, manual entry can be selected later in the return (step 3).
When prompted, swipe a gift card through your card reader, manually enter the gift card number, or scan the barcode on the gift card with a barcode scanner or the built-in camera on the register.
Swiping gift cards is not supported on the Clover Go credit card reader.
To manually enter or scan the gift card with a barcode scanner, tap ‘Manual Card Entry’ (iOS) or tender the return to ‘Gift card manual’ (Android devices). Enter the gift card number or scan the gift card barcode, then tap ‘Continue’ or ‘Submit’.
To scan the gift card with the register camera(only available on devices with a built-in camera), tender the return to manual entry as shown above. Tap the camera icon (iOS) or ‘Scan’ (Android), then align the gift card barcode with the box (iOS) or red line (Android) on screen. After the gift card number appears in the entry field, tap ‘Continue’ or ‘Submit’. Scanning works best in well-lit areas. On the Retail POS (S-Series) app for iOS, you must allow camera access after tapping the camera icon for the first time and can toggle between the rear-facing and front-facing cameras by tapping the switch camera icon.
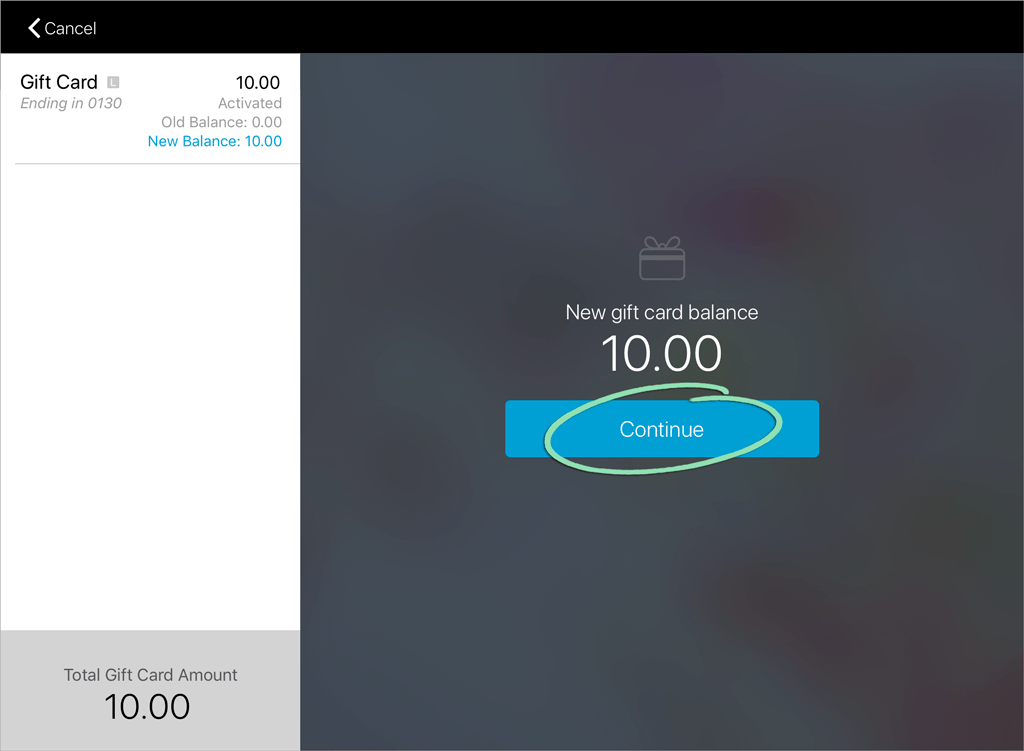
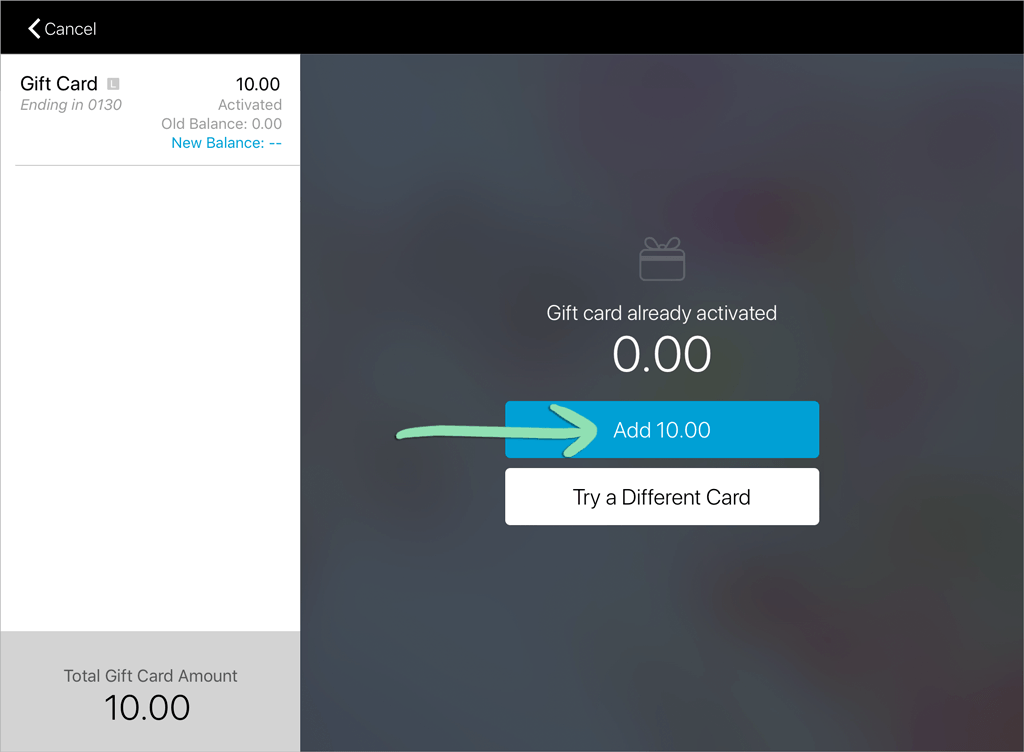
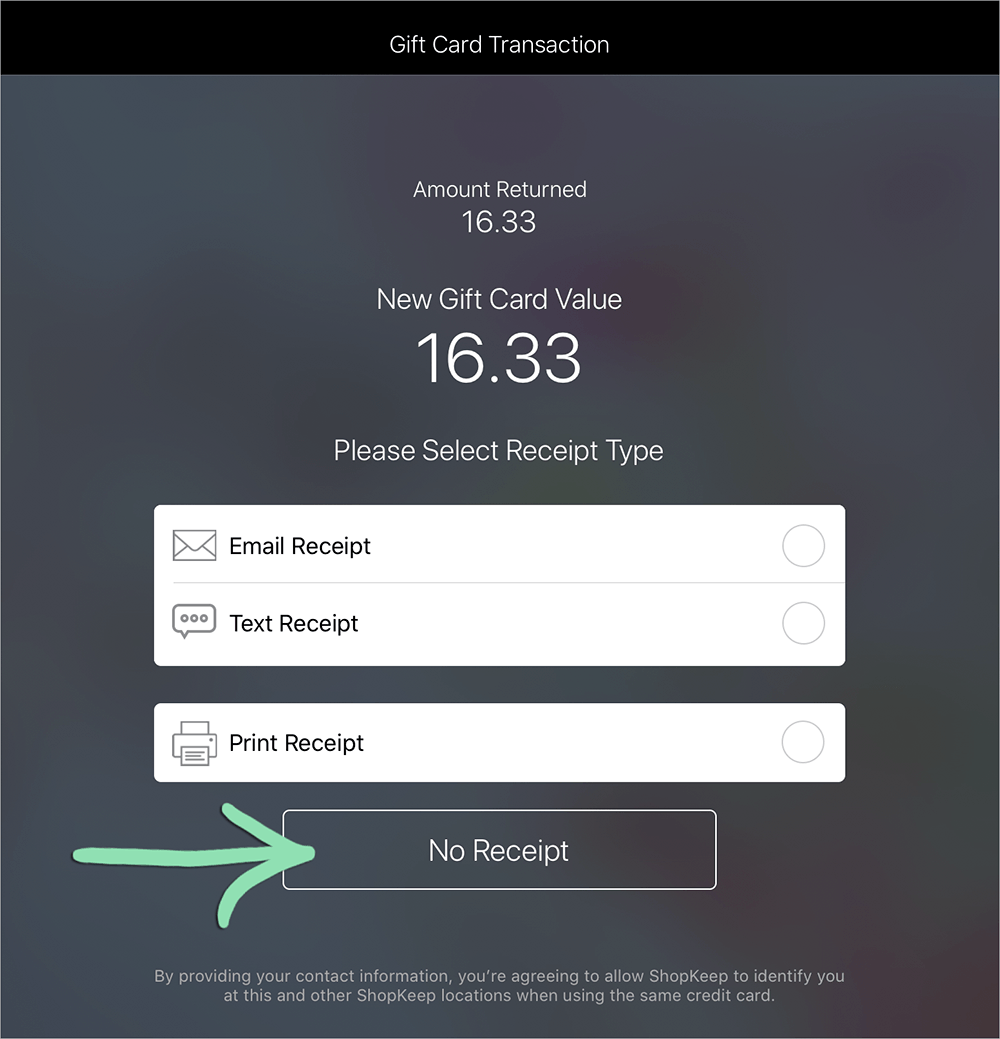
If using the Retail POS (S-Series) app for iOS, tap ‘Add’ to load the total return amount on the card, then tap 'Continue' to confirm the new gift card balance.
In the Retail POS (S-Series) app for Android, this step is not necessary as the return amount will be automatically loaded on the card.
View gift card sale and redemption totals by location, see the entire history of a single card, and generate other comprehensive reports on gift card usage through the gift card reporting portal.
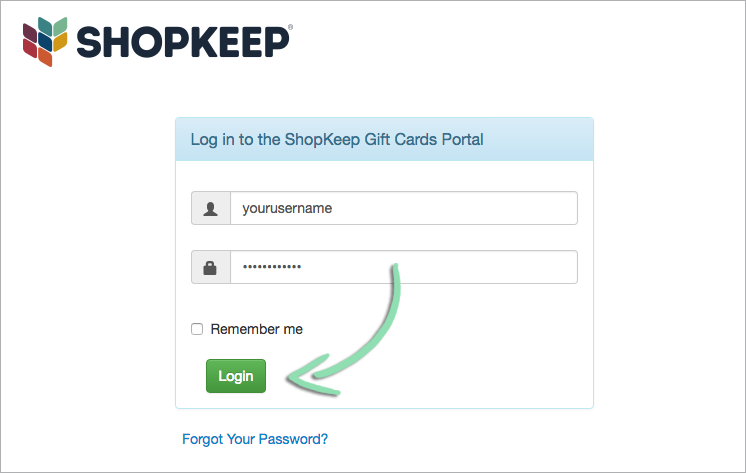
Before logging in to the portal for the first time, check your email for login credentials. A username and password are automatically sent to the email address associated with your Lightspeed Retail account after you set up gift cards.
Enter your reporting portal username and password, then click 'Login'.
Login credentials are sent to the email address associated with your Lightspeed Retail account after you set up gift cards. If you don’t know your username and password, check your email for this information.
If logging in for the first time, click ‘Change Password’ to reset the temporary password.
X-Series Gift Card Migration
If you are migrating from Lightspeed Retail (S-Series) to Lightspeed Retail (X-Series), you must migrate your S-Series integrated gift cards to use them with your X-Series account. First, export your gift card numbers and balances from the S-Series gift card portal. Then, import them into your X-Series account. If you do not take these steps, your S-Series gift cards will not be usable at your X-Series register.
To avoid discrepancies, immediately upload your gift card information to your X-Series account after exporting it from the S-Series gift card portal.
Export Gift Cards from S-Series
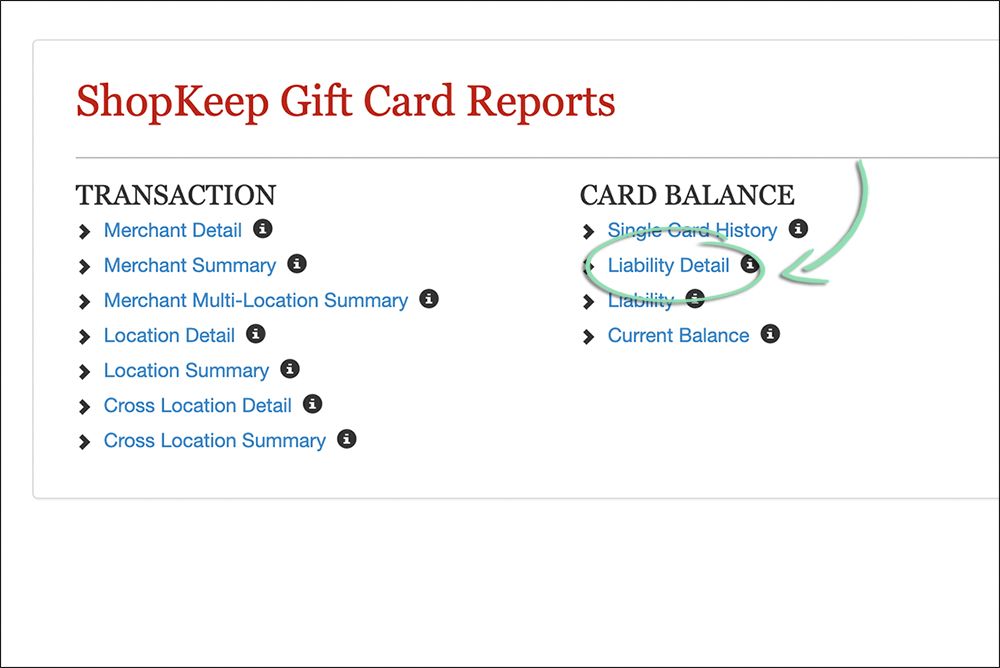
To export your gift card numbers and balances, sign in to the S-Series gift card portal, select the ‘Liability Details’ report, and download it to your computer.
Select the ‘Liability Detail’ report in the ‘Card Balance’ column.
This report displays the number and balance of every gift card for all locations as of a particular date. We recommend downloading the report and then immediately uploading it to your X-Series account to avoid discrepancies.
On the report page, click the calendar and select today’s date. Then, click ‘Run Report’.
After the report loads, click ‘Export to CSV’ or ‘Export to Excel’, depending on the file format you want to use.
If you have multiple locations, repeat these steps for each location.
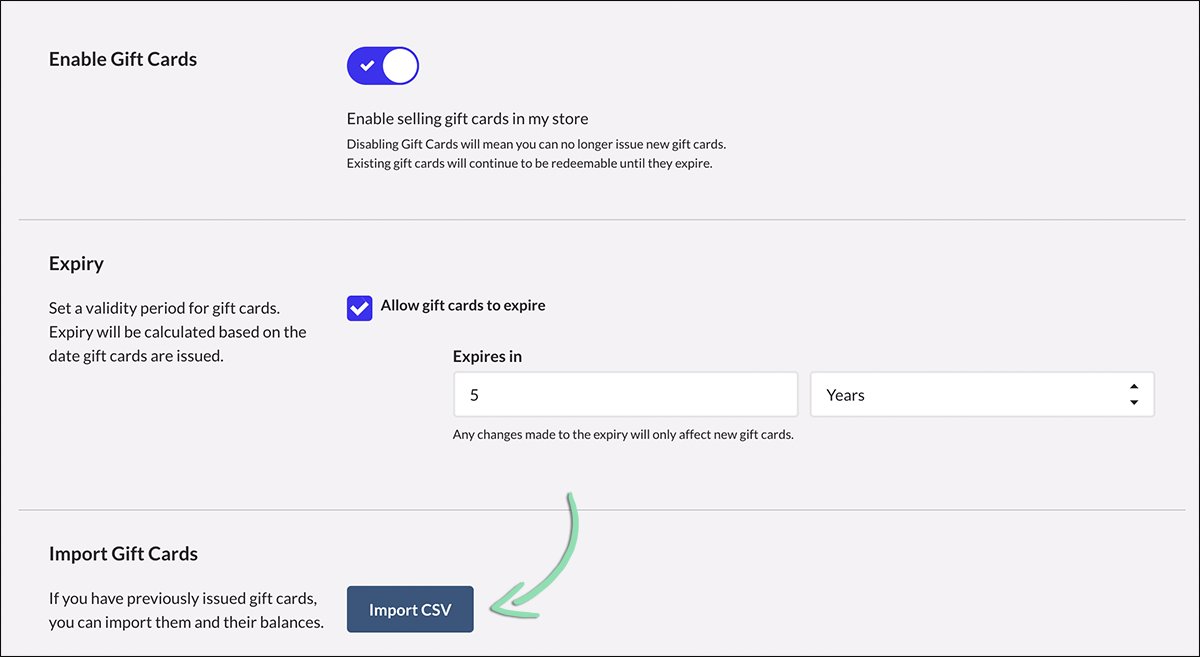
Import Gift Cards into X-Series
Once you’ve exported your gift card numbers and balances, sign in and upload them to your X-Series account using the X-series gift card import template.
Click here to download the X-Series gift card import template.
Enter the gift card numbers and balances from your 'Liability Detail' report into the X-Series template. The 'Account Number' and 'Gift' columns on the 'Liability Detail' report correspond to the 'Number' and 'Balance' columns on the X-Series import template.
If you have multiple locations, you can enter the gift card information for each location into the same X-Series import template.
Save the file in CSV format.
Do not include special characters in your CSV, such as dollar signs or ampersands. This will prevent you from uploading the file, as only alphanumeric characters are accepted.