This feature is only available to US Lightspeed Retail merchants on paid pricing packages using the Retail POS (S-Series) app for iOS.
Pay by Link
Pay by Link allows customers to pay for sales tendered in the Retail POS (S-Series) app for iOS from their own device using a credit card, even if they are not near the register. Customers pay by scanning a printed or virtual QR code using their mobile device or by visiting a link sent the iOS share function. To set up Pay by Link, merchants must sign up for online and mobile payments for their Lightspeed Retail account, enable the Pay by Link Tender in BackOffice, and enable Saved Sales Sync at the register.
Table of Contents
Pay by Link Setup
Set up the Pay by Link feature by completing the sections below: sign up for online and mobile payments, enable the Pay by Link tender in BackOffice, and enable Saved Sales at the register.
Online and mobile payments can be set up from BackOffice, as shown below, or from the Lightspeed Pocket app. You only need to sign up once using one of these methods. After signup and approval, you will be able to access Pay by Link and all other methods of online and mobile payments.
Sign Up for Online and Mobile Payments
Submit business and bank account information in BackOffice to get approved to process credit payments for Pay by Link sales run in the Retail POS (S-Series) app for iOS, sales run in Lightspeed Pocket, emailed invoices, and orders placed via a Lightspeed eCom (E) webstore.
Merchants who signed up for Lightspeed Pocket before February 8, 2021, can also sign up for online and mobile payments through the Pocket app. You only need to sign up once using one of these methods. After signup and approval, you will be able to access Pay by Link and all other methods of online and mobile payments.
Sign into BackOffice as the Business Owner.
Click ‘Card Payments’, then select ‘Online and Mobile Payments’.
Click to Enlarge
Follow the steps here to enter the DBA that will appear on customer credit card statements.
The DBA (Doing Business As name) appears on customer credit card statements next to online and mobile payment charges from your business. By default, the DBA is set to the website entered in the ‘Business Details’ section (see step 4). If you did not enter a website and do not update the DBA, it will default to ‘ShopKeep’.
Follow the steps in the section below to enable the Pay by Link tender in BackOffice.
Enable Pay by Link Tender
After completing the section above, enable the ‘Pay by Link’ tender in BackOffice to activate it for use in the Retail POS (S-Series) app for iOS. Only merchants who have signed up and been approved for online and mobile payments will be able to enable this tender.
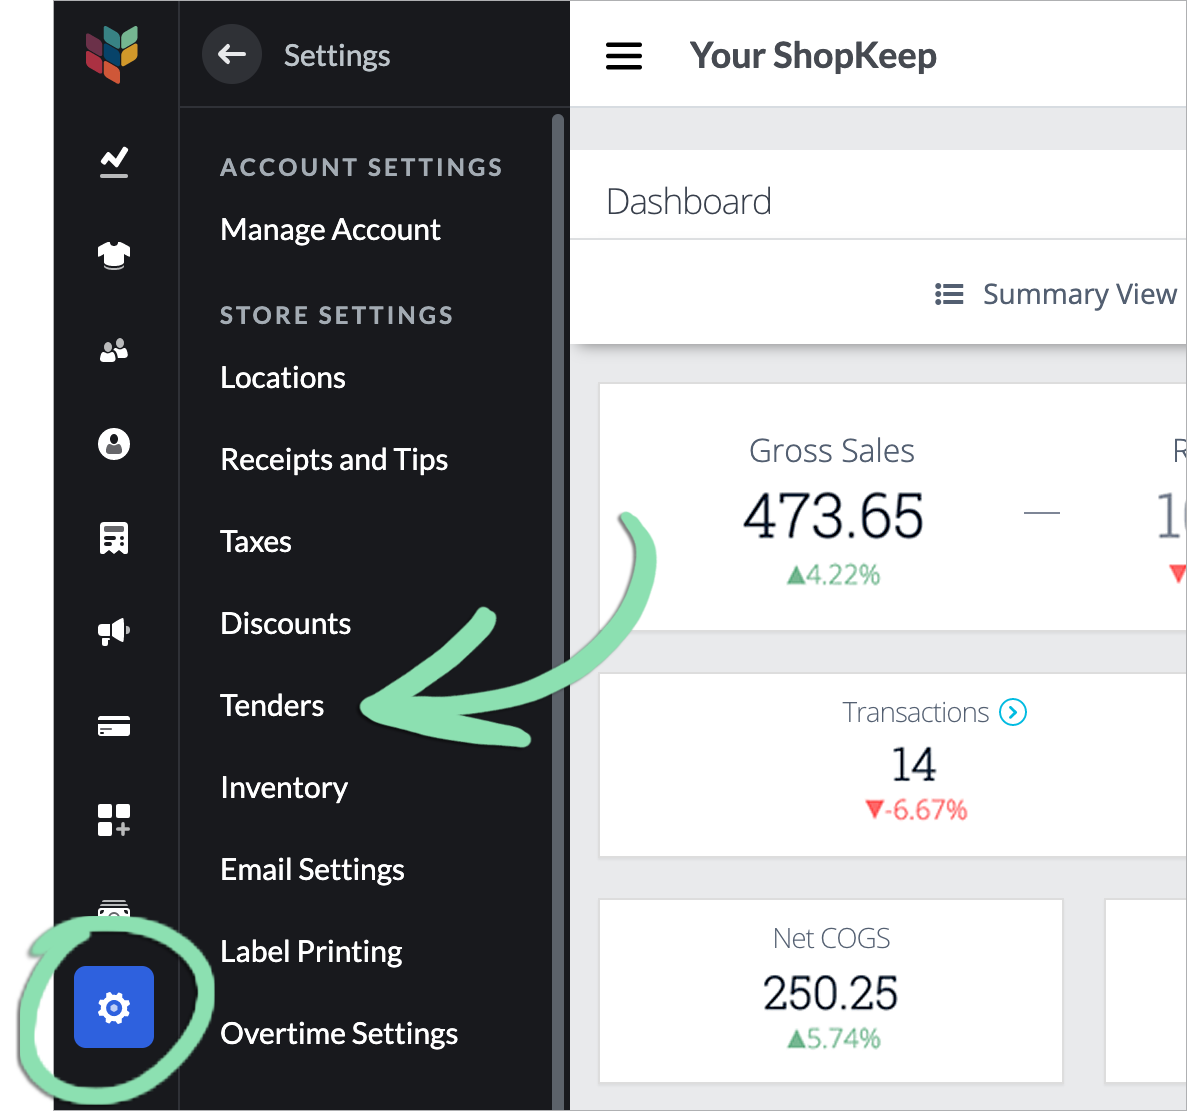
In BackOffice, click 'Settings' and select 'Tenders'.
Click to Enlarge
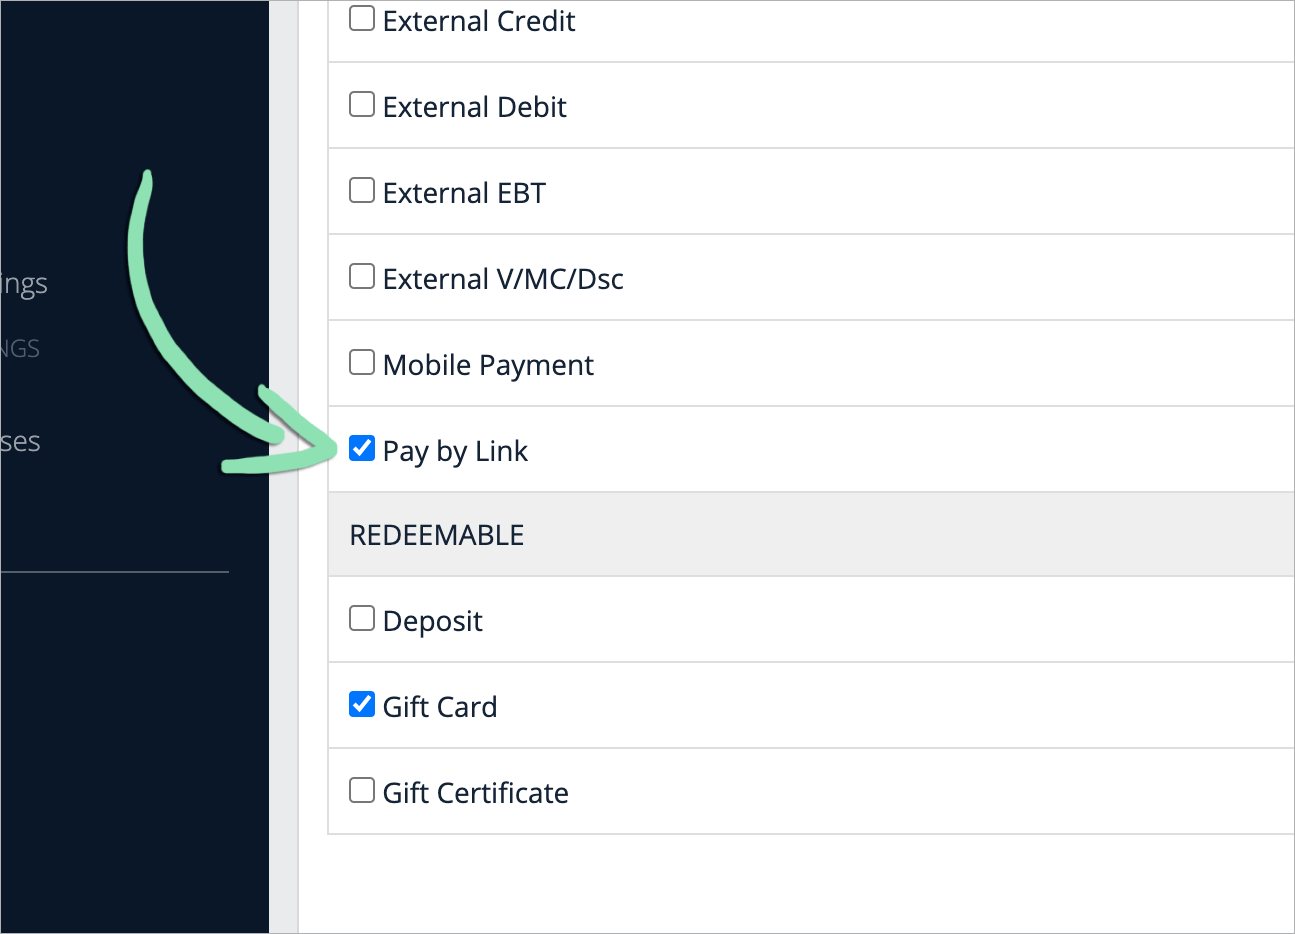
Make sure the box next to the 'Pay by Link' tender is checked.
If it is not, click the checkbox to enable it. This tender can later be unchecked to disable the Pay by Link feature if desired. The ‘Pay by Link’ tender is only available to merchants who have signed up and been approved for online and mobile payments.
Get updates on the iOS register to sync changes to the register.
Follow the steps in the section below to enable Saved Sales Sync in the Retail POS (S-Series) app.
Enable Saved Sales Sync
Saved Sales Sync enables businesses with an active internet connection to sync open saved sales between registers and makes other features, such as Pay by Link, possible.
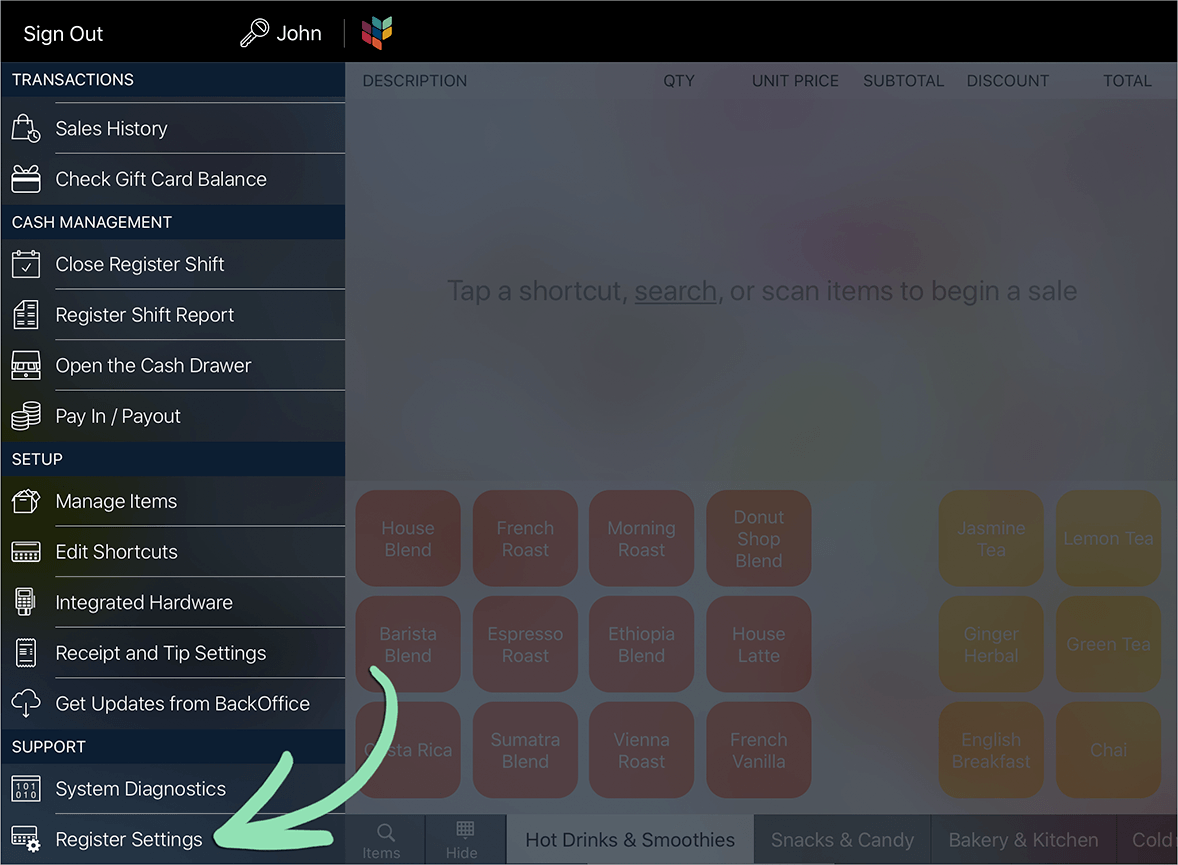
Sign into the Retail POS (S-Series) app for iOS as a register manager.
If it is not enabled, tap the switch to turn it on. We recommend keeping Saved Sales Sync enabled on all registers unless you plan to operate a particular register offline.
(Optional) Toggle the 'Print Pay by Link QR Code on Checks' setting to control whether QR codes are printed for saved sales when tapping the printer icon on the sale screen.
Click to Enlarge
(Optional) Repeat steps 1 - 4 on each additional register.
Use Pay by Link at the Register
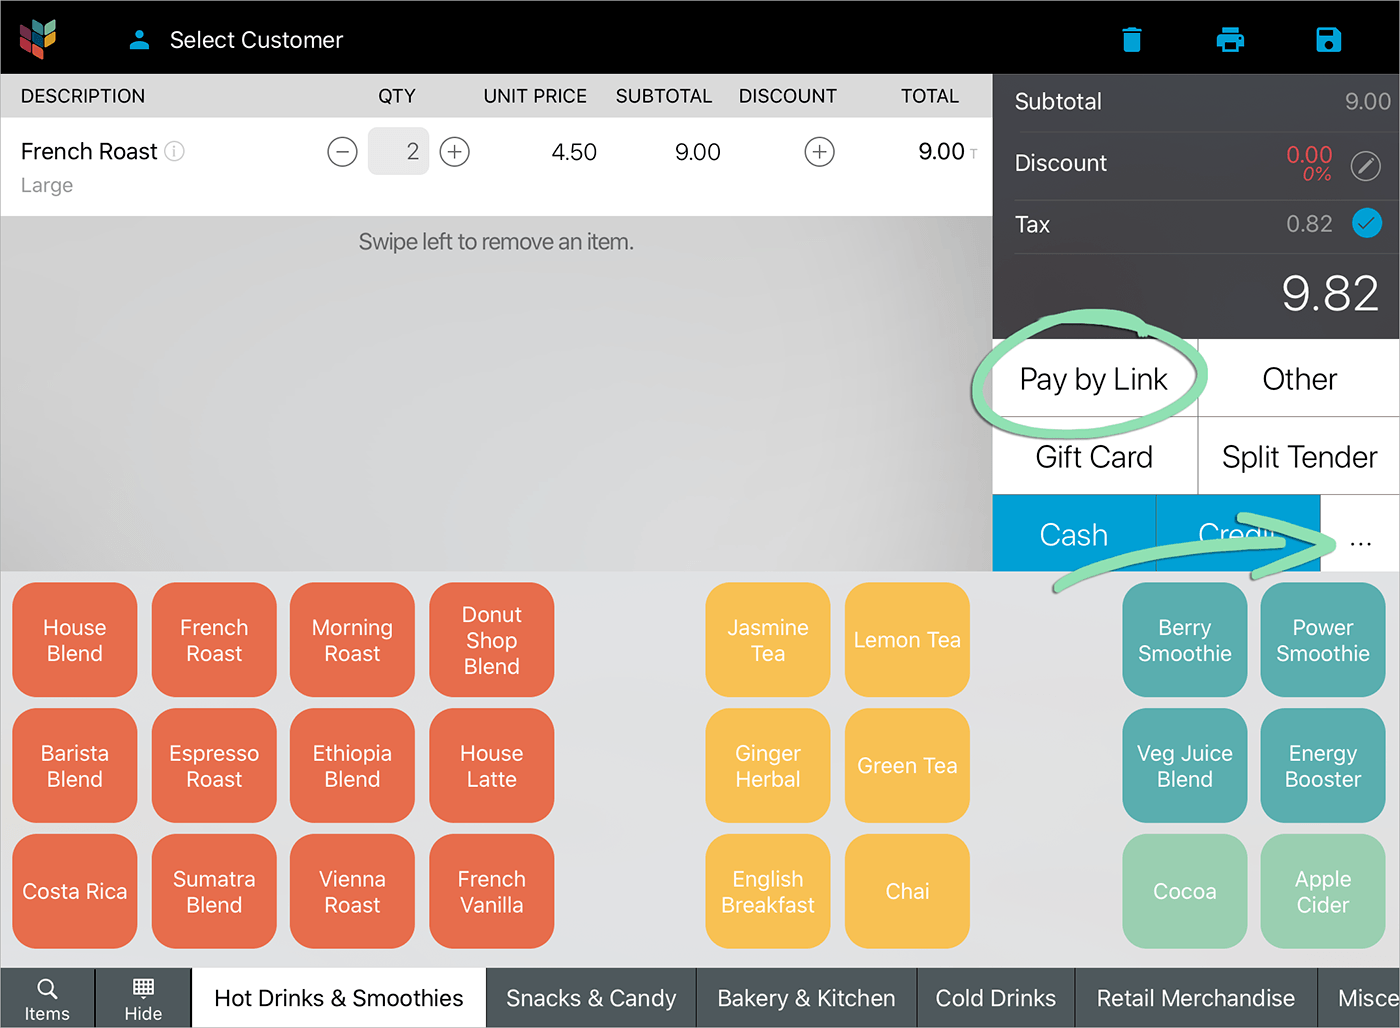
Select the ‘Pay by Link’ tender in the Retail POS (S-Series) app for iOS to generate a link or QR code that a customer can use to pay for the sale from their own device.
This feature is only available to US Lightspeed Retail merchants using the Retail POS (S-Series) app for iOS who have signed up for online and mobile payments and have Saved Sales Sync enabled.
In the Retail POS (S-Series) app for iOS, ring up a sale with a total of $0.50 or more.
All Pay by Link transactions require a minimum total amount of $0.50.
Select how to share the sale payment link with the customer.
Print QR Code | Print a QR code that, when scanned, opens the payment link. This option uses the receipt printer connected to the register. Display QR Code | Show a QR code on the register screen that, when scanned, opens the payment link. Share | Open the iOS ‘Share’ menu to select a method of sharing the payment link. Available sharing options will vary based on the specific apps installed and set up on the iPad but may include the abilities to email, copy, and AirDrop the payment link.
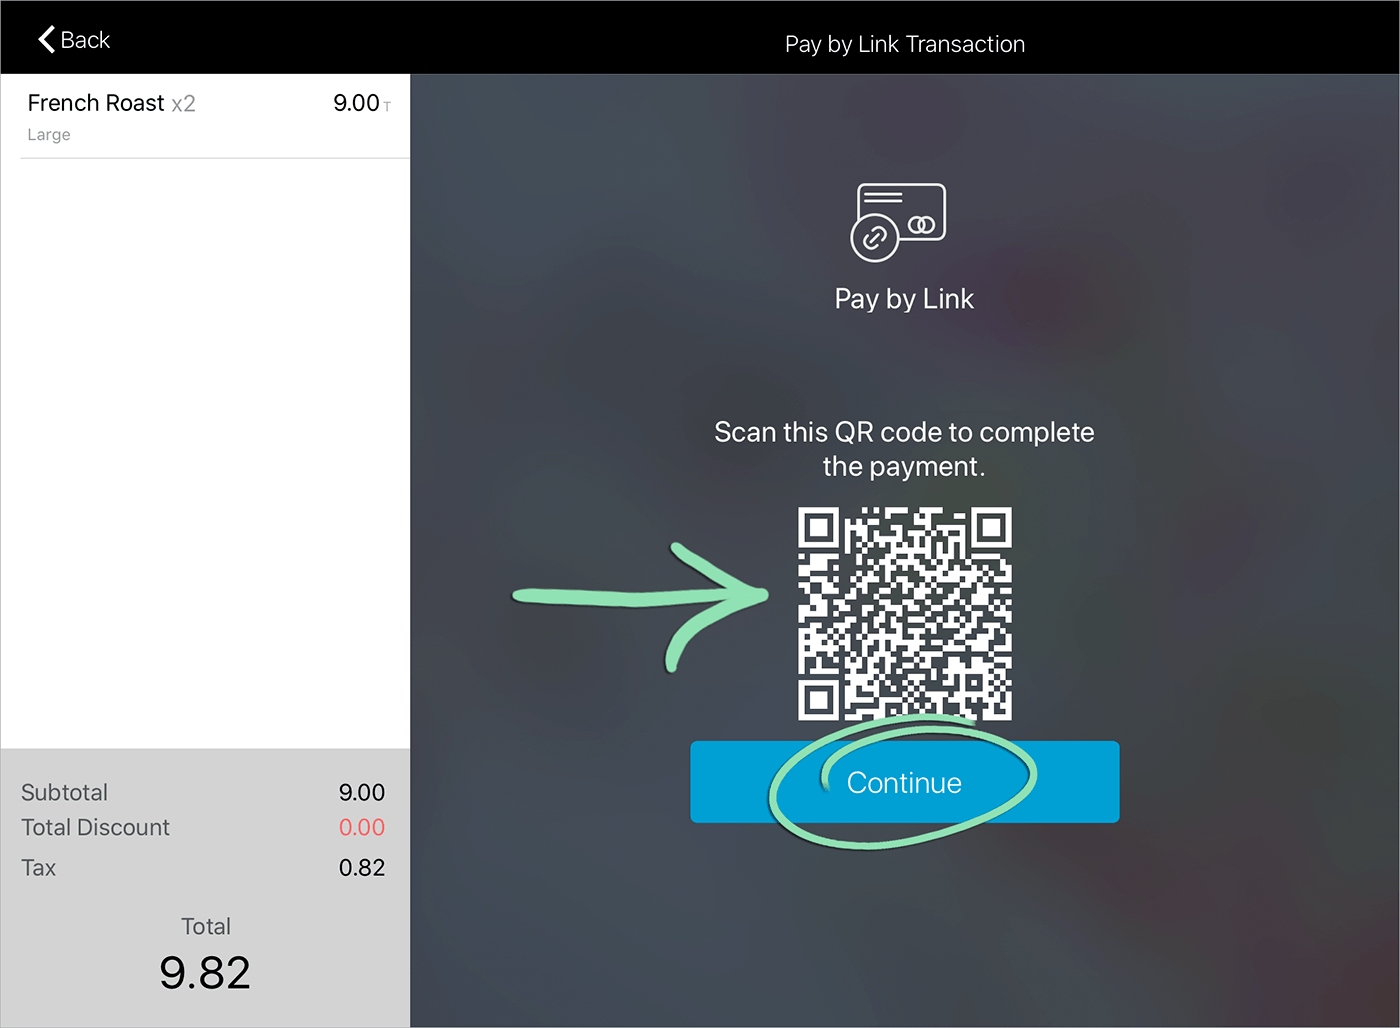
Based on the option selected in step 3, finish sending, printing, displaying, or sharing the payment link.
For Print QR Code, wait for a copy of the sale containing a QR code to print from the receipt printer, then tap ‘Continue’.
For Share, select an option on the iOS ‘Share’ menu and proceed accordingly to send the payment link to the customer.
Available sharing options will vary based on the specific apps installed and set up on the iPad but may include the abilities to email, copy, and AirDrop the payment link.
Customer visits the payment link sent to them or scans the QR code with their mobile device, then follows the prompts to pay for the sale.
To scan a QR code using the latest versions of iOS and Android, open the built-in camera app, point the camera at the QR code, and tap the banner that appears.
To view the steps customers must follow to pay for the sale on their device, visit the section below.
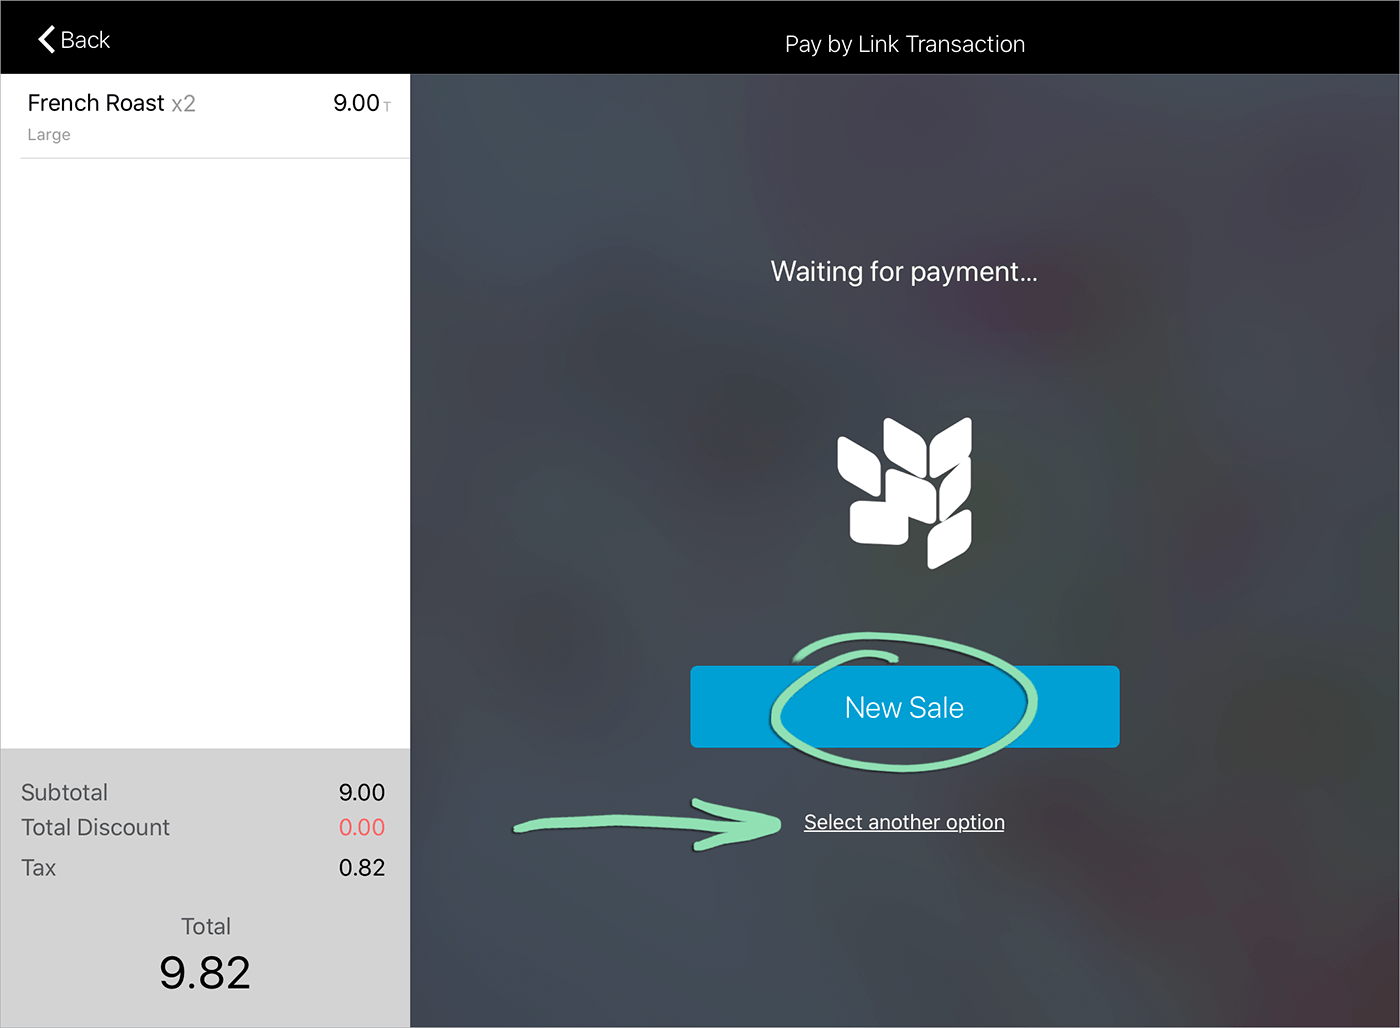
Cashier waits for the customer to pay or selects an option displayed on screen to continue.
If the customer pays immediately, skip to step 8 to complete the sale.
If the customer will pay at a later time, tap ‘New Sale’, then continue to step 7 to save the sale.
To select a different tender, tap ‘Select another option’ to return to the New Sale screen, then tap ‘Cash’, ‘Credit’, or another active tender.
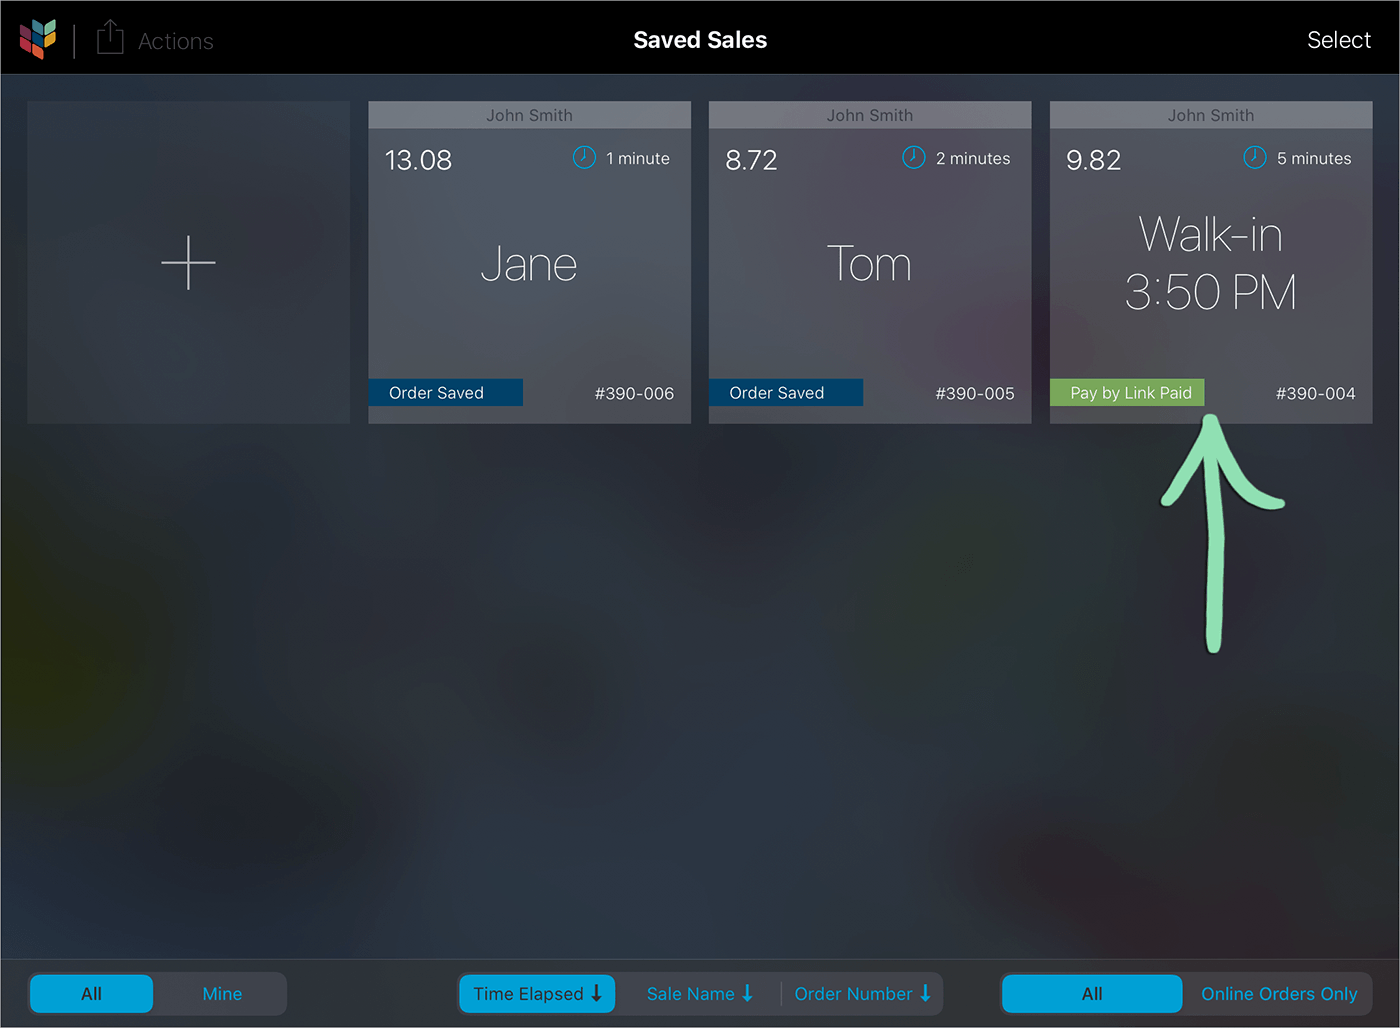
cTap the saved sale labeled ‘Pay by Link Paid’ to close it out, then continue to step 8.
By default, the name of the sale will be set to the name of the customer tagged to the sale. If no customer is tagged, it defaults to ‘Walk-in’ or to the name of the table where the order was started, plus the current time. Unpaid Pay by Link sales will be labeled ‘Pay by Link Sent’.
After sharing a payment link with a customer via QR code or an option on the ‘Share’ menu, the customer enters their credit card information on their own device to pay for the sale. See how this customer-facing part of Pay by Link transactions works below.
Customer visits the sale payment link sent to them or scans the QR code given to them in step 4 of the section above.
(Optional) If gratuity is enabled, the customer selects or enters a tip and taps 'Apply'.
Customer submits their payment by manually entering their credit card details or using Apple Pay or Google Pay from a compatible device.
aFor manual card entry, the customer enters their credit card information and taps ‘Pay Now’.
bFor Apple Pay or Google Pay, the customer taps ‘Check out with’ (Apple) or ‘Buy with’ (Google) from a compatible device and follows the prompts.
Customer waits for their payment to finish processing.
FAQ
View answers to common questions about using Pay by Link.
How do I customize the logo and business information customers see on the Pay by Link payment form?
These details come from Receipt Settings. Visit our Receipt Setup article to learn how to upload a new logo and update the business name and address.
Can I use Pay by Link on split tender transactions?
No, split tender transactions do not support Pay by Link.
Can I make changes to a Pay by Link sale after sending it to a customer?
Yes. If the customer has not yet paid for the sale, tap ‘Select another option’ to return to the New Sale screen (see step 6 in the Use Pay by Link at the Register section). From there, modify the sale and tender it to ‘Pay by Link’ again. The customer will be able to view the updated payment link by refreshing the payment form.
Can I cancel a Pay by Link sale after sending it to a customer?
Yes. If the customer has not yet paid for the sale, tap ‘Select another option’ to return to the New Sale screen (see step 6 in the Use Pay by Link at the Register section). From there, tap the trash can icon to void or discard the sale. The customer will not be able to access their payment link after the sale is cancelled.
Can I return Pay by Link sales at the register?
Yes. However, the Retail POS (S-Series) app only allows Pay by Link sales to be returned to non-credit tenders. To request a Pay by Link sale be refunded to the credit card used in the original transaction, contact [email protected].
Can I use an Android register to create, edit, or close out Pay by Link sales?
No. Pay by Link is not currently supported for use in the Retail POS (S-Series) app for Android.
Pay by Link sales started in the Retail POS (S-Series) app for iOS will appear on Android registers as normal saved sales. However, these sales should not be edited from an Android register as doing so will remove the ‘Pay by Link’ status and invalidate the customer payment link.


 b For Apple Pay or Google Pay, the customer taps ‘Check out with’ (Apple) or ‘Buy with’ (Google) from a compatible device and follows the prompts.
