Clover Mini Setup

Learn how to set up, activate, and connect the Clover Mini All-in-One Credit Card Reader and Printer to your Lightspeed Retail POS. In addition to reading credit cards and printing receipts, this device also allows customers to view sale details, enter tips, and select receipt options right on its screen.

This device is available to eligible merchants processing credit cards with ShopKeep Payments by Lightspeed. Visit our FAQ to learn about ShopKeep Payments by Lightspeed or request a free quote here.

Table of Contents

In the Box

The Clover Mini All-in-One Credit Card Reader and Printer ships with the parts listed below.

Click to Enlarge
  • Clover Device and Hub
  • Power Adapter Block and Cable
  • Ethernet Cable
  • 2 Rolls of Printer Paper
  • Cleaning Cloth
  • Feature Guide
  • USB Cable (not required for setup)
  • Screwdriver (not required for setup)
  • Hardware Setup

    Complete the basic steps of setting up the Clover device hardware and connecting it to power. After setup, the device can be activated for use with Lightspeed Retail.

    IMPORTANT: This device must be connected to your router physically via ethernet cable or wirelessly over Wi-Fi to be able to connect to Lightspeed Retail. You must also have Wi-Fi at the location to complete setup.

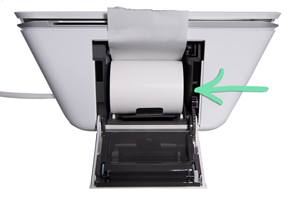
    1. Plug the power cable into the power adapter block.
    2. Plug the power adapter into the round port on the Hub.

      Do not plug the power cable for the Lightspeed Retail iPad register into the Hub’s USB ports. Instead, charge your register using the original white power adapter included with the iPad.

      Click to Enlarge
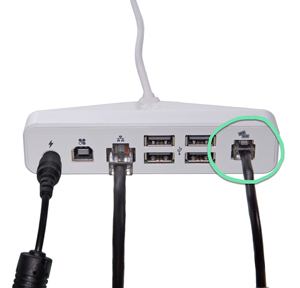
    3. Connect the Hub to your router via the included ethernet cable.
      An ethernet connection is recommended for the most reliable performance. Prefer to connect wirelessly? Skip this step and select your Wi-Fi network later during activation.
      a Plug the ethernet cable into the Hub’s network port.
      Click to Enlarge
      b Plug the other end of the ethernet cable into an open numbered port on your router.
      Click to Enlarge
    4. Pull open the printer cover on the rear of the device.
      Click to Enlarge
    5. Load the printer paper so it feeds up from the top of the roll.
      Purchase additional rolls of thermal receipt paper from the Lightspeed Store.
      Click to Enlarge
    6. Close the cover on the paper.
    7. (Optional) Connect a cash drawer.

      Lightspeed Retail APG cash drawers and Clover cash drawers are both compatible.

      • For APG drawers, you must use the CD-101A cable included with the drawer. Purchase a new CD-101A cable here, if necessary.
      • For the Clover cash drawer, you must use the cable that came with the drawer.
      a Plug the small end of the cash drawer cable into the Hub’s rightmost port.
      Click to Enlarge
      b Plug the larger end of the cash drawer cable into the bottom of the drawer.
      Click to Enlarge
    8. Plug the power cable into a power outlet.

      The device boots up automatically. After a few startup screens, the setup wizard appears.

      Click to Enlarge
      If the display does not turn on, visit our troubleshooting guide for help.
    9. Follow the steps below to activate the Clover device for use with Lightspeed Retail.

    Device Activation

    After setting up the Clover device hardware, use the setup wizard to complete the activation process. Once activated, the device will be ready to connect to the Lightspeed Retail POS.

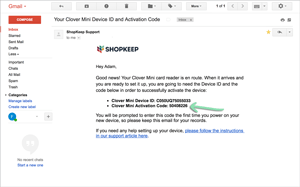
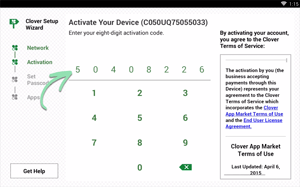
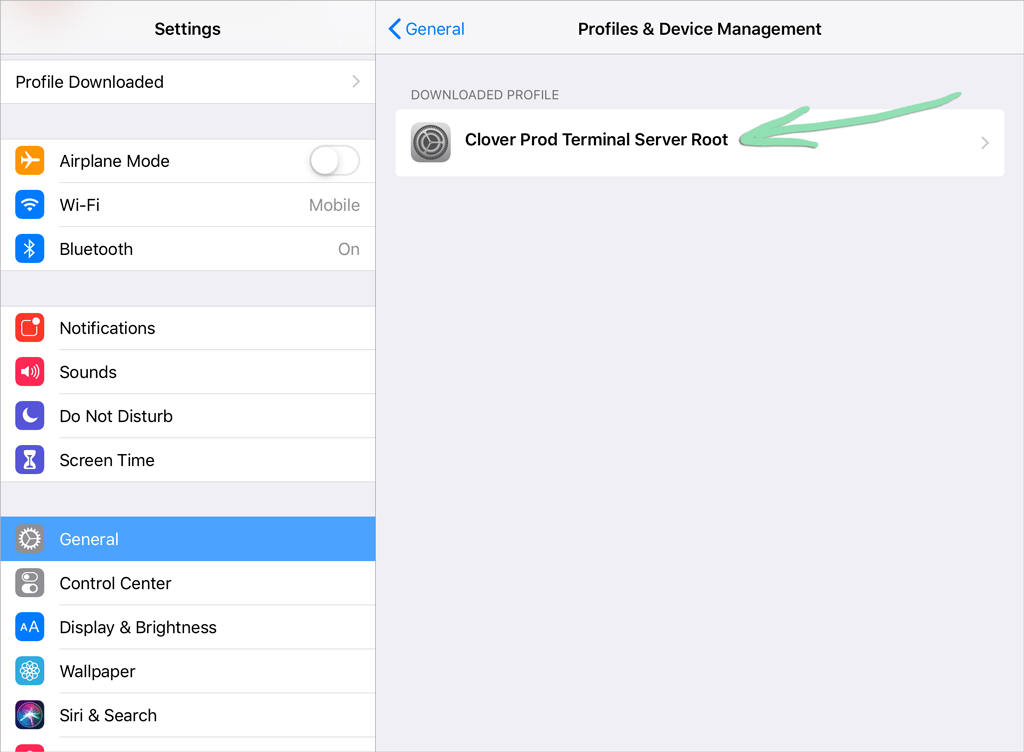
    1. Locate your activation email and make note of the activation code.

      The email is sent to the Lightspeed Retail account’s Business Owner email address with the subject ‘Your Clover Mini Device ID and Activation Code‘.

      Click to Enlarge
      If you have multiple Clover devices, match the Device ID in each activation email to the number on the bottom of each Hub to tell which code is for which device.
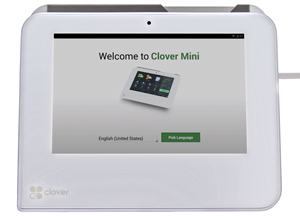
    2. On the Clover device, select your language and tap ‘Pick Language’.
      Click to Enlarge
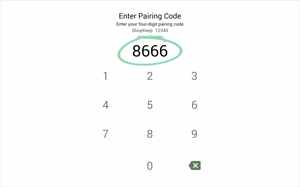
    3. Connect the device to your network.
      a If you plugged the Hub into your router via ethernet cable, tap ‘Next’.
      Click to Enlarge
      b If you did not plug the Hub into your router, tap ‘Configure’ to connect to your Wi-Fi network.
      Click to Enlarge
    4. After the device checks for updates, tap ‘Continue’.
      Click to Enlarge
    5. Enter the 8 digit activation code from step 1.
      Click to Enlarge
    6. Set a 4 or 6 digit passcode and tap ‘Set Employee Passcode’.

      This is used to unlock the device when you reboot it, wake it from sleep mode, and exit the Network Pay Display app.

      Click to Enlarge
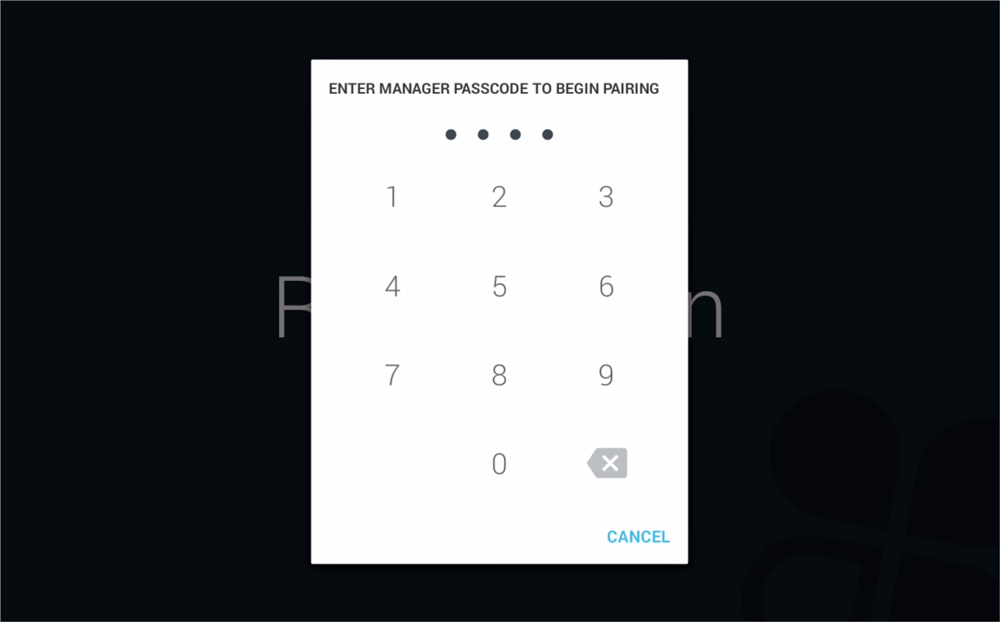
      The passcode cannot be changed on the device itself, so pick one that is easy to remember. Need to reset your passcode? Visit our troubleshooting guide for help.
    7. Enter the passcode again and tap ‘Confirm Passcode’.
    8. Wait for the default apps to download and install, then tap ‘Next’.
    9. (Optional) Customize the passcode setting and tap ‘Continue’.

      With Lightspeed Retail, tip and signature preferences are controlled from Receipt and Tip Settings, so there is no need to change the second setting here.

      Click to Enlarge
    10. On the Home screen, swipe left to the next page and open the Network Pay Display app.

      To change the order in which apps appear, tap and hold an icon to rearrange them.

    11. In the Network Pay Display app, tap 'Start'.
      Click to Enlarge
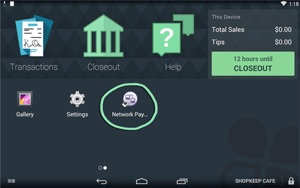
    12. Review how to exit the Network Pay Display app and tap 'Got it'.
      Click to Enlarge
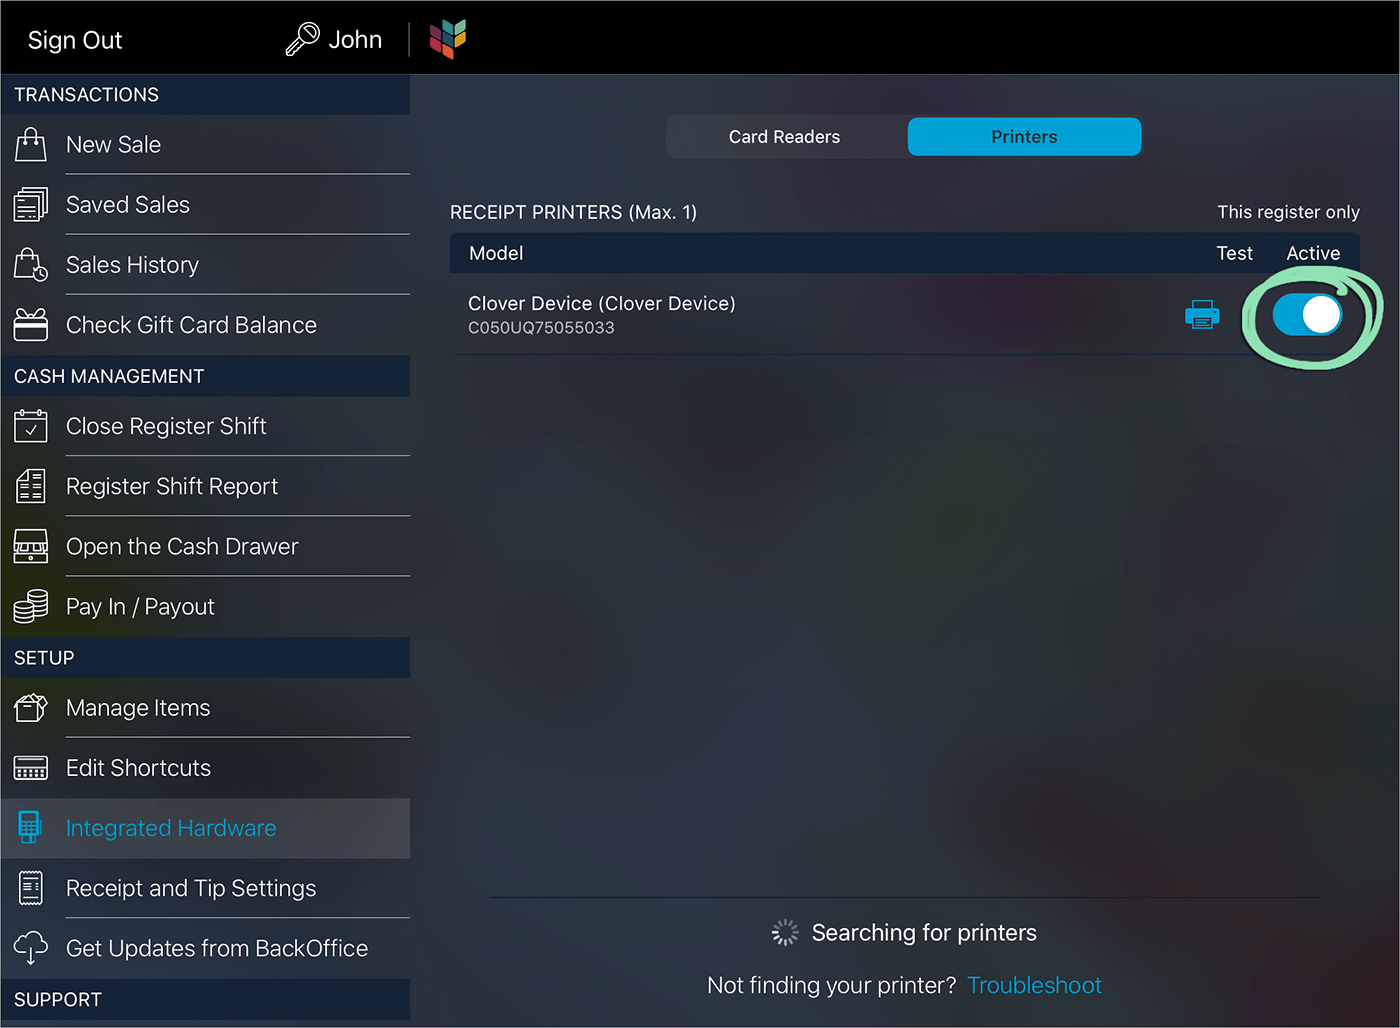
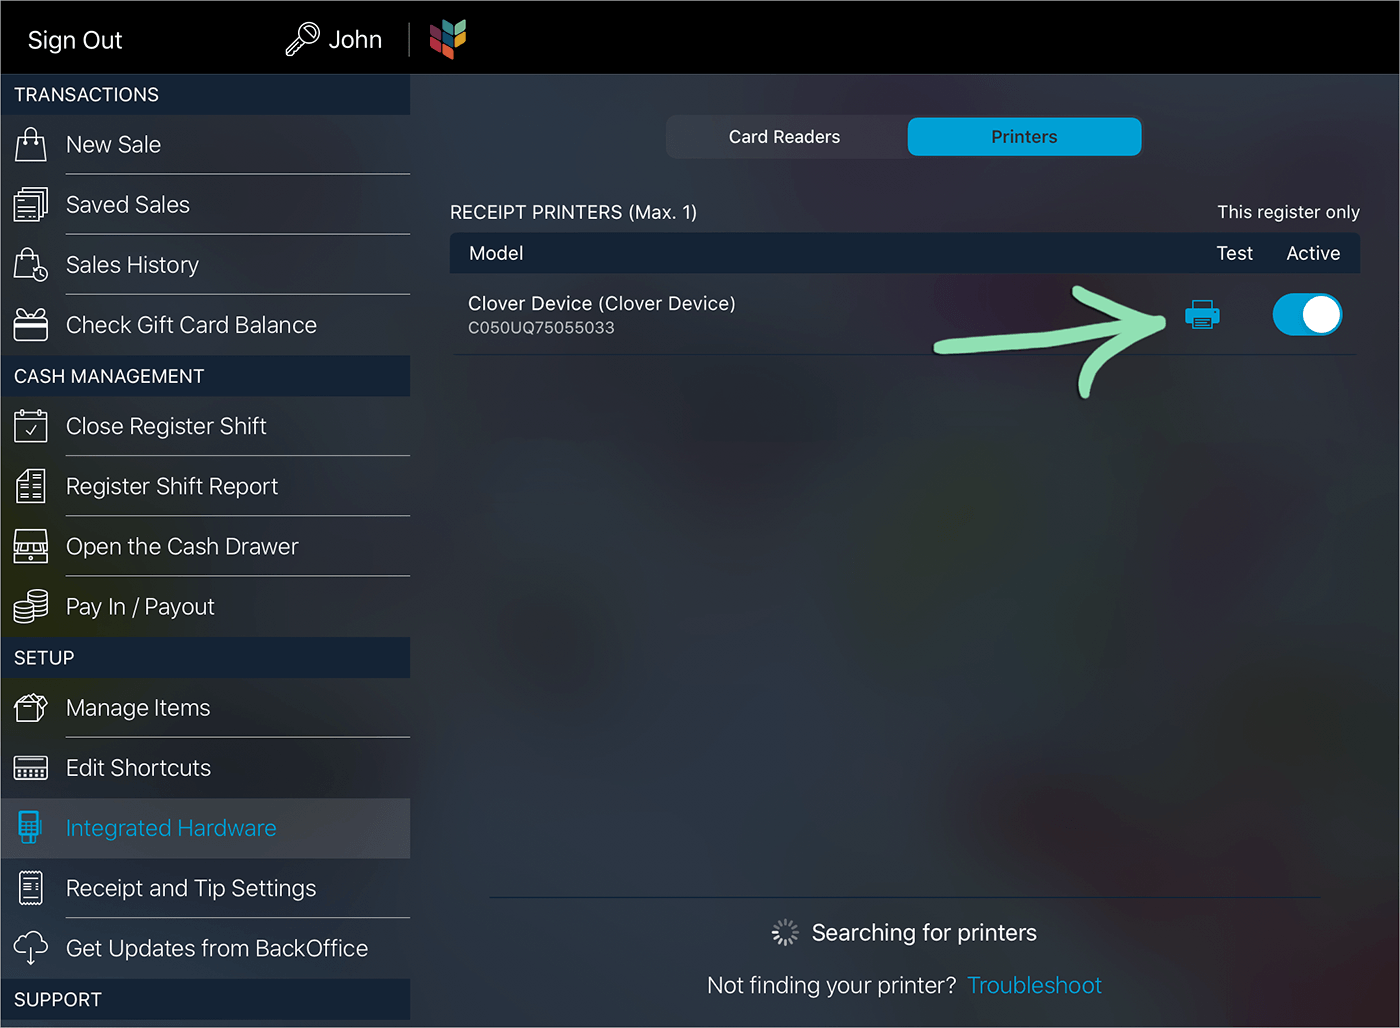
    13. Follow the steps below to connect the device to Lightspeed Retail.

    Connect to Lightspeed

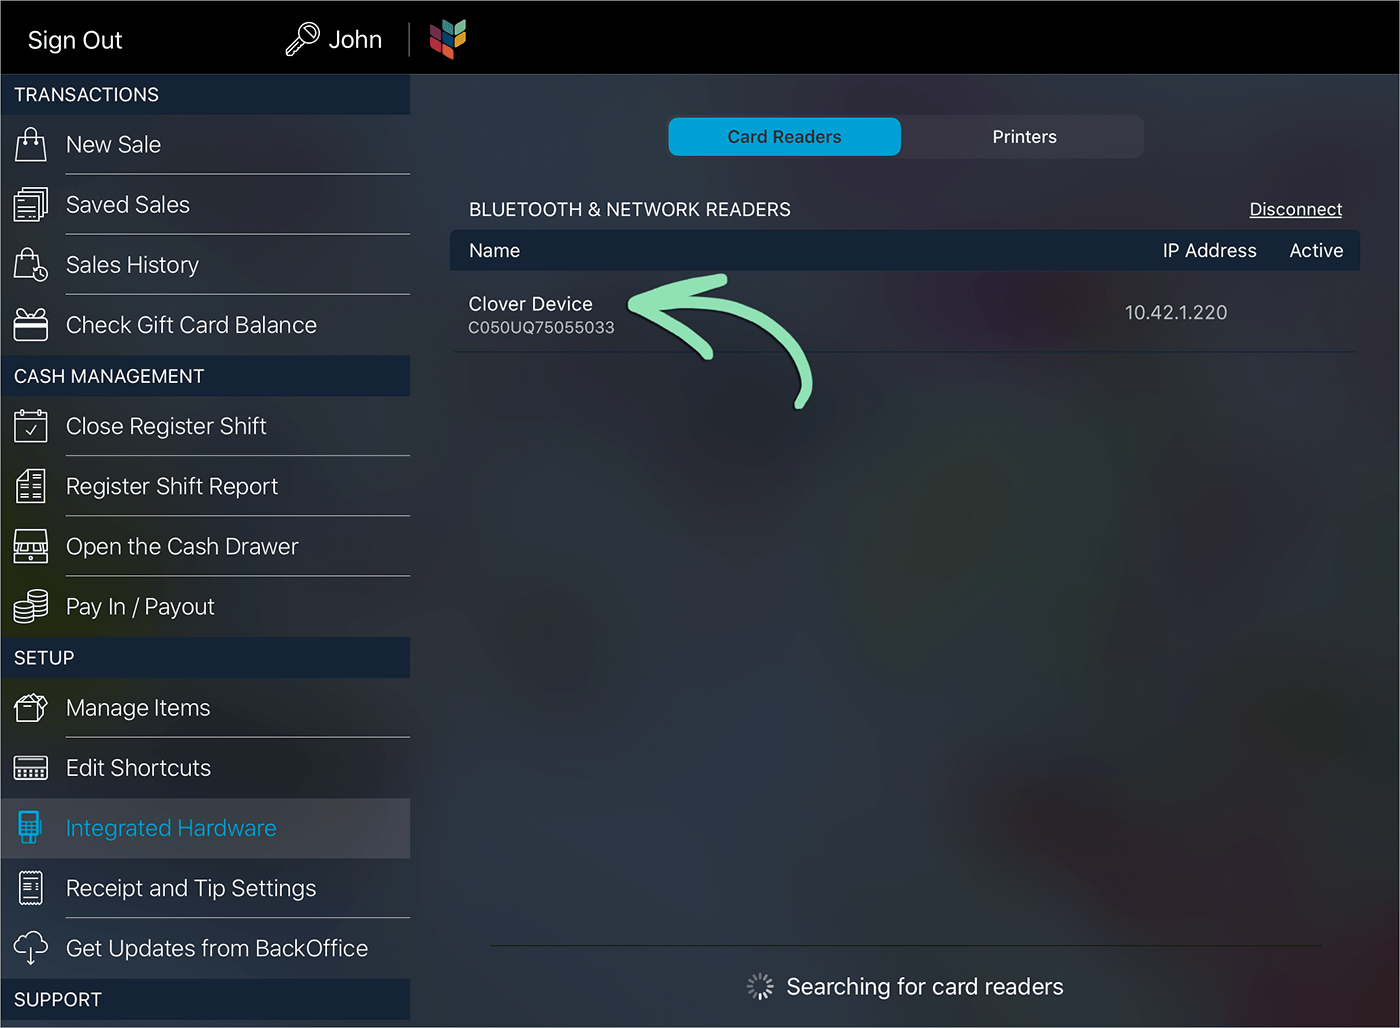
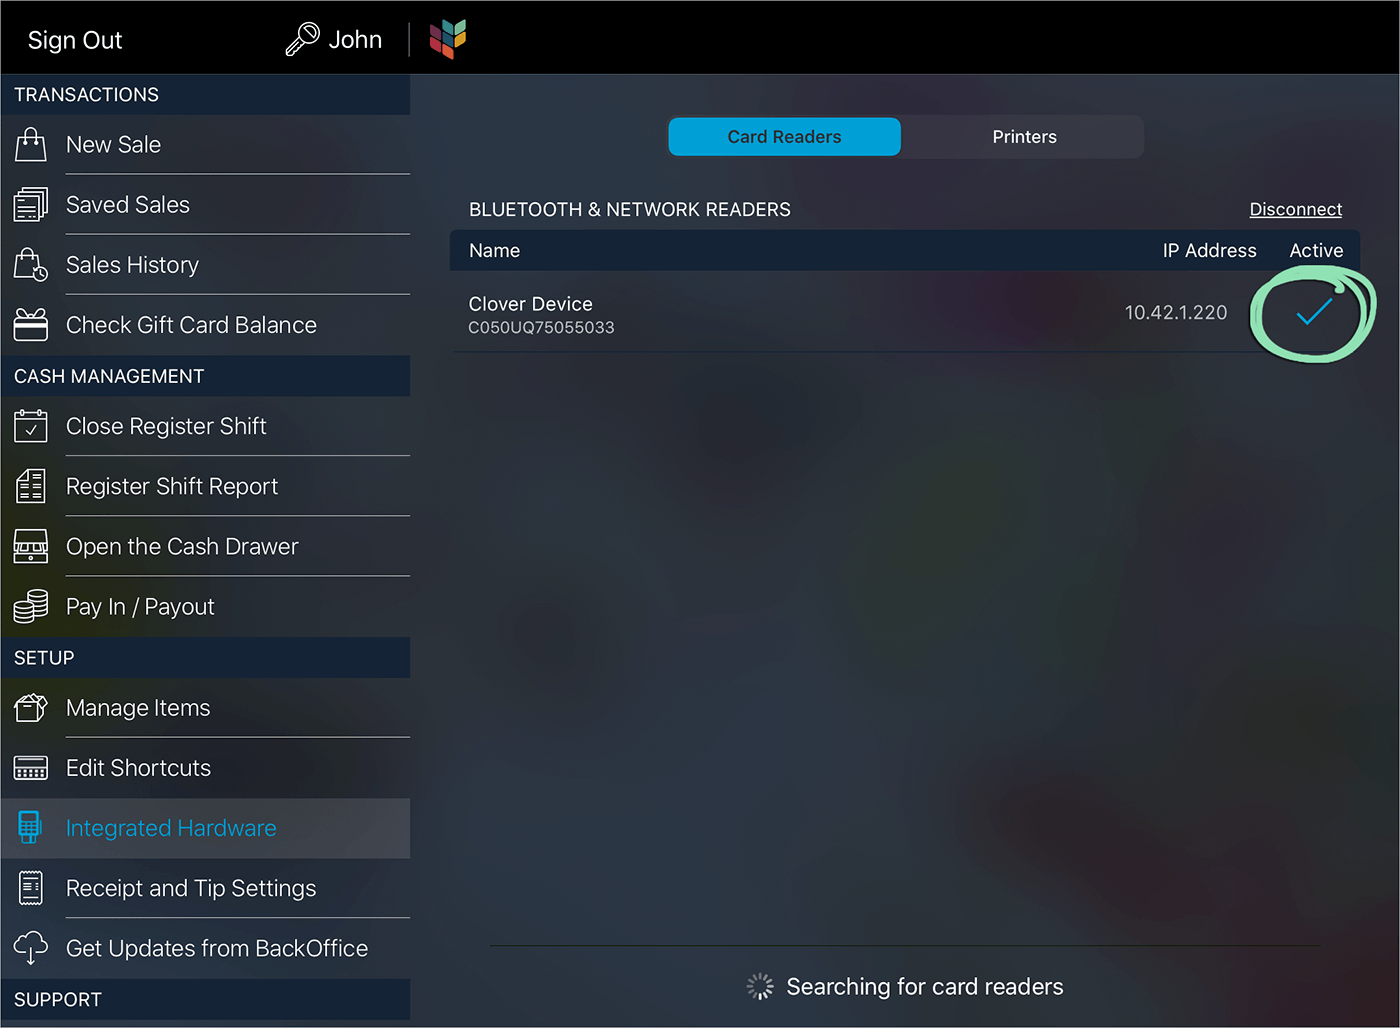
    With the Clover device activated, connect it to the Retail POS (S-Series) to begin using it. Before getting started, make sure the Clover device and your Lightspeed Retail iPad register are on the same internet network.

    Please note that the Clover device can only be connected to one Lightspeed Retail iPad register at a time.

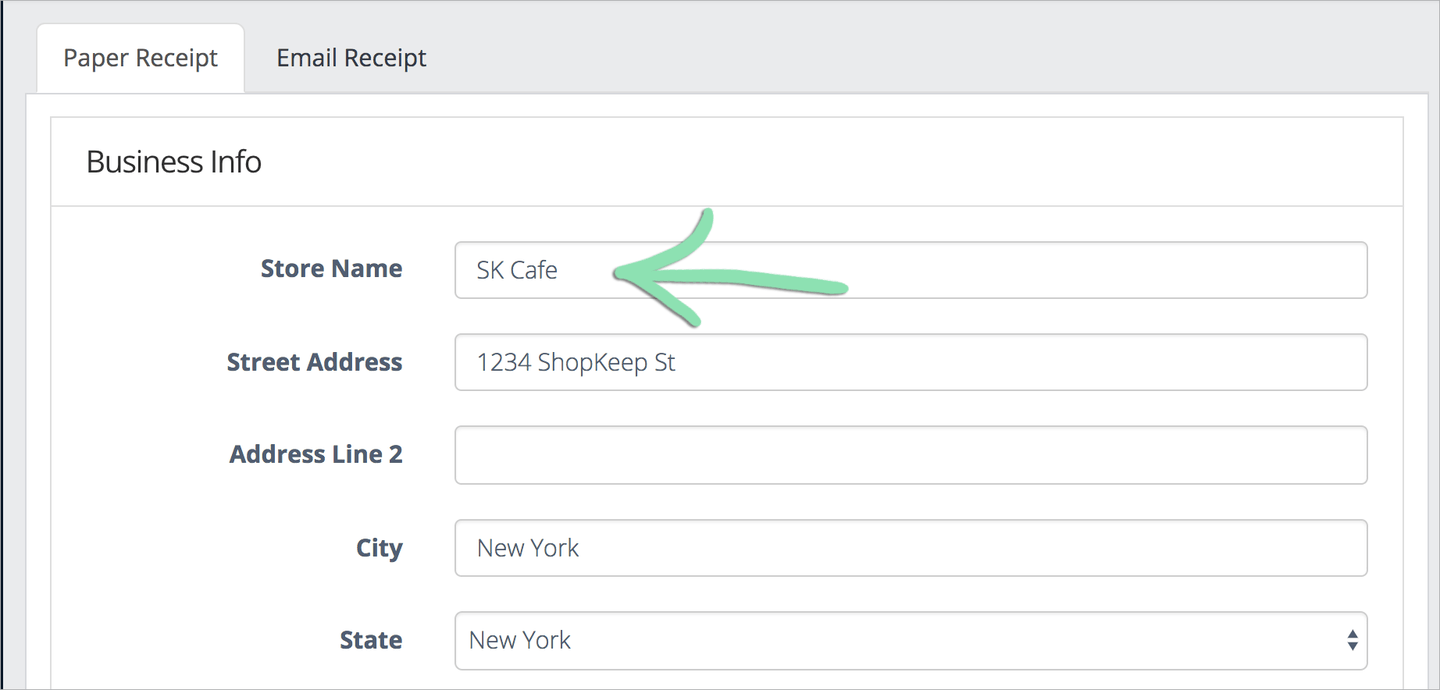
    1. Customize your paper receipt with a 'Store Name'. Learn how to set up receipts here.

      The ‘Store Name’ displays on the Clover Mini’s ‘Welcome’ screen after it is connected to the Lightspeed Retail POS.

      Click to Enlarge
    2. In the Retail POS (S-Series) app, open the Main Menu, tap 'Get Updates from BackOffice, then ‘Get Updates’.

      Receiving an error when you get updates? Visit our troubleshooting guide for help.

      Click to Enlarge
    3. Tap 'Integrated Hardware'.
      Click to Enlarge
    4. On the 'Card Readers' screen, tap the Clover device.

      Don’t see the Clover device? Visit our troubleshooting guide for help.

      Click to Enlarge
    5. Tap 'OK' on the pop-up to install the required certificate.

      The Retail POS (S-Series) app will automatically close and the Safari app will open.

      Click to Enlarge
    6. In Safari, tap 'Install Certificate'.
      Click to Enlarge
    7. Tap 'Allow'.
      Click to Enlarge
    8. Tap ‘Close’, then open the Settings app.
      Click to Enlarge
    9. In Settings, tap ‘General’ and select ‘Profiles & Device Management’.
      Click to Enlarge
    10. Tap ‘Clover Prod Terminal Server Root’.
      Click to Enlarge
    11. Tap ‘Install’, then tap ‘Install’ again.
    12. Tap 'Install' to confirm the installation.
      Click to Enlarge
    13. Tap 'Done'.
      Click to Enlarge
    14. Reopen Safari, then follow step 2 displayed in the browser.
      • This step in Safari must be completed.
      • Failure to complete this step will prevent the Clover device from connecting to the Lightspeed Retail POS.
      Click to Enlarge
    15. After completing the Safari step above, tap 'Return to register' and 'Open'.

      This automatically opens the Retail POS (S-Series) app.

    16. In the Retail POS (S-Series) app, tap the Clover device.
      Click to Enlarge
    17. On the Clover device, enter the passcode created during device activation.
      Click to Enlarge
    18. On the Clover device, enter the pairing code displayed in the Retail POS (S-Series) app.

      Not receiving a pairing code in the Retail POS (S-Series) app? Return to Safari and complete step 14 from above.

      Click to Enlarge
    19. In the Retail POS (S-Series) app, wait for a checkmark to appear next to the Clover device.
      Click to Enlarge
    20. Tap 'Printers'.
      Click to Enlarge
    21. Toggle the switch next to the Clover device to use it as the receipt printer for this register.
      Click to Enlarge
    22. (Optional) Tap the printer icon to test the connection between the Retail POS (S-Series) app and the device.

      If successful, this prints a slip of paper with the device’s name, MAC address, and the date and time.

    The Clover Mini All-in-One Credit Card Reader and Printer is now set up and ready to use with your Lightspeed Retail POS. Visit our Using the Clover Mini article to learn about the device’s features.