This feature is only available for Lightspeed Retail merchants on select pricing packages.
Invoices
Use Invoices to send customers a bill for goods or services to be paid online, by mail, or in person at a later time. Invoices can be used to manage special types of sales interactions, such as work orders, deposits, and mail orders.
From BackOffice, invoices can be sent via email, printed out for delivery by mail or in person, and tracked individually by status. Invoices can be paid online if online payments are set up or manually marked as paid in BackOffice if a customer pays by cash, check, or another accepted payment method.
Table of Contents
Create an Invoice
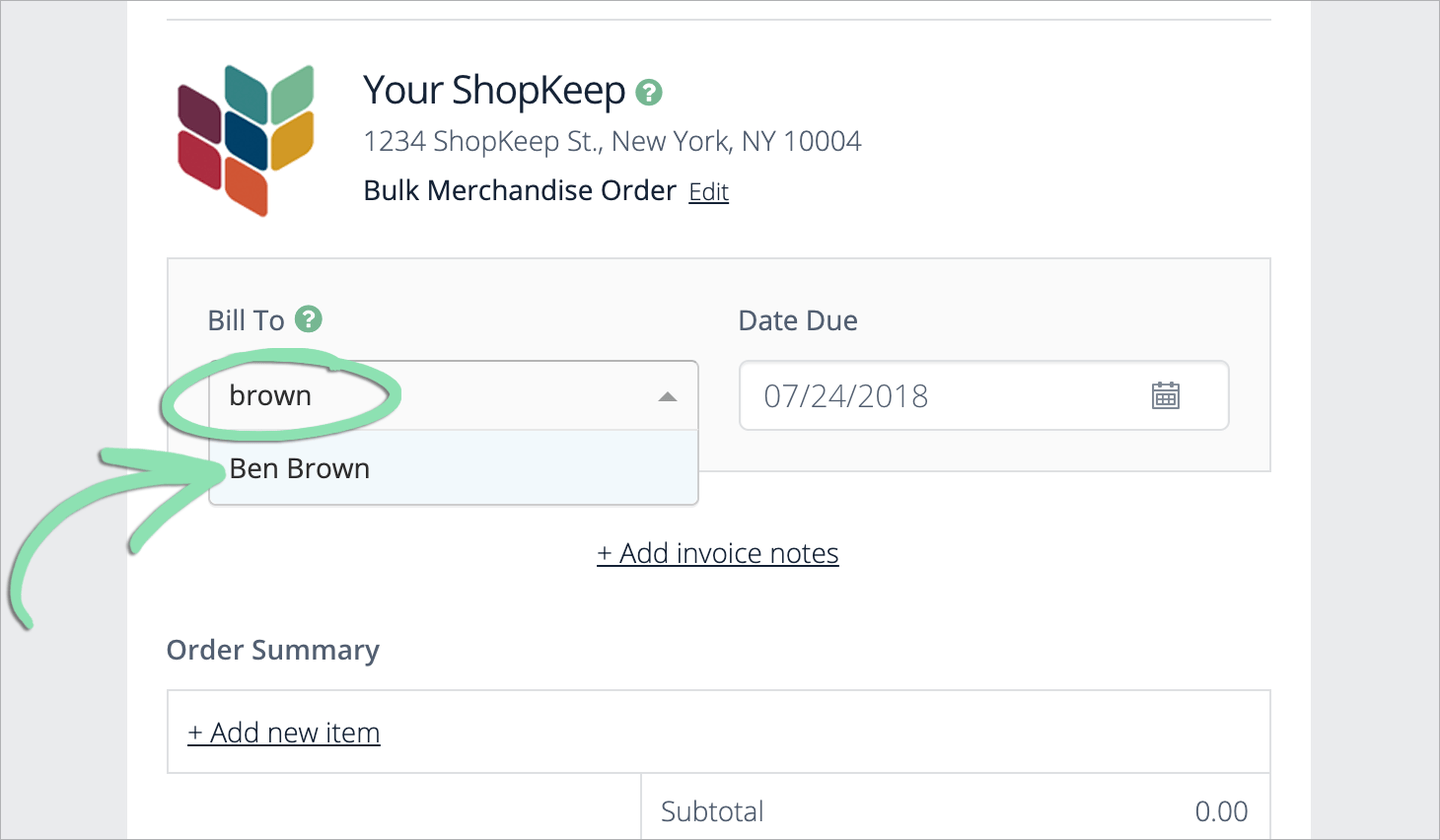
Set up a new invoice in BackOffice to create a bill for items you sell or services you provide. Once created, an invoice can be emailed to its assigned customer or printed into a physical copy.
From the ‘Bill To’ drop-down, select an existing customer or add a new one to assign to the invoice.
To select an existing customer, search by name, email address, or phone number and click to select. Only customers with a saved email address will appear.
To add a new customer, enter their email address and click ‘Add new customer’. The email will be added to the Customer List, where you can later edit the customer to add their name, phone number, address, and other details.
Visit our Manage Customers article to learn how to create new customers or edit existing ones.
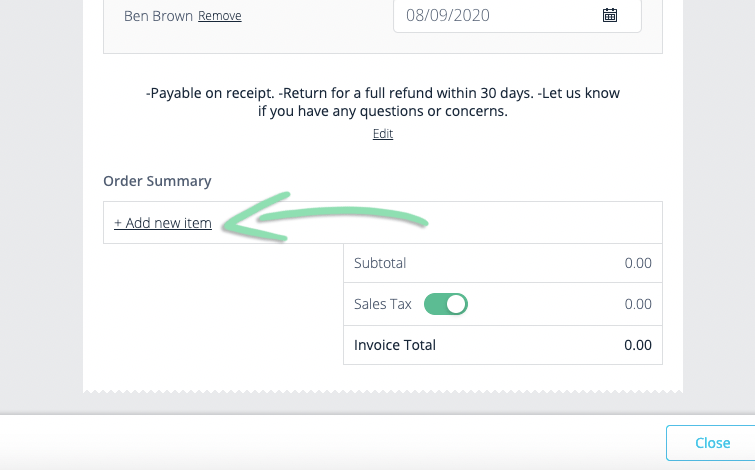
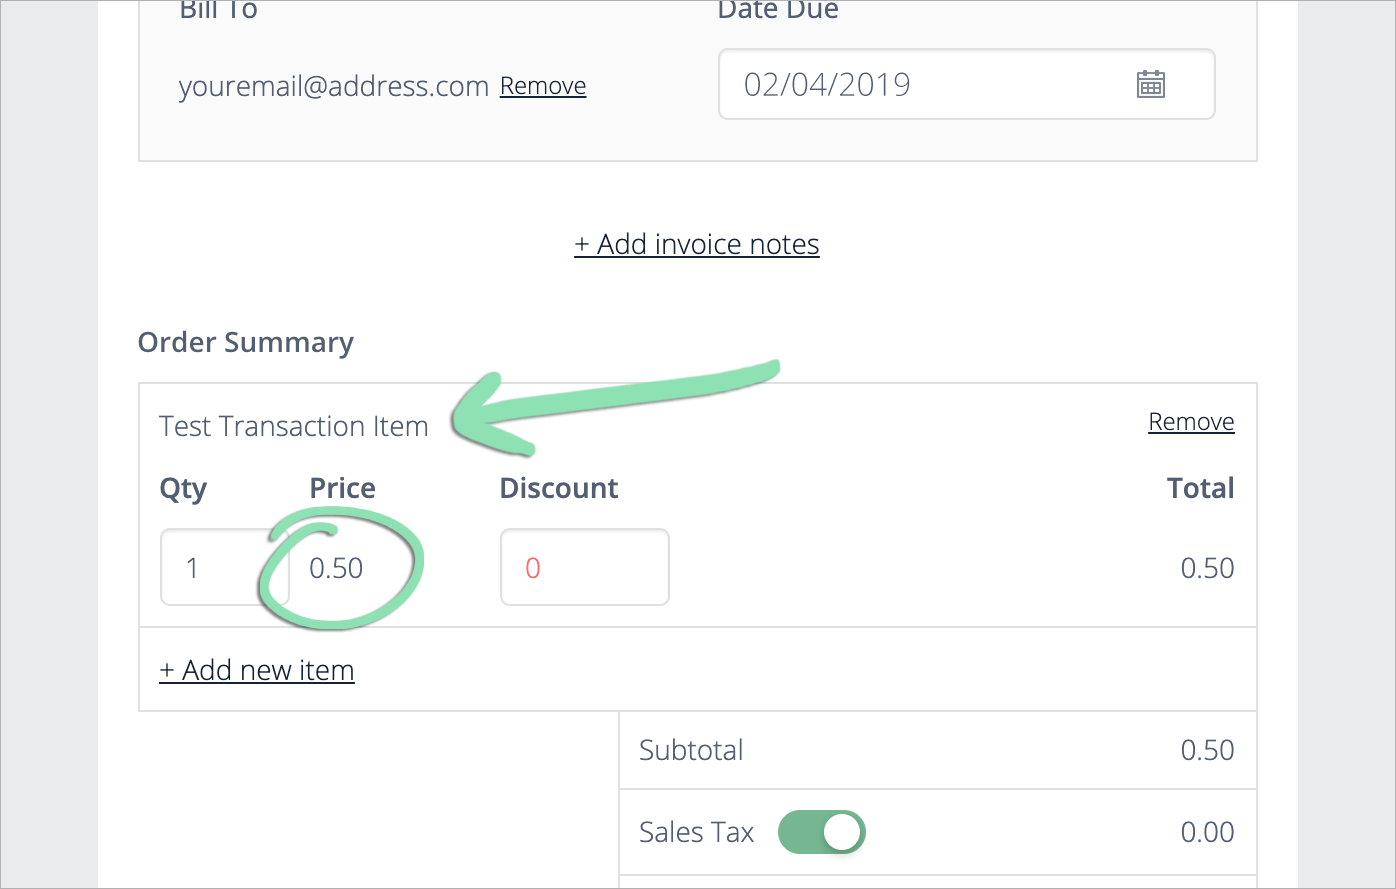
bSelect an existing item, or create a new basic item, to add to the invoice.
To select an existing item, search by item name or scroll through the list, then click to select an item. By default, the drop-down list displays the 20 most recently modified items before entering a search term.
To create a new basic item, enter a name for the item, then click ‘Create’. Enter the item price in the pop-up that appears, then tap ‘Save’. To learn how to add a cost, quantity on hand, and other properties to the item after creating it, visit our Add a Basic Item article.
Basic items and items with variants are supported, but modifiers for basic items cannot be selected. Do not add Integrated Gift Cards to invoices as gift cards must be issued in the Retail POS (S-Series) app in order to be activated with a value.
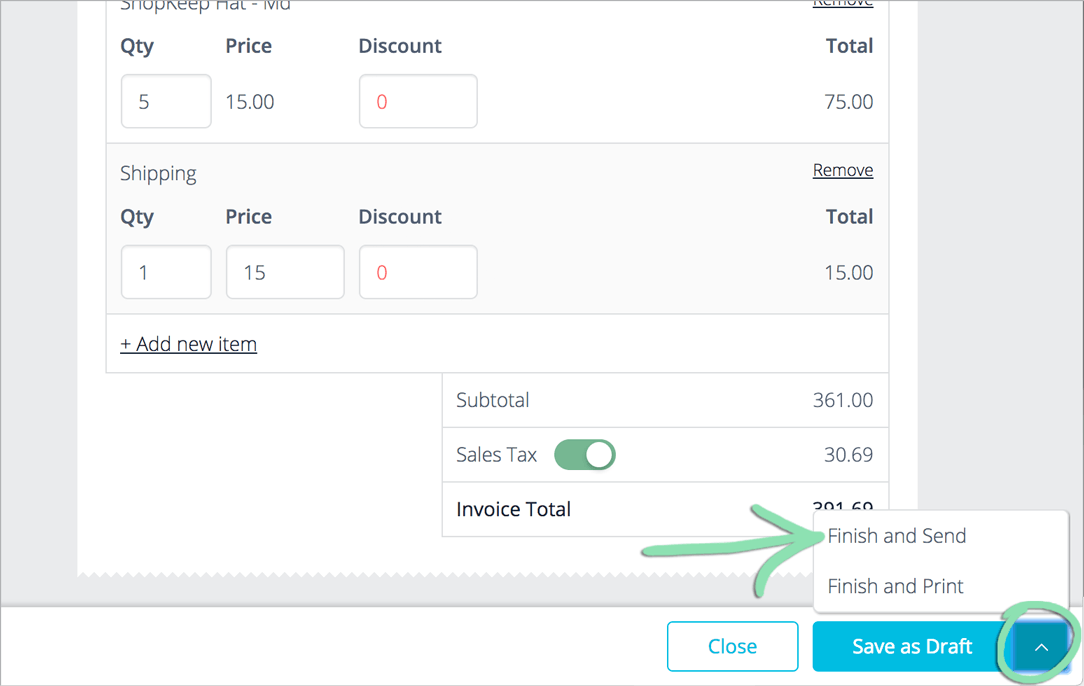
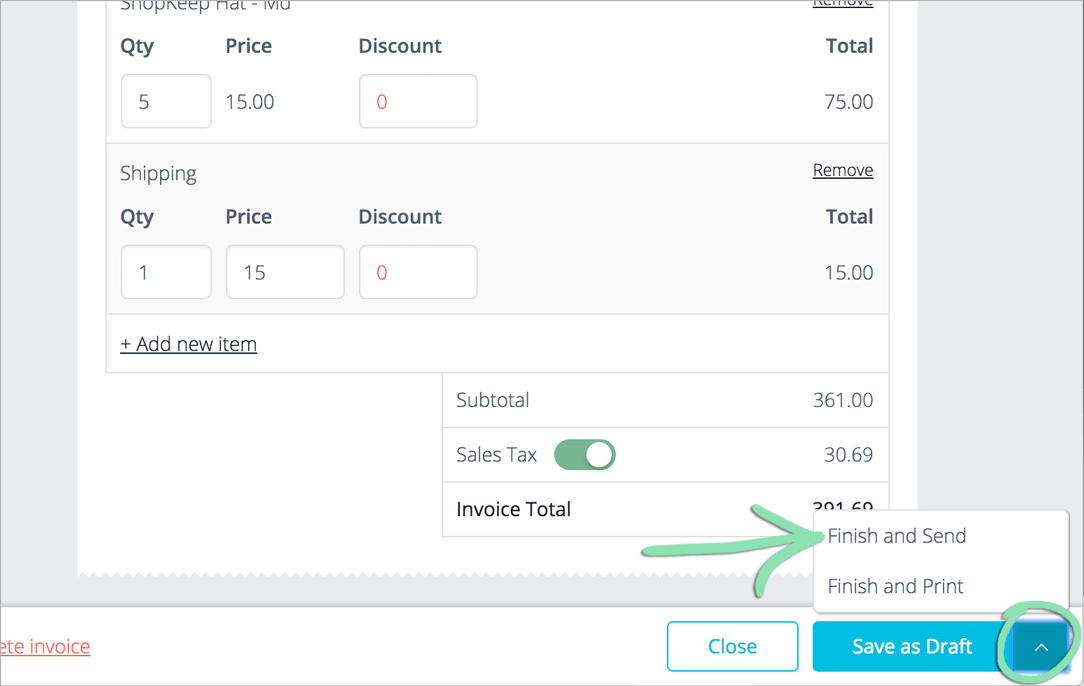
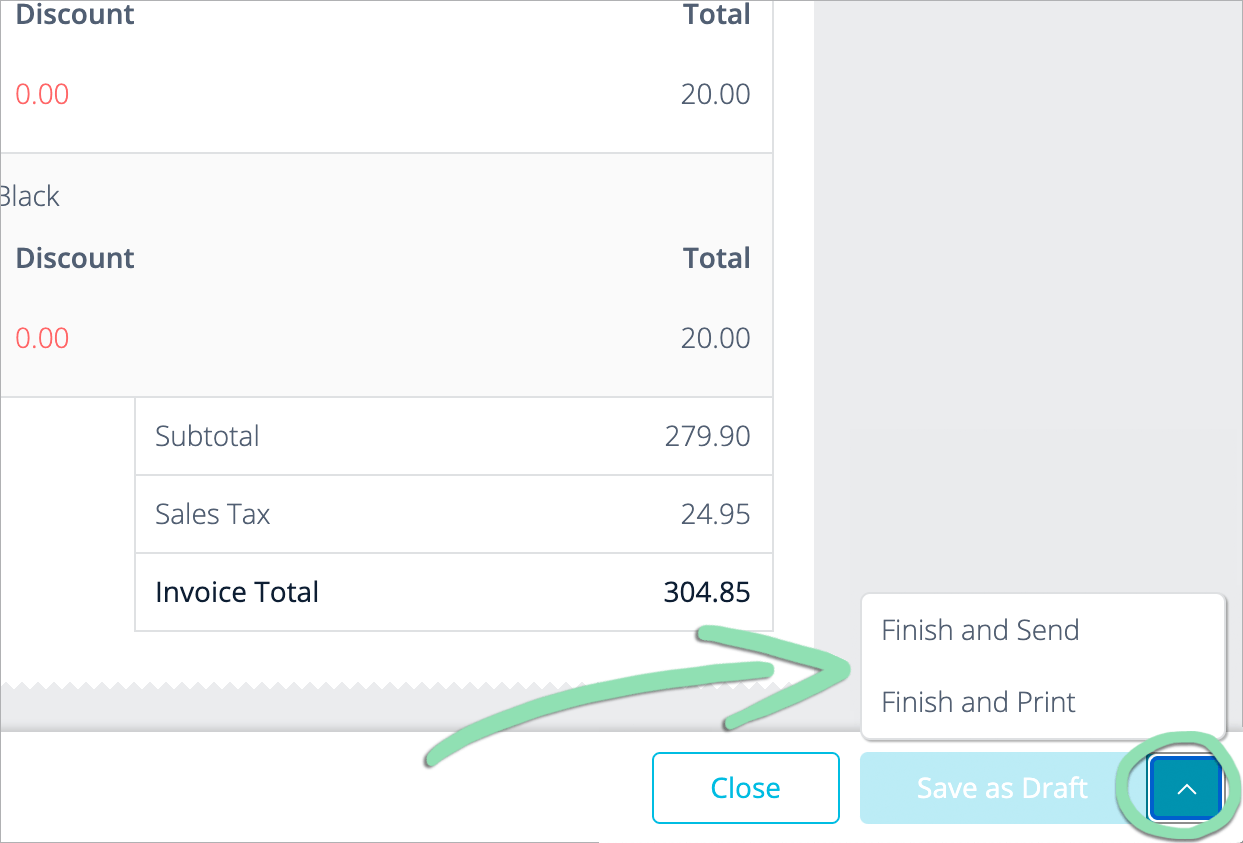
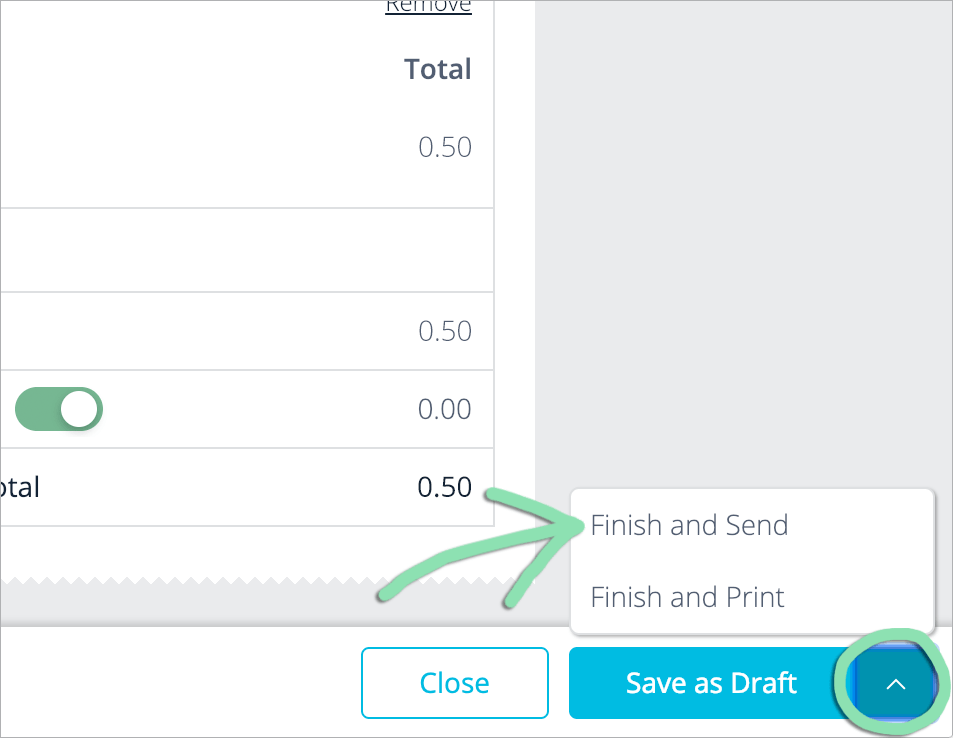
bTo finish the invoice and share it with the customer, click the arrow and select an option. Finished invoices cannot be deleted but can be edited or canceled before payment.
Finish and Send | Send the invoice by email to the address on file for the customer. The email sends from [email protected] and its subject contains the store name and invoice number. If online payments are set up, emailed invoices can be paid online by the customer. If an emailed invoice is later edited or canceled, the customer will receive an email confirming the changes or cancellation.
From BackOffice, check the status of existing invoices, edit or delete invoice drafts, and resend, reprint, edit, or cancel finished invoices
Check Invoice Status
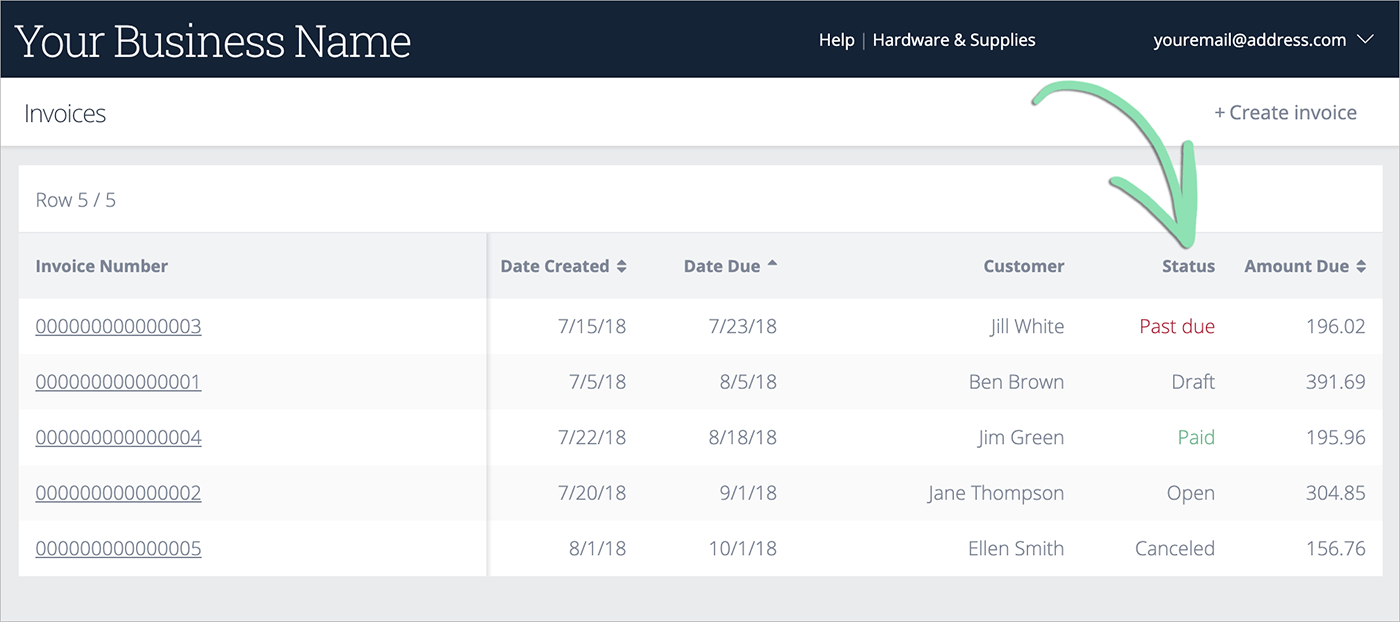
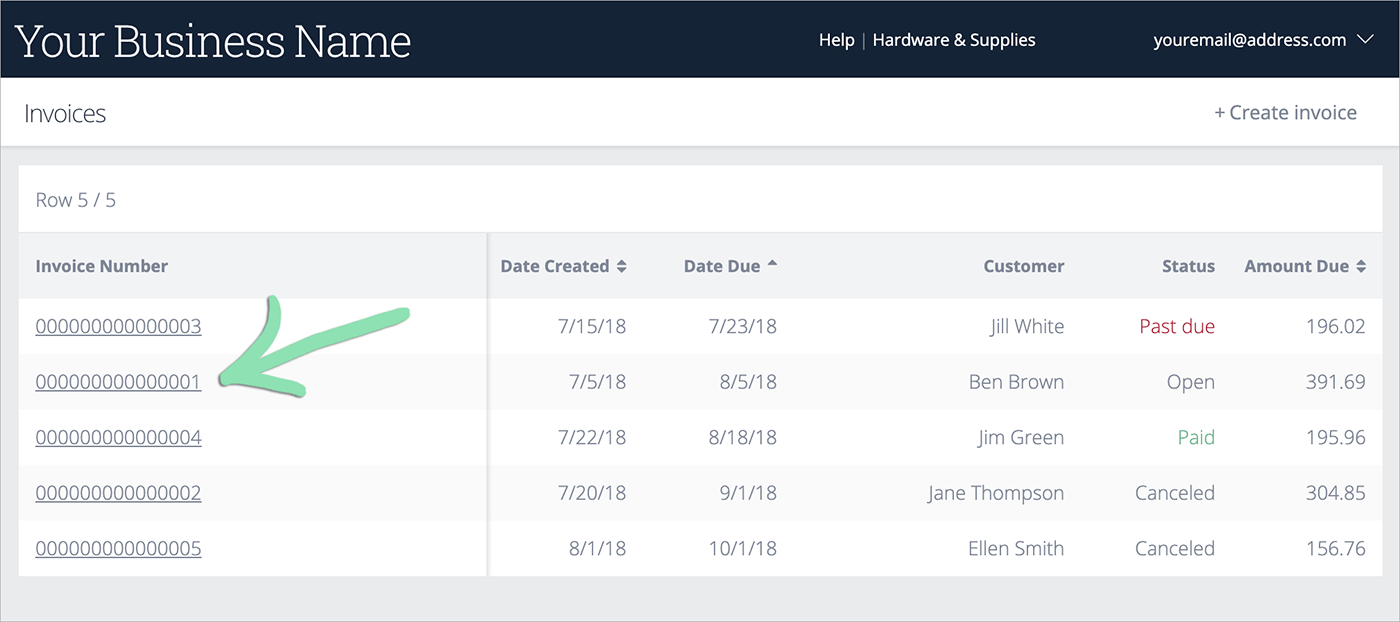
The status of an invoice shows whether it is a draft, open, paid, past due, or canceled. Visit the Invoices screen to check invoice statuses and view other details.
(Optional) Click any header with arrows to sort the table.
Click to Enlarge
Invoice Number | Unique identification number generated by Lightspeed Retail that cannot be changed. Date Created | Date the invoice was created in BackOffice. Date Due | Date by which the customer must pay the invoice. This can be set to any date in the future or the past. Customer | Name or email of the customer assigned to the invoice. Status | Draft, Open, Paid, Past Due, or Canceled. Learn about each status below in step 3. Amount Due | Total invoice amount. This does not change when a customer pays an invoice.
Check the ‘Status’ column for the status of each invoice.
Click to Enlarge
Draft | Invoice is saved as a draft. Open | Invoice is finished, printed or emailed, and awaiting payment. Open invoices appear in some BackOffice sales reporting. Paid | Invoice was marked as paid. Invoices paid online are automatically marked paid after the customer pays via the link in their emailed invoice. When paid by cash, check, or any other tender you accept, the invoice must manually be marked paid. When invoice reporting is enabled, paid invoices appear in most BackOffice sales reporting. Past Due | Due date passed and the invoice was not marked as paid. Past due invoices appear in some BackOffice sales reporting. Canceled | Invoice was manually canceled while ‘Open’ or ‘Past Due’ because it was no longer needed.
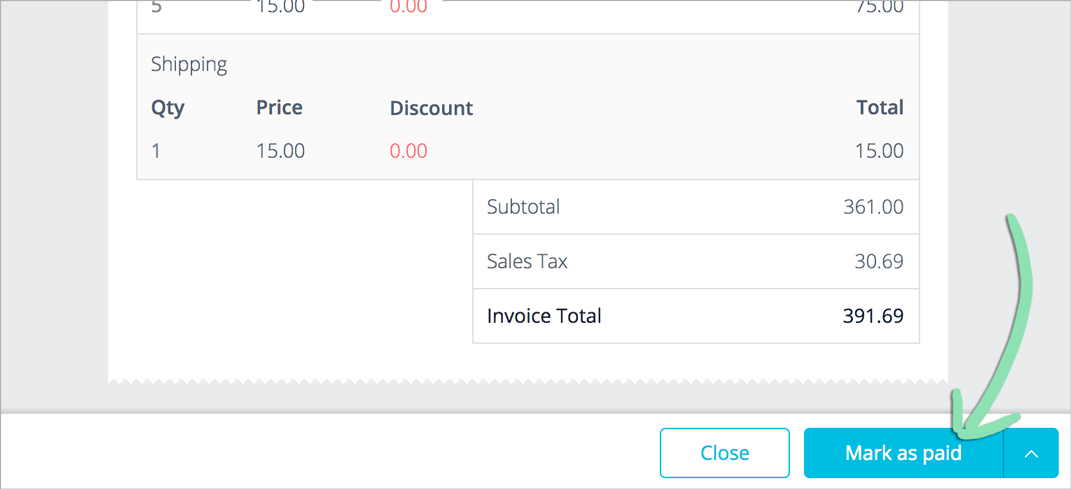
Click an invoice to view its items and other details.
Click to Enlarge
Edit or Delete Draft Invoices
Edit an invoice draft to make changes before sending it to a customer. If a draft is no longer needed, delete it to remove it from BackOffice.
To edit an ‘Open’ or ‘Past Due’ invoice, follow the steps here. ‘Paid’ and ‘Cancelled’ invoices cannot be modified.
If an ‘Open’ or ‘Past Due’ invoice is no longer needed, follow these steps to cancel it as only drafts can be deleted.
Select a draft invoice from the Invoices screen.
Click to Enlarge
Make changes to the draft or click 'Delete Invoice' to remove it.
If editing the invoice, choose to either save again as a draft or finish the invoice.
bTo finish the invoice and share it with the customer, click the arrow and select an option to email or print. Finished invoices cannot be deleted but can be edited or canceled before payment
Edit an open invoice to make changes after sending it to a customer but before it is paid. Cancel an open invoice if it is no longer needed after being printed or emailed to a customer. Canceled invoices remain on the Invoices screen after cancellation and cannot be uncanceled or paid.
To edit a draft invoice, follow the steps here. ‘Paid’ and ‘Cancelled’ invoices cannot be modified.
Only ‘Open’ and ‘Past Due’ invoices can be cancelled. If a ‘Draft’ invoice is no longer needed, follow these steps to delete it.
Select an ‘Open’ or ‘Past Due’ invoice from the Invoices screen.
Click to Enlarge
If cancelling the invoice, click ‘Continue’ to complete the cancellation.
If the invoice was emailed to the customer when it was originally finished, the customer will automatically receive an email confirming the cancellation.
Set up online and mobile payments to allow customers to accept credit and debit card payments online for emailed invoices, orders placed via a Lightspeed eCom (E-Series) webstore, and Pay by Link sales run in the Retail POS (S-Series) app for iOS. The Lightspeed Retail account owner can fill out the application for online payments and connect a bank account from BackOffice, then run an optional test transaction to make sure everything works properly.
Merchants who signed up for Lightspeed Retail before February 8, 2021, can also use the Pocket app to run mobile sales. Visit our Running Sales in Lightspeed Pocket article to learn more. If you signed up for Lightspeed Retail after February 8, 2021, use Lightspeed Pay to run sales on mobile devices instead.
Online and mobile payments can be set up from BackOffice, as shown below, or from the Lightspeed Pocket app. You only need to sign up once using one of these methods. After signup and approval, you will be able to access all methods of online and mobile payment. Additional steps are required to accept credit payments in a Lightspeed eCom (E-Series) webstore.
Payment Setup
Lightspeed Retail Business Owners can access the online payments setup flow in BackOffice to get approved for processing credit payments for emailed invoices, sales run in Lightspeed Pocket, orders placed via a Lightspeed eCom (E-Series) webstore, and Pay by Link sales run in the Retail POS (S-Series) app for iOS.
Accepting credit payments in a Lightspeed eCom (E-Series) webstore requires additional steps.
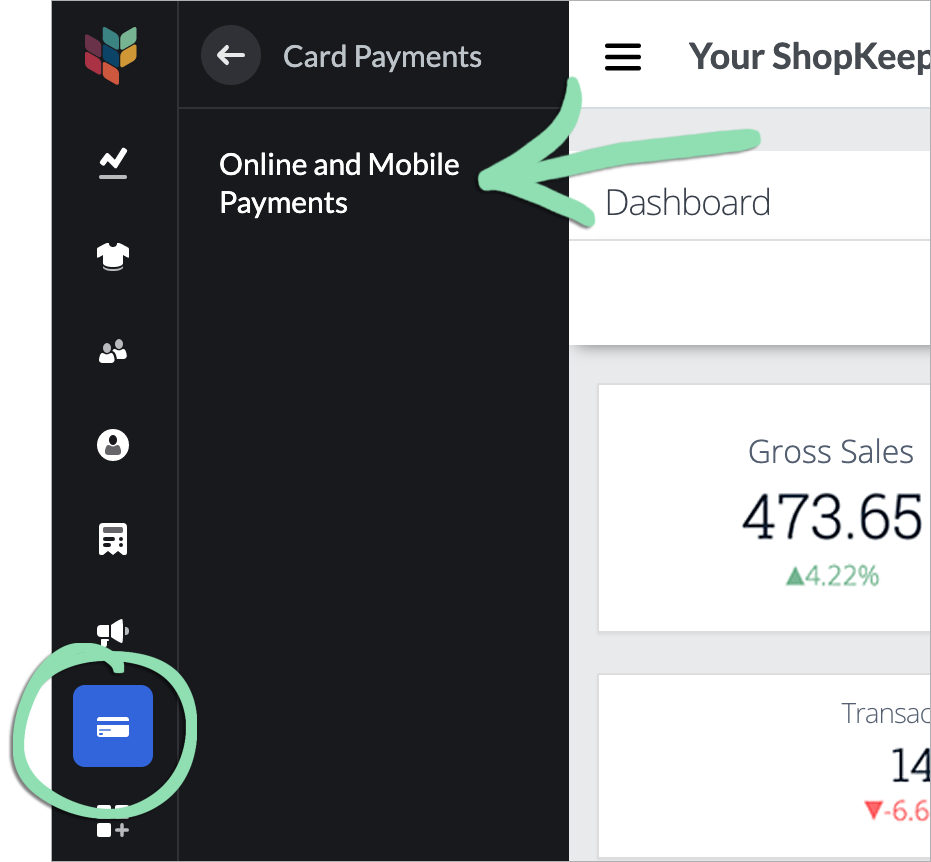
Sign into BackOffice as the Business Owner.
Click ‘Card Payments’, then select ‘Online and Mobile Payments’.
Don’t see ‘Online and Mobile Payments’ when signed in as the Business Owner? Upgrade to a paid Lightspeed Retail plan in BackOffice or at the register to be able to set up and run online and mobile payments.
Click ‘Bank Account’, then follow the prompts to enter the details for the bank account where you want to receive deposits.
Provide your long-term choice of deposit account as this information cannot be updated in BackOffice. To learn how to change this account, contact [email protected].
For this step, you will need to enter the:
Routing number and account number of the bank account
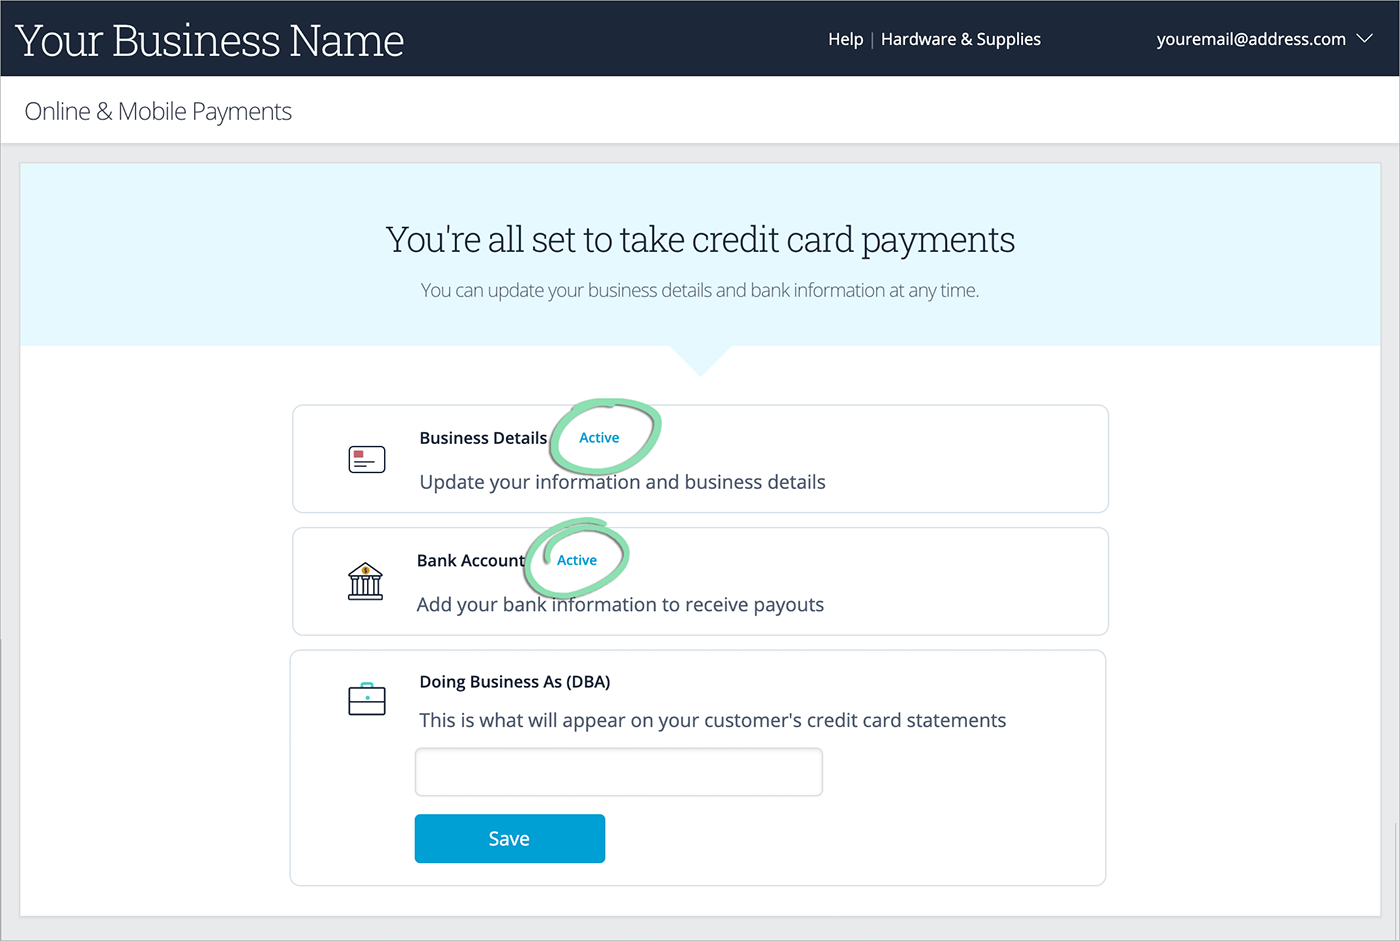
Wait for ‘Active’ to appear next to ‘Business Details’ and ‘Bank Account’, indicating approval for payments.
Most merchants will be approved within moments. If either status shows ‘Pending’, check back in 1 – 3 business days or wait to receive email confirmation that you were approved.
Once you begin processing online invoice payments, you will receive a weekly email statement summarizing the online and mobile payments processed the previous week.
Enter the DBA for your business in the ‘Doing Business As’ field, then click ‘Save’ to save changes.
The DBA must be 5 – 22 characters long, contain no special characters, and have at least 1 letter.
The DBA, or ‘doing business as’ name, appears on customer credit card statements next to each online and mobile payment charge from your business.
By default, the DBA is set to the website entered in the ‘Business Details’ section (see step 4). If you did not enter a website and do not update your DBA, it will default to ‘ShopKeep’.
(Optional) Follow the steps here to enable payments for your Lightspeed eCom (E-Series) webstore.
(Optional) Follow the steps in the section below to run a test transaction.
Run a Test Transaction (Optional)
After setting up online payments in BackOffice, run an optional test transaction by paying for an invoice online to confirm the setup was successful.
A test transaction can be run by paying for an invoice, as shown below, or by using one of the other methods listed here. You only need to use one of these to run a test transaction and confirm that online and mobile payments setup was successful.
After running a test transaction, either perform a return at the register to balance out the net sales amount for that day or exclude that day when running sales reports. Transactions run at the register or in Lightspeed Pocket will appear in reporting and cannot be deleted. Paid invoices cannot be deleted from BackOffice or reporting.
Online and mobile payments cannot currently be refunded back to the card used in the original payment via the Lightspeed Pocket or Register apps, BackOffice, or the eCommerce Dashboard. To request a refund for an online or mobile payment, contact [email protected].
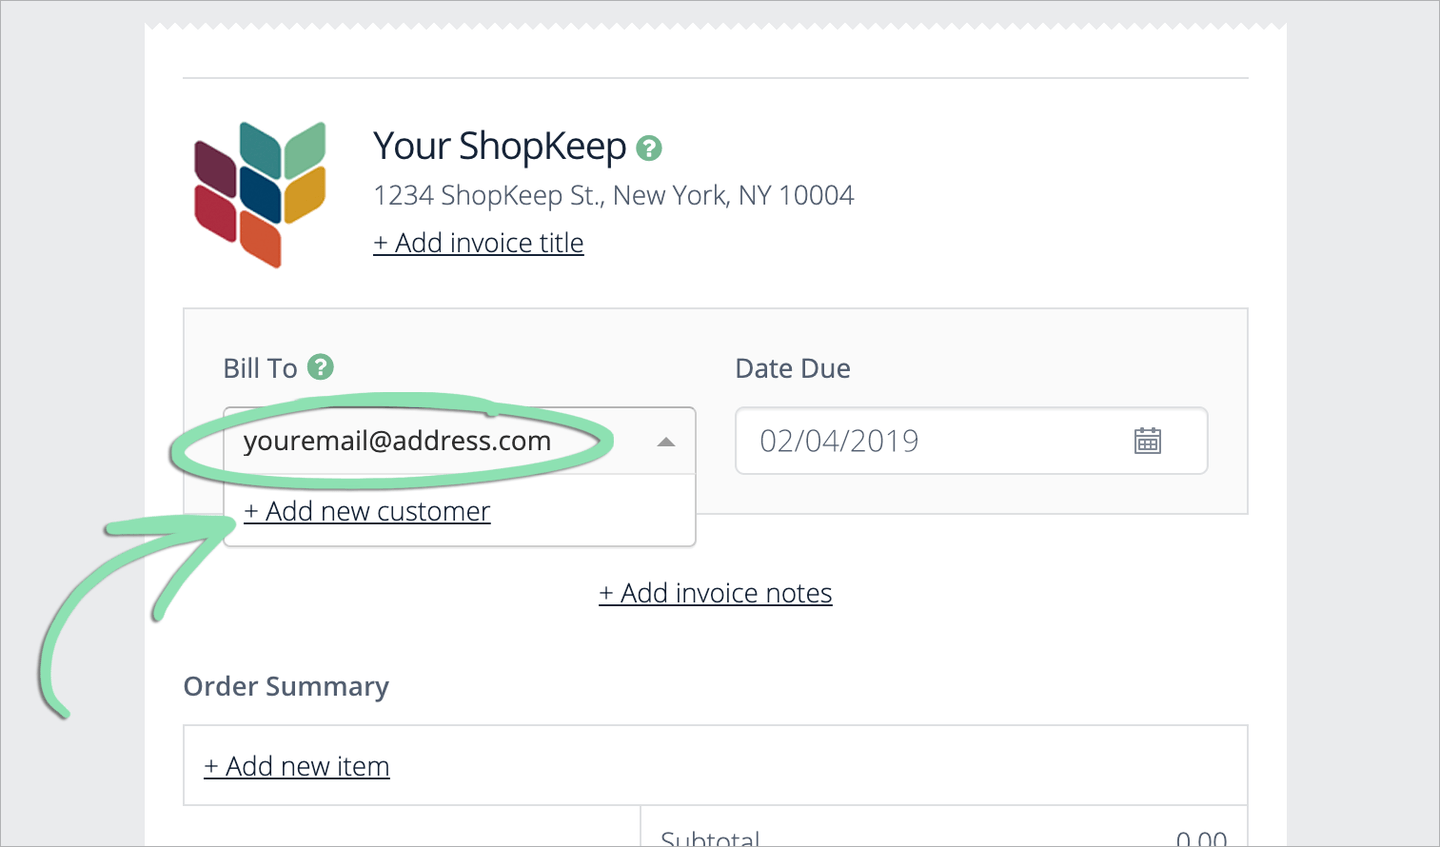
Create a new invoice, then enter your email in the ‘Bill To’ drop-down and click ‘Add new customer’.
Don’t see ‘Add new customer’? Select your name or email from the drop-down.
Click the arrow, then select ‘Finish and Send’.
Click to Enlarge
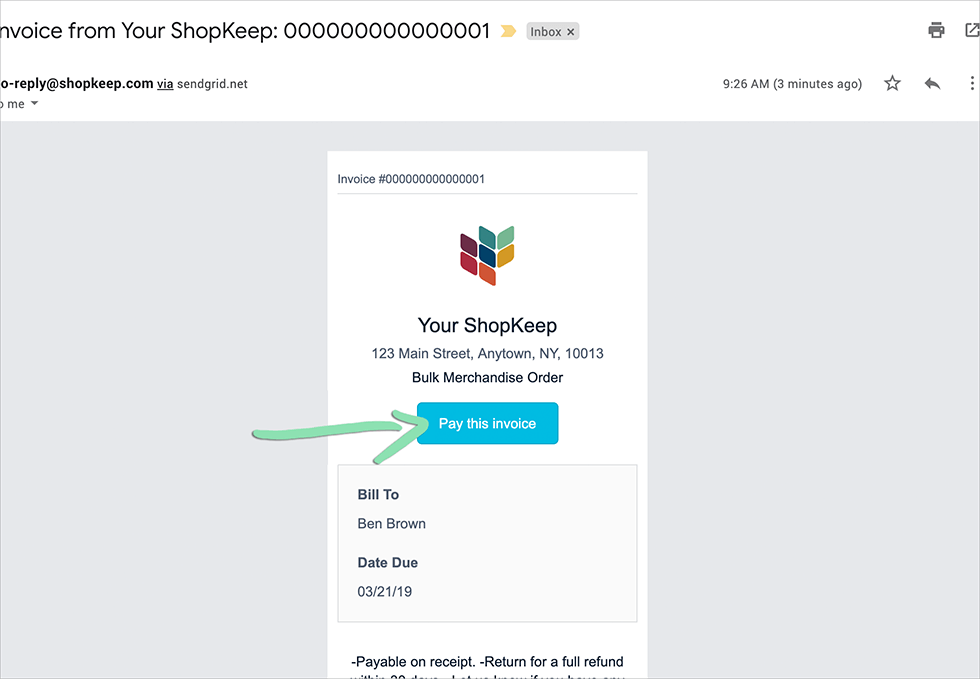
Locate the invoice in your email and follow the steps here to pay it online.
The credit or debit card used to pay for the test invoice must not be tied to the bank account used to set up online and mobile payments. Invoices paid online will be included in your weekly Lightspeed Online & Mobile Card Processing Statement email.
Invoice Payment
Customers can pay for an invoice online via the link in their emailed invoice, or they can make a manual payment with cash, check, or any other tender you accept. Learn below how customers pay for invoices using each of these methods.
Pay Online
Customers can pay emailed invoices online with a credit card if online payments are set up by manually entering their card information or using Apple Pay or Google Pay. After a payment has been received, the invoice will automatically be marked paid in BackOffice.
An invoice can only be paid online if it was emailed to the customer after online payments were set up.
In the newly opened tab, the customer submits their payment by manually entering their credit card details or using Apple Pay or Google Pay from a compatible device.
aFor manual card entry, the customer enters their credit card information and clicks ‘Pay Now’.
Customers can pay invoices by giving you cash, a check, or any other payment tender you accept. After receiving this type of invoice payment, manually mark the invoice paid in BackOffice.
Customer provides payment for the invoice via a tender that you accept.
We do not recommend placing invoice payments in the same cash drawer used for the Retail POS (S-Series) app. Invoice payments are not included on X and Z reports and will upset the balance of the cash drawer if added to it. If you must add a cash invoice payment to the drawer, perform a pay in to ensure the cash drawer stays balanced.
When invoice reporting is enabled, paid invoices will automatically appear in most BackOffice sales reporting. Marking an invoice as paid changes its status to ‘Paid’ and cannot be reversed.
Open and past due invoices automatically appear on the Transactions Report and Dashboard, while paid invoices must be manually enabled to appear on reports. Learn how to view reporting for each type of invoice, identify how invoices appear on these reports, and enable reporting for paid invoices.
Open Invoice Reporting
In BackOffice, visit the Dashboard to view the total number and value of invoices that are open or past due, or run the Transactions Report to see individual open and past due invoices along with saved sales currently open on registers with Saved Sales Sync enabled.
Dashboard
In BackOffice, click ‘Reports’, then select ‘Dashboard’.
Click to Enlarge
Click the date icon to choose a preset or custom range.
Click to Enlarge
The report shows the total number and value of open and past due invoices last finished or edited during the date range.
# of Outstanding Invoices | Number of invoices in ‘Open’ and ‘Past Due’ statuses. Invoices will only appear if they were last finished or edited during the range. Historical invoice data is not available. Net Invoices Balance Due | Value of all invoices included in the ‘# of Outstanding Invoices’ tile. This is the pre-tax subtotal of each invoice minus discounts applied.
Transactions Report
In BackOffice, click ‘Reports’, then select ‘Transactions’.
Click to Enlarge
Use the calendar to select a date range for the report that includes the current day.
For example, select ‘Today’, ‘Week-to-date’, or a custom range ending today.
This option can only be selected when the date range of the report includes the current day, such as when it is set to ‘Today’, ‘Week-to-date’, or a custom range ending today.
The Transactions Report displays open and past due invoices that were last finished or edited during the selected date range, and saved sales currently open on registers with Saved Sales Sync enabled last saved during the range. Businesses open past midnight can set business hours in BackOffice to view reporting based on when they are open.
Time | Date and time the invoice was last finished/edited or sale was last saved. Sales Channel | Indicates whether a transaction is an invoice (‘Invoicing’) or a saved sale (‘In Store’). Register | This is left blank for invoices. For saved sales, it is the number of the register where the sale was last saved. Cashier | For open invoices, this is the name of the employee who last finished or edited the invoice. For saved sales, it is the name of the employee who originally saved the sale. In either case, the cashier name appears as it is currently entered in BackOffice. Operation Type | Type of transaction: sale. Amount | Total dollar amount of the items in the invoice or saved sale. Discount | Total discount amount applied to the invoice or saved sale. Tax | Total tax amount. Total | Total amount charged after discounts and tax.
(Optional) To view the individual items on an invoice or saved sale, click the arrow next to the transaction.
Click to Enlarge
Description | Name of the item as it is currently entered. Department | Name of the department assigned to the item at the time the invoice was finished or sale was saved. Category | Name of the category assigned to the item when the invoice was finished or sale was saved. Price | Price per item. Quantity | Total number or amount of the item present on the invoice or saved sale. Subtotal | Item total before discounts and tax. Discount | Discount amount applied to the item. Net Total | Total amount charged for each item after discounts.
Paid Invoice Reporting
Before you can view paid invoices in BackOffice reporting, you must enable sales reporting for invoices from the Invoices screen. After doing so, learn about which BackOffice reports support paid invoices and how paid invoices appear in reporting.
After enabling invoice reporting, future invoices that are marked paid will automatically appear in BackOffice reporting. Do not ring up these invoices at the register as this will duplicate the transaction in reporting. Once enabled, invoice reporting cannot be disabled.
Invoices marked paid before enabling this feature will not appear in reporting.
From the Invoices screen, click the link to enable sales reporting for invoices.
Don’t see this link? Invoice reporting is already enabled for your account.
Paid invoices appear in all BackOffice sales reports except for the Shifts Summary and the ‘Register Summary’ tile on the Dashboard.
Paid invoices also appear in Lightspeed Pocket reporting.
The ‘Other’ payment tender is used in reporting for all paid invoices.
The employee who originally printed or emailed a paid invoice is credited in reporting as having performed the sale.
Discounts are reported as a discount called ‘Open Amount’.
Paid invoices are not assigned to a register or register shift, do not appear anywhere in the Retail POS (S-Series) app, and do not contribute towards the expected total of the cash drawer.
FAQ
View answers to common questions about invoices.
How do I customize the invoice logo and business address?
These details come from Receipt Settings. Visit our Receipt Setup article to learn how to upload a new logo and update business information.
Can I change invoice numbers?
No. Invoice numbers are created by Lightspeed Retail, are unique for each invoice, and cannot be edited.
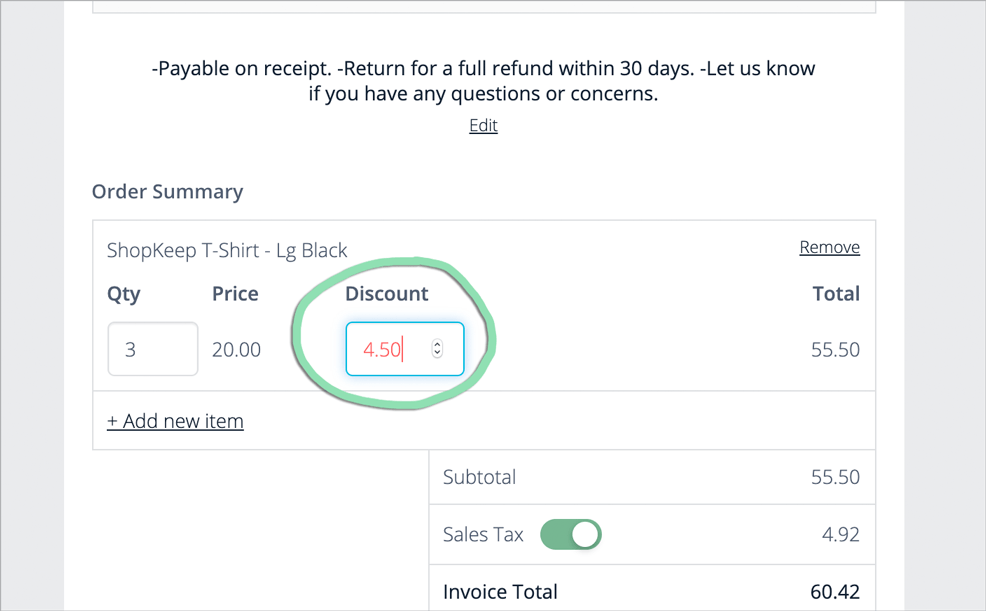
Can I add discounts to an invoice?
Yes, line items can be discounted by individual amounts while an invoice is being created or edited.
Can I backdate the due date of an invoice?
The due date on an open or draft invoice can be set to any date in the past or future. If the invoice has been marked as ‘“Paid’” (manually marked or paid online) the due date cannot be changed.
Can I change the email address invoices send from?
No, this address ([email protected]) cannot be changed and is not monitored.
Can I remove tax from an invoice?
Yes, tax can be manually toggled off and on while an invoice is being created or edited. However, for tax-exempt customers, tax is always 0.00 regardless of the position of the sales tax toggle switch.
Can customers pay invoices online?
Yes. Customers can pay email invoices online by manually entering their credit or debit card or by using Apple Pay or Google Pay. Learn about how to set up online payments and how customers pay for invoices here.
Do invoices appear in sales reporting?
Yes. Open and past due invoices are available on the Transactions Report and Dashboard, and paid invoices appear in most BackOffice sales reporting after enabling invoice reporting. To learn how to view invoices in reporting and enable paid invoice reporting, visit the Invoice Reporting section above.
Can I edit, delete, or cancel invoices?
Yes. ‘Draft’, ‘Open’, and ‘Past Due’ invoices can all be edited. Invoices can be deleted if saved as drafts and not finished, but only ‘Open’ and ‘Past Due’ invoices can be cancelled.
Can I view invoices at the register?
No, invoices are available only in BackOffice.
How can I get help with a problem related to invoices?