Use Update Inventory in BackOffice to add to, remove from, or replace the quantity on hand of an item, variant, or raw good. While receiving new units from reorders, update item cost and price and print barcode labels directly from the Update page. Track the date, user, reason, cost, and other details for each item adjustment using the Adjustment History report.
Looking for information on ‘Adjust Inventory’? Use the ‘Count’ feature of ‘Update Inventory’ to quickly replace the quantity on hand of an inventory item.
Table of Contents
Update Inventory
Update Inventory allows the Business Owner and employees with BackOffice inventory permissions to add units to the quantity on hand of an item or raw good, receive new units from reorders, update costs, prices, and print barcode labels while receiving. It also allows users to add to, remove from, or replace the current quantity on hand of individual items or raw goods.
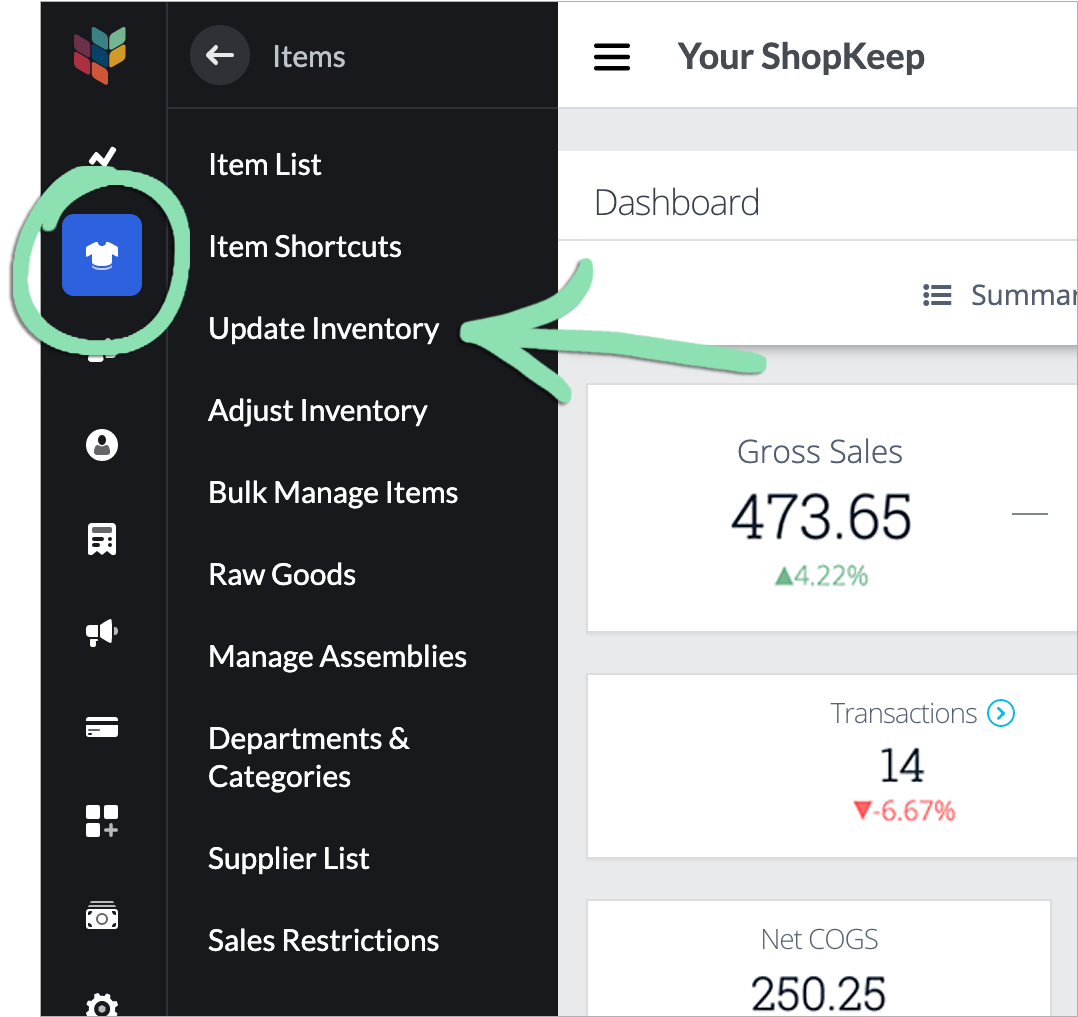
In BackOffice, click 'Items', then 'Update Inventory'.
Receive Inventory Users can skip this step as they are automatically taken to the Update Inventory page after logging into BackOffice.
Add/receive inventory is used to increase an item or raw good’s quantity on hand or to receive new units from reorders.
Remove inventory is used to reduce an item’s quantity on hand. This action is only available to the Business Owner and employees with BackOffice inventory permissions. Raw goods cannot be removed using this action and must be adjusted using Count Inventory.
Count Inventory is used to set an item or raw good’s current quantity on hand to a specific value. This action is only available to the Business Owner and employees with BackOffice inventory permissions.
The ‘Add/receive inventory’ action is used to add units of existing items and raw goods into inventory, receive new units from reorders, update costs and prices, and print barcode labels while receiving.
This feature is available to the Business Owner and employees with BackOffice inventory permissions. Learn how to give an employee BackOffice access and about employee permissions here.
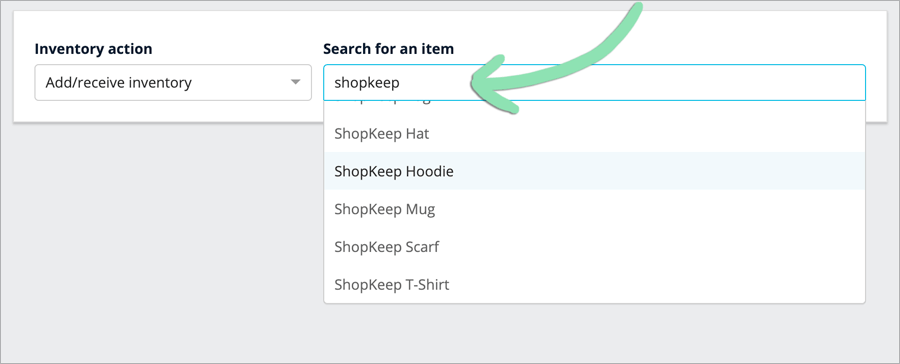
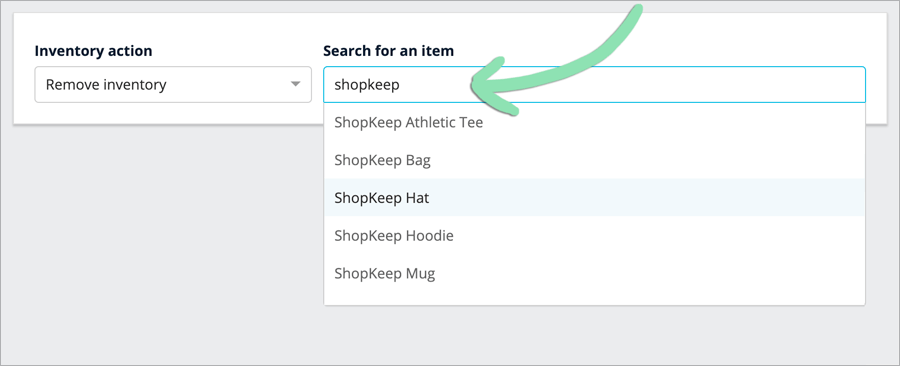
From the Update Inventory page, search for an item or raw good by name or UPC and click on it.
Only inventory items with inventory tracking enabled can be added or received.
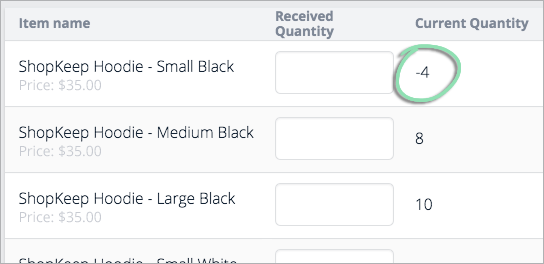
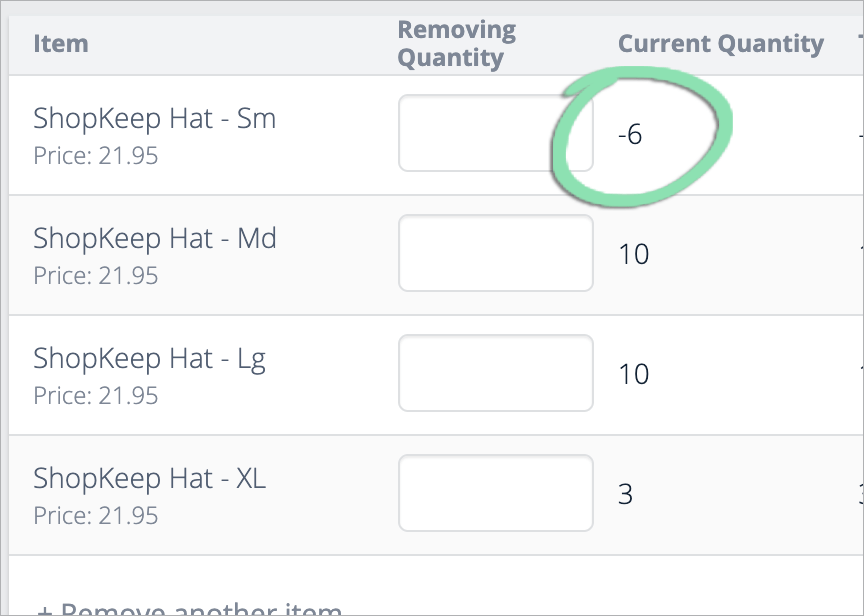
If the 'Current Quantity' is negative, adjust it to the correct quantity on hand before adding or receiving the item. Learn how to adjust inventory quantities here.
Failure to complete this step will result in an incorrect quantity and cost for the item after adding or receiving it.
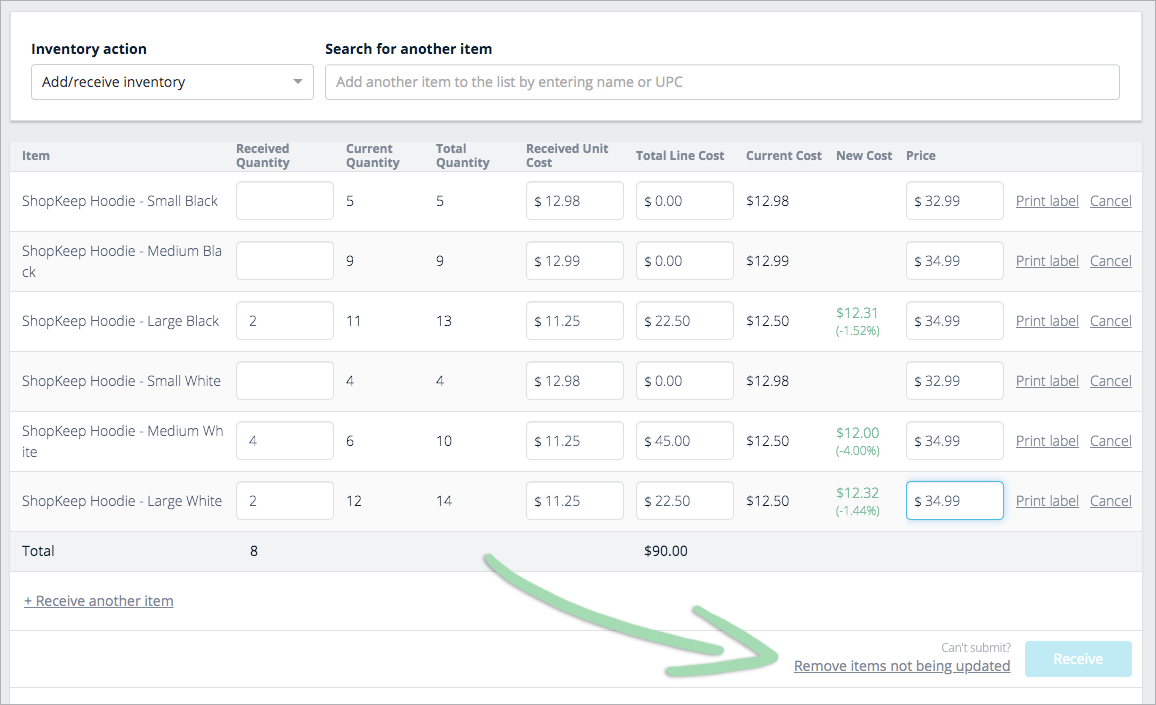
Enter the 'Received Quantity' for each item, variant, or raw good being added or received, then update the pre-filled 'Received Unit Cost', 'Total Line Cost', and/or 'Price' if needed.
For items, variants, or raw goods not being received, leave ‘Received Quantity’ blank.
For unit priced items, open priced items, and raw goods, Price cannot be updated while receiving.
Not sure what goes in each column? See term definitions below.
Received Quantity | Total number of units being added or received for that item. Leave blank for items or variants not being received. Received Unit Cost | Per-unit cost of the added or received item. This automatically populates with the item’s previous receiving cost. If the item has never been received, the item’s current cost is used. Adjusting this will update the Total Line Cost. Total Line Cost | Total cost of all units added or received. This populates automatically after entering the Received Quantity and is calculated by multiplying the Received Quantity and Received Unit Cost. Adjusting this will update the Received Unit Cost. Price | Per-unit price of each item. This automatically populates with the current price set for each item. Adjusting this will update the current selling Price of the item to the new price entered. Price cannot be adjusted for unit priced items, open priced items, and raw goods. Total (bottom row) | Total value of the Received Quantity and Total Line Cost columns.
By default, New Cost updates to a weighted average of the current and receiving costs.
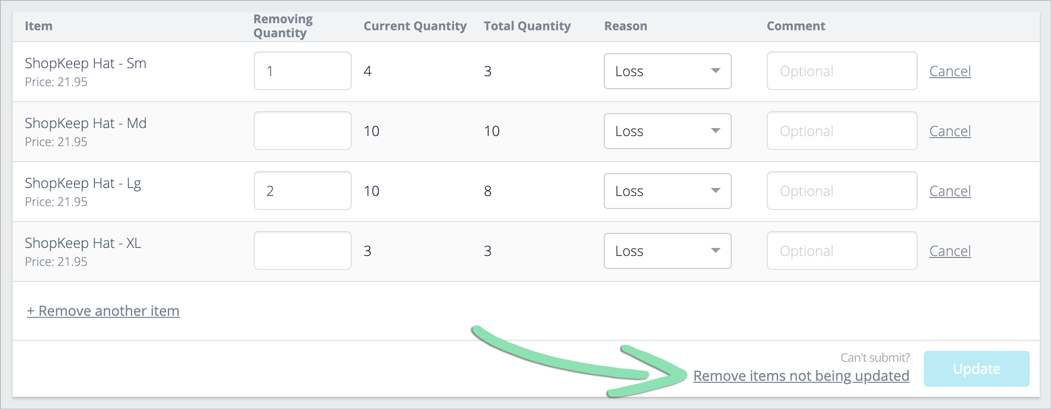
Click ‘Remove items not being updated’ to automatically remove all items, variants, and raw goods with no ‘Received Quantity’ from the page.
Click to Enlarge
(Optional) Click 'Print Label' to print barcode labels for the added or received items to your DYMO printer.
Click to Enlarge
Note: The number of units added or received is automatically entered in the Print Label dialog box as the quantity of labels to print. If necessary, adjust the label style and quantity before clicking ‘OK’. To learn how to customize what appears on printed labels, follow the steps here.
(Optional) Click '+ Receive another item' and repeat steps 1 - 5 to add additional items to the page or use the search bar to quickly add items.
Click to Enlarge
Click 'Receive' to finish adding or receiving the item(s).
Get updates on the iOS or Android register to sync item updates to the register.
If you receive an error while getting updates, visit our troubleshooting guide for help.
Remove Inventory
The ‘Remove inventory’ action is used to take units of existing items out of inventory and track the specific reasons behind their removal.
This feature is available to the Business Owner and employees with BackOffice inventory permissions. Learn how to give an employee BackOffice access and about employee permissions here.
Raw goods cannot be removed using this inventory action and must be adjusted using Count Inventory.
If the 'Current Quantity' is negative, adjust it to the correct quantity on hand before removing the item. Learn how to adjust inventory quantities here.
Click to Enlarge
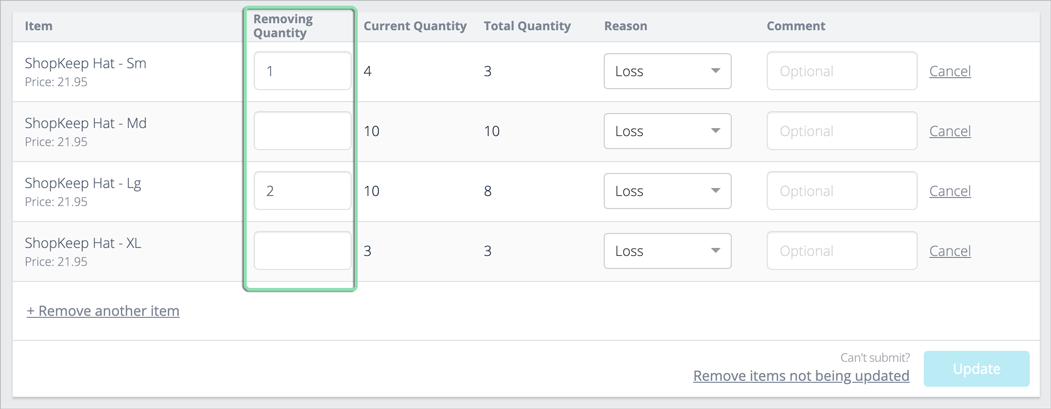
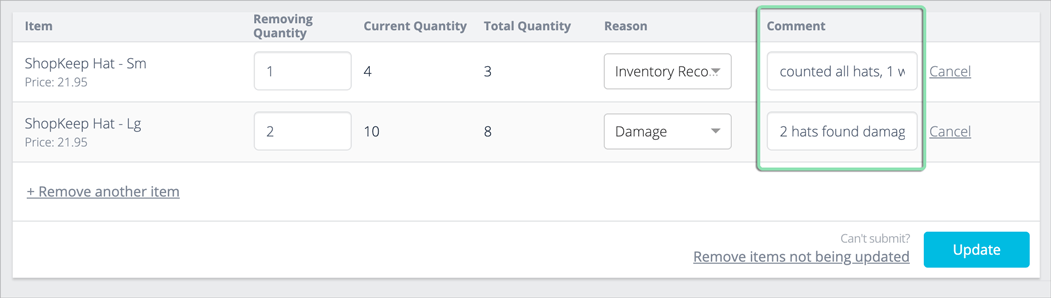
Enter the number of units to remove for each item or variant being removed under 'Removing Quantity'.
Leave ‘Removing Quantity’ blank for items or variants not being removed.
(Optional) Click '+ Remove another item' and repeat steps 1 - 6 to add additional items to the page or use the search bar to quickly add items.
Click to Enlarge
Click 'Update' to finish removing the item(s).
Count Inventory
The ‘Count inventory’ action is used to replace the current quantity on hand of an item or raw good with a specific value. ‘Count inventory’ is helpful for adjusting the quantities on hand of several items from a single page without having to navigate away. If you use raw goods, they must be adjusted using this method.
This feature is available to the Business Owner and employees with BackOffice inventory access. Learn how to give an employee BackOffice access and about employee permissions here.
From the Update Inventory page, search for an item by name or UPC and click on it.
Only inventory items set up with inventory tracking enabled can be adjusted. Looking for a raw good? Search for it by name.
Enter the number of units on hand for each item, variant, or raw good under ‘Counted Quantity’.
Click to Enlarge
Click ‘Remove items not being updated’ to automatically delete all items, variants, and raw goods with no ‘Counted Quantity’ from the page.
Click to Enlarge
(Optional) Enter a comment for the adjustment of each item.
The Adjustment History report shows adjustment reasons to keep a record of why inventory counts changed.
(Optional) Click '+ Add another item' and repeat steps 1 - 4 to add additional items to the page or use the search bar to quickly add items.
Click to Enlarge
Click 'Update' to finish adjusting the item(s).
Click to Enlarge
Receive Inventory Users
Receive Inventory Users are employees whose BackOffice access is limited to only the Receive Inventory page.
Learn how to set up a new Receive Inventory User here.
Receive Inventory Users are automatically taken to the Update Inventory page when logging into BackOffice.
From this page, the employee can add or receive inventory, adjust costs and prices, and print labels for received items. Learn how to use the Update Inventory page above.
Receive Inventory Users cannot remove or count inventory as these actions are only available to the Business Owner and employees with BackOffice inventory permissions.
Links to other areas of BackOffice are hidden so the employee cannot navigate away from the Update Inventory page.
Adjustment History Report
Run the Inventory Adjustment report to see the date, time, and other details of inventory items and raw goods adjusted and removed in BackOffice. This report is read-only.
This feature is available to the Business Owner and employees with BackOffice reporting permissions. Learn how to give an employee BackOffice access and about employee permissions here.
The Adjustment History report shows only inventory adjustments and removals. There is no report for received inventory, however the Quantity History report shows receiving events for individual items.
Run the Report
From BackOffice, run the Adjustment History report for an overview of inventory adjustments and removals made during a specific period of time.
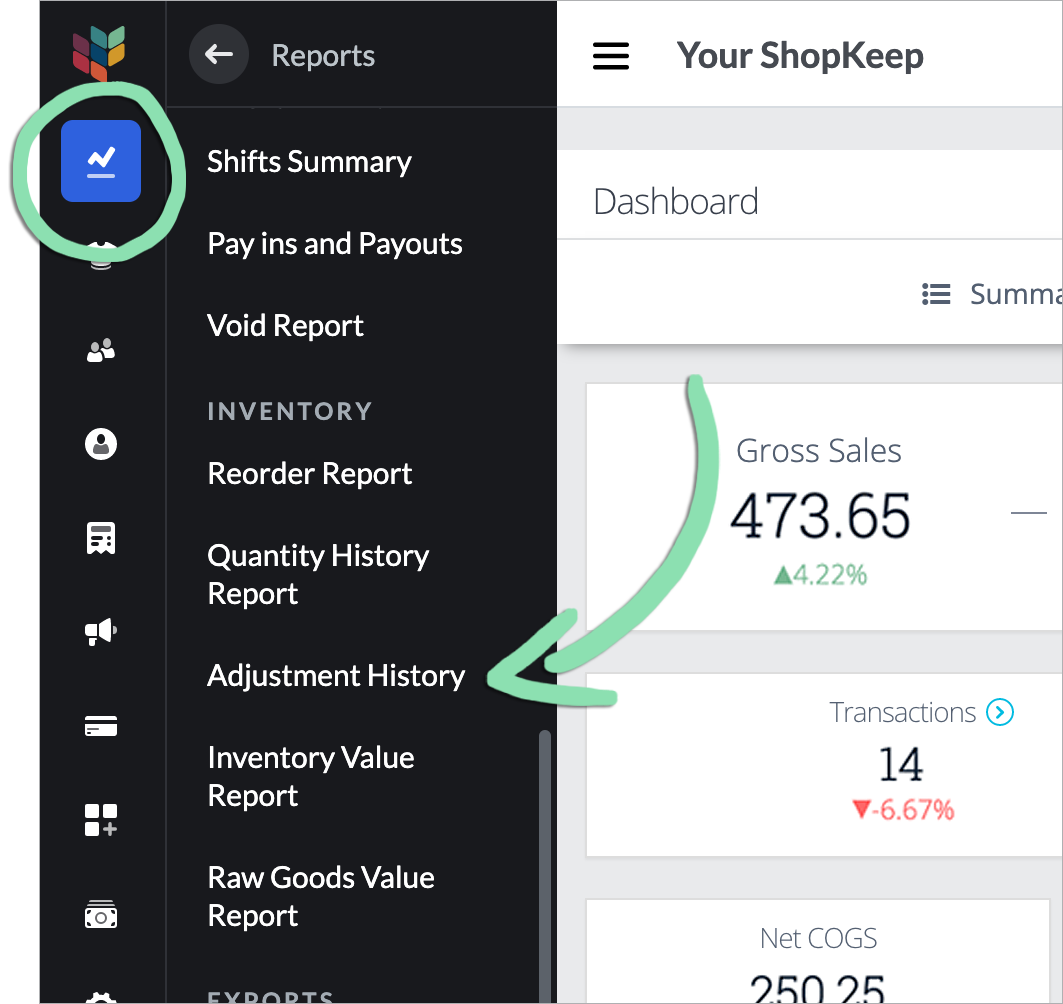
Click 'Reports' and select 'Adjustment History'.
Click to Enlarge
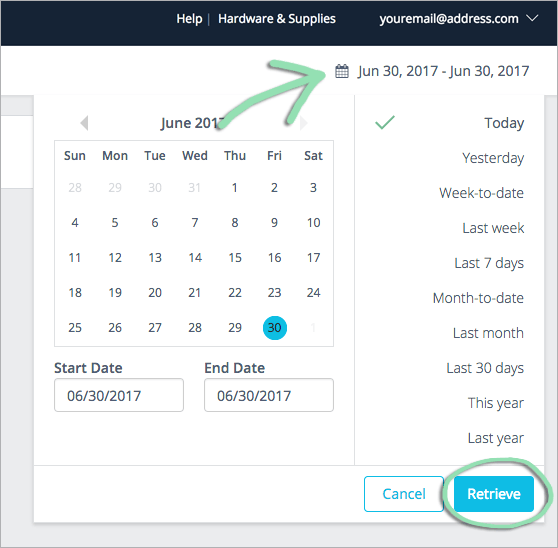
Click the date icon to choose a preset or custom range, then click 'Retrieve'.
Click to Enlarge
Read the Report
The Inventory Adjustment report allows you to track who adjusts and removes inventory, when adjustments and removals are made, and how adjustments and removals impact the overall inventory value.
Item / Raw Good Name | Name of the item or raw good as it is currently entered in BackOffice. Date | Date and time each adjustment or removal was made. Username | BackOffice username of the employee who made the adjustment or removal. Adjustment Reason | Reason entered for the count adjustment or comment entered for the removal. Delta | Total number of units added to or removed from inventory. Cost | Item’s cost at the time of adjustment or removal. Total | Value of the units added to or removed from inventory (Delta x Cost).
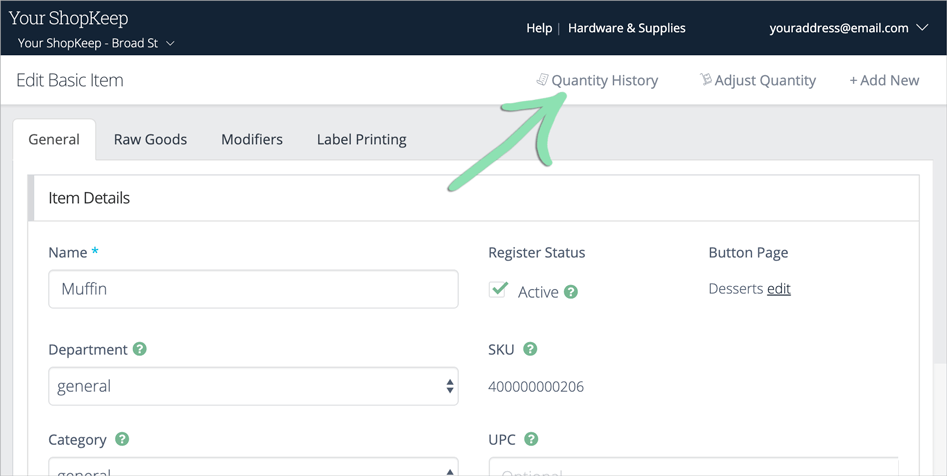
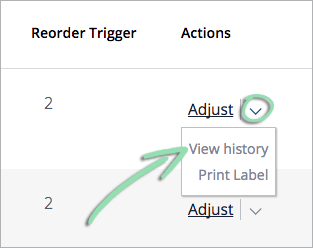
Quantity History Report
The Quantity History Report shows how an item’s quantity on hand changes over time. See when a specific item was received, removed, adjusted, sold, and returned and how these actions affected its quantity.
The Quantity History Report can also be run for all items in inventory by accessing it from the ‘Reporting’ sidebar menu. For more information, visit our Quantity History Report article.