This page focuses on solving issues related to staff and employees, BackOffice time clock punch reporting, and labor tracking.
Table of Contents
Staff List Issues
From missing employees to missing settings, this section has solutions to common Staff List problems.
Some employees are missing from the Staff List.
BackOffice Managers and employees without the proper permissions see a limited staff list that excludes other employees with BackOffice access. Log in as the Business Owner or as an employee with ‘Manage Staff’ and ‘Manage BackOffice Access’ permissions to view all staff.
Click the arrow at the top and select 'Logout'.
Click to Enlarge
Enter the login information of the Business Owner or an employee with ‘Manage Staff’ and ‘Manage BackOffice Access’ permissions and click 'Log in'.
The Business Owner login is the email and password used to create the store.
I can't add, edit, delete, or give BackOffice permissions to employees.
Only the Business Owner and employees with ‘Manage Staff’ and/or ‘Manage BackOffice Access’ permissions can manage employees. If you cannot add, edit, and delete employees or don’t see ‘BackOffice Access’ when managing employee profiles, you are not signed in as a user with the proper permissions.
Log out of BackOffice.
Log back in as the Business Owner or as an employee with ‘Manage Staff’ and/or ‘Manage BackOffice Access’ permissions.
I created a new employee, but they can't sign into the register or BackOffice.
This problem can occur if the employee was not saved on the Staff List, the register was not updated after adding the employee, or the employee is using the wrong register code or BackOffice login.
After an employee is entered or employee information is updated, click 'Save' on the employee information page.
Click to Enlarge
Click the relevant link below for additional steps to troubleshoot the issue.
If you are having problems with the BackOffice Time Clock report, we have you covered in this section.
Time clock punches in BackOffice show the wrong time.
There are a few date and time settings that affect how time clock punches display. Follow the steps below to troubleshoot each potential cause of this issue.
Make sure the time zone is set correctly on the device from which you’re accessing BackOffice.
There are a few reasons why time clock punches may be missing from BackOffice. Follow the steps below to troubleshoot each potential cause. After each step, check to see if the punches are still missing.
Make sure employees know how to clock in and out.
Clocking in and out is different from signing in and out of the register. Learn more about using the time clock here.
Follow the steps here to troubleshoot the register’s network connection.
The register only syncs clock punches to BackOffice when it has an active internet connection. Performing this step ensures future clock punches will sync to BackOffice but does not sync previous clock punch attempts that failed due to internet issues.
An employee forgot to clock in or out or clocked in or out at the wrong time.
Visit the Using the Time Clock article to learn how a BackOffice user with the proper permissions can add missed clock punches and edit existing ones.
An employee has multiple work shifts listed for the same day.
The Time Clock report displays more than one work shift when an employee clocks in and out multiple times. If necessary, delete unneeded work shifts and adjust the in or out time on the other shift(s) as needed.
Before following the steps below, decide if it is necessary to update the employee’s work shifts. In some situations, it is normal for employees to have multiple work shifts listed on the same day. For example, employees who receive unpaid breaks need to clock out before going on break.
Click the trash can to delete one of the work shifts.
Click to Enlarge
Some work shifts are shorter or longer than expected.
Employees must be clocked in to be able to clock out and vice versa. If an employee records a clock punch at the wrong time to start or end a shift so they can clock in or out, the work shift will not be the correct length and will need to be adjusted.
This section covers issues related to the Labor Tracking Report available in BackOffice.
The report’s overtime, double time, or total hours worked look incorrect.
The Labor Tracking Report is generated based on clock punches recorded in the Time Clock report and the BackOffice overtime settings that control the start of your pay week and how overtime is earned. Verify these details to ensure the report displays correct information.
Follow the steps here to verify all employee hours in the Time Clock report.
Follow the steps here to check and, if necessary, update overtime and double time rules.
Please note that the pay week starting day cannot be changed.
New overtime settings take effect at the start of the following pay week and apply to hours worked from then forward. This ensures future reporting is accurate but does not affect historical reporting.
I cannot select a particular date range.
The Labor Tracking Report only provides data for date ranges of one or more pay weeks that occur after overtime settings initially take effect. A partial week range can only be selected for the current pay week. Other date ranges cannot be selected.
I need to change my overtime and double time rules.
If local labor laws change, update your overtime settings to make sure the Labor Tracking Report correctly calculates employee overtime and double time hours. New overtime settings take effect at the start of the following pay week and apply to hours worked from then forward.
Please note that the pay week starting day cannot be changed.
Follow the steps here to update your overtime settings.
This ensures future reporting is accurate but does not affect historical reporting.
“Welcome to the new Labor Tracking report!”
Initial setup of overtime settings in BackOffice must happen before running the Labor Tracking Report for the first time. Follow the steps below to configure your overtime settings.
Click ‘Add Wage Settings Now’ to go to the overtime settings page.
Click to Enlarge
Follow the steps here to set up your overtime settings.
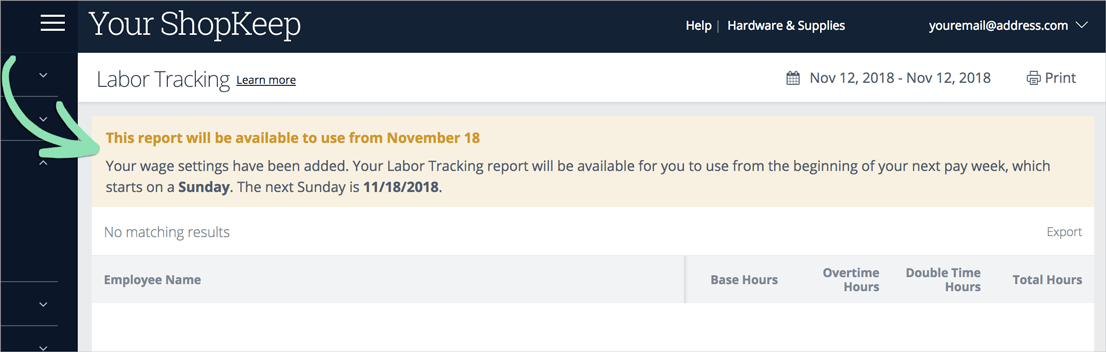
“This report will be available to use from…”
This error appears on the Labor Tracking Report after overtime settings are initially configured, but before they have taken effect. Overtime settings go into effect at the beginning of the following pay week.
Run the Labor Tracking Report after the date listed on the error.
Click to Enlarge
Help us improve Lightspeed Support. Was this article helpful?