Having issues with online orders on the Saved Sales screen of the Retail POS (S-Series) app? Visit our Online Ordering Troubleshooting guide for help.
For help with issues related to processing eCommerce online orders in the Lightspeed Pay mobile app, visit our Lightspeed Pay Troubleshooting guide.
Table of Contents
General Issues
This section covers general issues related to saving, viewing, and modifying saved sales. Never saved a sale before? Visit our Saved Sales article to learn how they work.
I misspelled a sale's name when saving it.
Follow the steps below to rename a saved sale if you make a mistake.
I merged saved sales, but the merged sale does not have a customer, discount, or the tax removed.
When merging saved sales, the merged sale will automatically be assigned to the ‘Walk-in’ customer, receive no transaction-level discounts, and have sales tax applied to it. Warnings on the iOS and Android Retail POS (S-Series) apps alert you of this behavior as sales are being merged. If necessary, tag a customer to the merged sale, apply a transaction-level discount, and/or remove the tax.
When saved sales are merged on the Retail POS (S-Series) app for iOS, transaction-level discounts must be discarded unless each saved sale has the same percentage discount applied to it or each has an amount discount. Decide whether to continue with the merge, then reapply discounts to the merged sale if necessary.
Tap ‘Cancel’ to cancel the merge or ‘Merge’ to merge the saved sales without discounts.
Click to Enlarge
(Optional) If merging the sales, reapply the discount to the new merged saved sale.
I split or merged a saved sale, but the split or merged sales are not assigned to the correct employee. (iOS only)
When splitting or merging saved sales on the Retail POS (S-Series) app for iOS, new split or merged sales created will automatically be assigned to the employee performing the split or merge. If necessary, transfer the split or merged sales to the employee who is actually managing those orders.
Follow the steps here to transfer the saved sales to the correct employee.
“Unable To Merge” (Android only)
This error occurs on the Retail POS (S-Series) app for Android when a manager tries to merge saved sales with different owners. Transfer saved sales to the same employee to be able to merge them.
When saved sales are merged on the Retail POS (S-Series) app for Android, high-level settings such as customer assignments, transaction-level discounts, and tax removal are not automatically applied to the merged sale. Decide whether to continue with the merge, then reapply these settings if necessary.
Tap ‘Yes’ to merge the saved sales or ‘No’ to cancel the merge.
Click to Enlarge
If yes, reapply the relevant sale-level setting(s) to the new merged saved sale.
Assign a customer, apply a transaction-level discount, or toggle the tax off.
I cannot split, merge, or transfer a saved sale.
This issue occurs when a cashier tries to split, merge, or transfer a saved sale assigned to a different employee or when you try to split or merge online orders.
Ask a Register Manager to sign into the register and complete the split, merge, or transfer.
Cashiers can only split, merge, and transfer their own saved sales, but managers can modify saved sales assigned to any employee.
Make sure you are not splitting or merging online orders.
Online orderscannot be split or merged and must be processed as placed.
The Saved Sales screen does not show all open saved sales. (Android only)
When sales go missing from the Saved Sales screen of an employee on the Retail POS (S-Series) app for Android, that employee may have applied filters that prevent those sales from being displayed. If saved sales are still missing after disabling all filters, check a different register for the missing sales or see if they were closed out.
From the Saved Sales screen, clear the search field and set both filters to ‘All’.
Click to Enlarge
If Saved Sales Sync is disabled, search another register for the missing sales.
Search the BackOffice Transactions Report to see if the saved sales were tendered.
Once tendered, sales are closed and removed from the Saved Sales screen. Learn how to access the Transactions Report here.
How do I remove an old saved sale?
Saved sales remain on the register until they are paid for, voided, or deleted. Follow the steps below to complete one of these actions to close out a saved sale.
Saved sales cannot be reopened once closed, but there are actions you can take to remedy the situation. Follow the specific steps below that reflect what happened to the saved sale.
If the problem persists, contact Customer Care by submitting a case here.
Or click ‘Help’ in BackOffice to view all available contact options.
Serverless Sync™ Issues
This section covers issues related to the Serverless Sync feature that enables saved sales to sync between registers. Need help setting up Serverless Sync for the first time? Visit our Serverless Sync article.
Saved sales are not syncing to other registers.
This issue indicates either a problem with how Serverless Sync is set up or connection trouble. Follow the specific steps below that reflect if saved sales have previously synced between registers.
If saved sales have never synced between registers:
The Register List says a register is disconnected.
Registers can disconnect for a variety of reasons including if the WiFi connection is lost, the Retail POS (S-Series) app is closed, or a register goes to sleep. Be aware that if the Register List on one device shows all registers as disconnected, it is likely that register is actually disconnected.
After each step, wait a full minute and then check if the problem is resolved.
Check that all registers have the Retail POS (S-Series) app open.
If the Retail POS (S-Series) app is closed, open it back up.
Make sure all registers are on the same WiFi network.
If a register is disconnected, reconnect it to the correct network.
Once the saved sale reappears on the register, transfer it back to the original owner.
Saved Sales Sync Issues
This section covers issues related to Saved Sales Sync feature that allows saved sales to be managed from any register at the business and automatically backs up saved sales to the cloud.
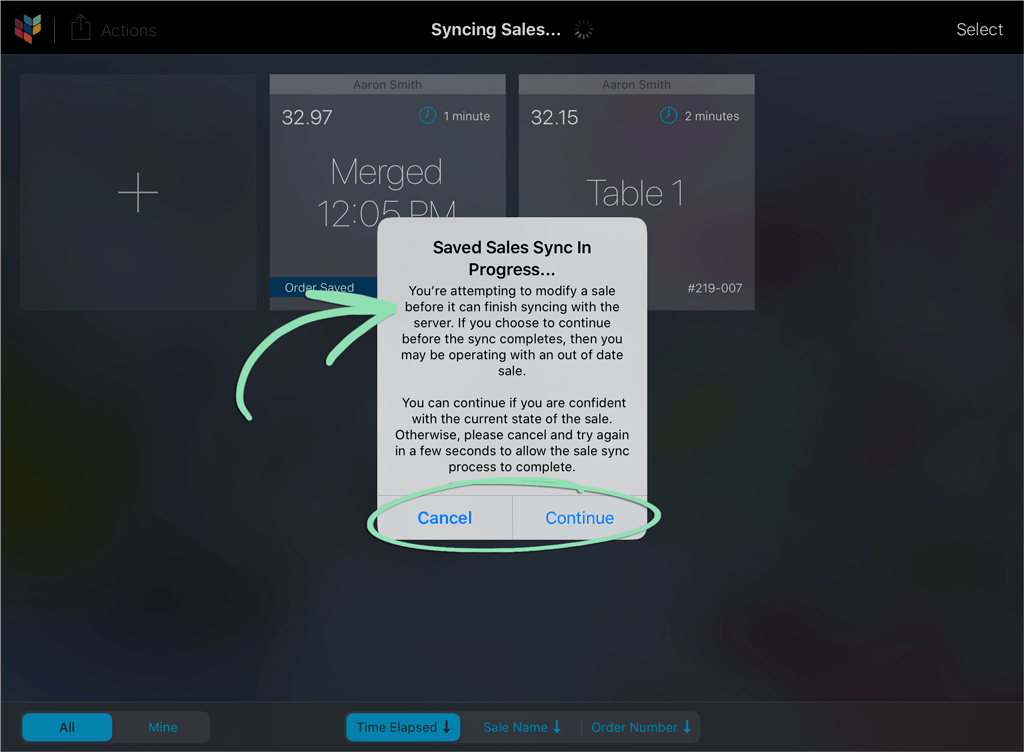
“Saved Sales Sync Unable to Connect” / “Register Offline Warning”
When modifying a saved sale from a register without an internet connection, the register may not be in sync with the latest version of the sale. Review the best practices within this warning to determine how to proceed.
Read the best practices, then tap ‘Cancel’ or ‘Continue’.
We recommend tapping ‘Cancel’, then switching to an online register to modify the saved sale. If you only have one register, it is safe to continue, but the sale will not be backed up until connectivity is restored.
Continue troubleshooting below based on the option selected in the previous step.
If you tapped ‘Cancel’:
Go to an online register and modify the saved sale from there. Do not create or modify saved sales on the offline register until internet connectivity is restored.
If no other registers are online, modify the saved sale from the offline register, tap ‘Continue’, then skip to the ‘Continue’ section below.
Troubleshoot the internet connection of the offline register. If connected via ethernet, make sure the cable is plugged into both the register and the router. If connected via Wi-Fi, exit to the home screen, then open the ‘Settings’ app and reconnect to your network.
Be aware that once connectivity is restored to the offline register, changes made from online registers will automatically sync to it.
If you tapped ‘Continue’:
Finish modifying or processing the saved sale on that register.
Do not modify the saved sale from other registers until the offline register is brought back online.
Do not create or modify any saved sales from the offline register until internet connectivity is restored. If all registers are offline, only create and modify saved sales on a single register able to accept all payment tenders needed for checkout.
Troubleshoot the internet connection of the offline register. If connected via ethernet cable, make sure the cable is plugged into both the register and the router. If connected via Wi-Fi, exit to the home screen, then open the ‘Settings’ app and reconnect to your Wi-Fi network. If all registers are offline, make sure your network follows our best practices, then reboot the router or contact your internet service provider for help restoring the internet connection.
If you intend to always operate this register offline, disable Saved Sales Sync to avoid receiving future warnings.
Be aware that once connectivity is restored to the offline register, the updated saved sale will automatically sync to all online registers.
“Saved Sales Sync Unavailable”
When disabling Saved Sales Sync on a register, the register will try to sync updated versions of its saved sales to your other registers. If the sales cannot be synced due to an internet connection issue, you must either resolve the issue or choose to delete saved sales from that register.
Read the warning message and decide how to proceed.
In most cases, we recommend tapping ‘Cancel’, then troubleshooting the register’s internet connection. If you do not want the saved sales to be synced, tap ‘Delete’ to remove them.
If you tapped ‘Cancel’ in the previous step, continue troubleshooting below:
aTroubleshoot the register’s internet connection.
If connected via ethernet, make sure the cable is plugged into both the register and the router.
If connected via Wi-Fi, exit to the home screen, then open the ‘Settings’ app and reconnect to your Wi-Fi network.
If the problem persists, make sure your network follows our best practices, then reboot the router or contact your internet service provider for help restoring the internet connection.
This warning appears when the version of a saved sale stored on a register differs from the version backed up in the cloud. Since the version in the cloud takes priority, changes made on the register will be overwritten.
If there are changes you want to document, tap ‘Print’ to print a copy of the saved sale.
Click to Enlarge
Read the warning message, then tap ‘Cancel’ (Android) or ‘Continue’ (iOS or Android).
‘Cancel’ will stop the current action and ‘Continue’ will overwrite the local version of the saved sale with the version stored in the cloud. If the sale was closed on another register, ‘Continue’ will remove the sale from this register.
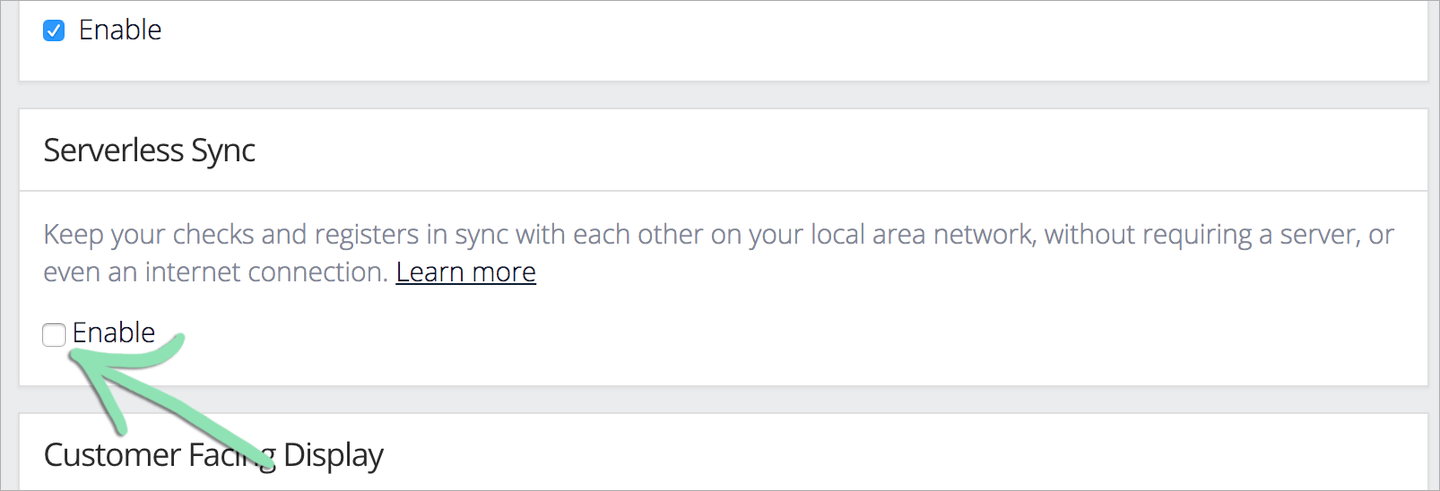
This error appears on the Retail POS (S-Series) app for iOS when enabling Saved Sales Sync if Serverless Sync is already enabled. Disable Serverless Sync to be able to enable Saved Sales Sync.